
alright!
Darren here and welcome back to another c-sharp tutorial!
So, last time we worked on a hello world tutorial. If you missed it, I highly recommend starting there if you are brand new!
I’m going to assume at this point you know how to make a simple windows form and drag a button on it.
Today we are going to be talking about if statements in C#.
alright, so first we are going to make a simple little form that will turn a box green or red based on some conditions.
We are going to assume this is for a movie theatre entrance and make 18 the barrier for entry.
If the person is below 18, the box will turn red and if they are over 18 the box will be green!
so, we start off with getting a button and placing it on the form. This button is just going to say calculate.
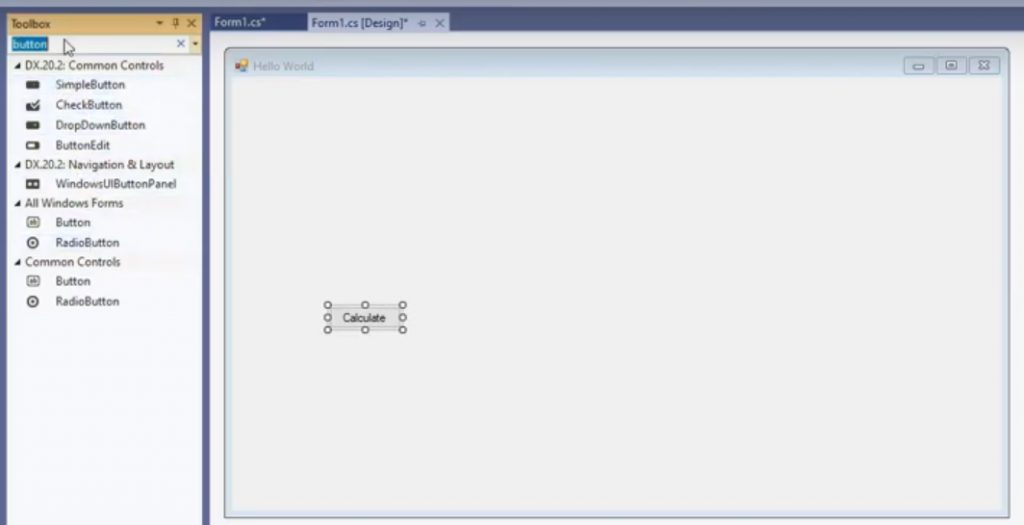
Alright, next we will rename it to button calc.
This button is actually going to be what runs our code. (the button’s click event triggers the event handler)
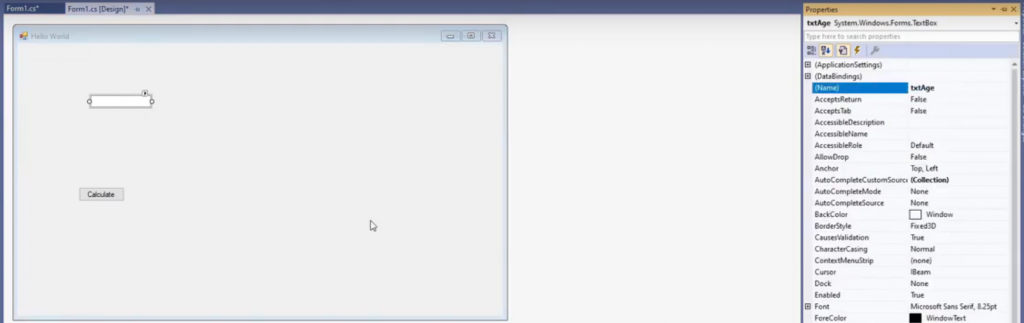
Next, we need to grab a textbox from our toolbox. This textbox will store the movie patreon’s age.
After adding this textbox, we need to rename it txtAge.
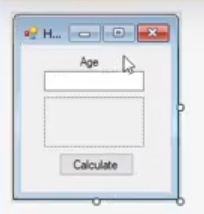
so after getting the button and textbox set up, we are going to need the actual PictureBox that’s background color will be changed.
Drag a PictureBox over from your toolbar and then rename it to pbResult. I’m calling it pbResult because we will be using it to display our results.
The last control we are going to bring over would be a label to make the form look a bit better. Change the text of the label to say “age” and center everything in the middle of the form.
It doesn’t have to be the best-looking form ever since this application is just for learning purposes. After that, rename the label to lblAge and that’s it for our controls.
Now that we have our simple little form built out, we need to handle the button’s click event.
To do that, you need to go to your button and select it. Now hit f4 to open the properties window on the right.
Once you are there at the top right, there will be a lightning bolt symbol that once pressed switches from properties to events.
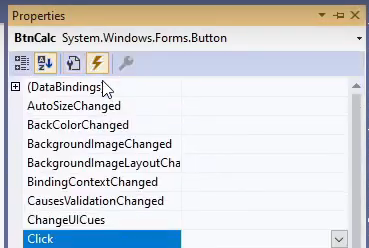
After clicking on that button and getting to the events view, you should see the “Click” event in the list. Double click on the click events row and Visual Studio will take you to the code window.
It will have also written out a click event handler and place you inside of the new function it created.
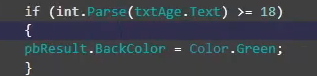
Once you are inside of the newly created function, it is time to write a simple IF statement. The new if statement should say “if textbox text is greater than 18 then make the background color of the PictureBox green.”

You will most likely see a squiggly line. If you see it or not will be based on your current Visual Studio settings.
Visual Studio is showing this warning because the text inside the textbox is actually a string instead of an integer. Strings can hold letters and numbers, so the compiler is worried that the user could cause an error.
The way to stop the warning would be to wrap int.parse() around our string to convert it into an integer(number).
So the resulting code would look like this.
if (int.Parse(txtAge.text) > 18)
{
   pbResult.BackColor = Color.Green;
}
Ok, now we can run the program and input an age. So first we put in 20 to test and the PictureBox should turn green. After that, stop the application and re-start it.
If you put in 10 this time, the PictureBox won’t turn green. Nothing will happen actually since our if statement’s condition wasn’t true.
The value has to be more than 18 for our code to run.
You can put in 19 to see it turn green again before closing it. Now let’s beef the application up a bit.
This time we want to include people that are 18 and not just over 18. To do that, we will need a greater than or equal to sign, which is what the operator I used below is.
we can come back and we can say it’s 18 that’s greater than or equal to 18.
So, it turns green but the problem is that if we say 18 and then we change it to 12 it stays green because we don’t have any code setting the color to red.
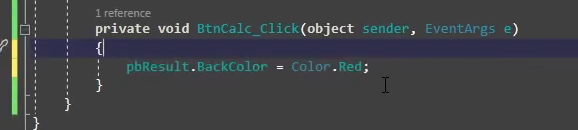
So, what we can do is drop-down below the if statement and add an else.
This else is actually a part of the if statement. So we want to say “else” set the background color to red instead of green.
if (int.Parse(txtAge.text) >= 18)
{
   pbResult.BackColor = Color.Green;
}
else
{
  pbResult.BackColor = Color.Red;
}
Once you add the new else, your if statement now reads “If the text boxes text is greater than or equal to 18 set the PictureBox background color to green otherwise set it to the color red.”
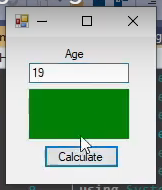
Alright, now run the application again with the else in place. Now we can input “19” and get green, then once we change the text to 10 and click the button, we get a red background!

okay, so next we are going to add in an else if which will be our last thing for today.
While an else is a catch-all for anything that doesn’t satisfy the if statement, else-if is similar but has a specific condition check as well.
This allows you to say something like: “if the first thing isn’t true BUT this other specific thing IS true then do this instead.”
if (int.Parse(txtAge.text) >= 18)
{
   pbResult.BackColor = Color.Green;
}
else if (int.Parse(txtAge.text) == 17)
{
   pbResult.BackColor = Color.Blue;
}
else
{
  pbResult.BackColor = Color.Red;
}
So, with the else-if in our example, we are going to say if the age is 17 then we set the background color to blue.
Our logic is that the worker needs to make sure the kid looks mature enough or something.
anyways, to do this we are going to say if it’s greater than or equal to 18 it needs to be green else-if they’re 17, set it to blue, otherwise set it to red.
Now we run this and test it by inputting 20. This should set the picture box to green, if we change the text to 17, the picture box should turn blue.
Lastly, if we set the number to 16, the picture box should turn red.

So, that is it really! That about sums up if statements in C#!
They are a really nice construct and you are going to use this over and over again.
This will be very similar in C#, Java, Python, Javascript, VB.Net etc.
You may have curly bracers “{ }” or the words “then” and “end” in vb, the syntax changes a little but the concept is the same.
If this then do this, else if this then do this other thing and else do that.
The cool thing is that once you get a handle on If Statements and learn how to put a simple form together, you will be able to make so many cool things!
That’s it for now,
I really hope you guys learned something from this and join me in the next one!
I’ll see you in the next one!