The SMTP server requires a secure connection or the client was not authenticated – Easy fix

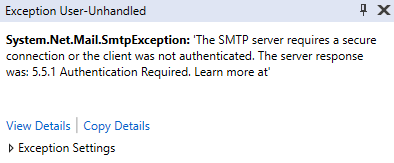
When trying to send an email via SMTP you may get the dreaded “The SMTP server requires a secure connection or the client was not authenticated” error. This error is annoying but is actually really easy to fix!

The SMTP server requires a secure connection or the client was not authenticated.

Why did I receive the SMTP server Authentication error?

This authentication error actually happens because Google is blocking you from signing into your Gmail account. The reason for this used to be a setting called “Allow less secure apps.” but now you will have to generate an App Password and use that in your code.

Google doesn’t initially allow any application to log into your Google account. You will have to give permission for applications to access your Gmail account. This used to require a simple setting change to allow unsecured applications. Google has since changed that policy and you will have to generate a password for your application. I will show you how to do that and include an example code below!

How to fix “The SMTP server requires a secure connection or the client was not authenticated” – Old Method

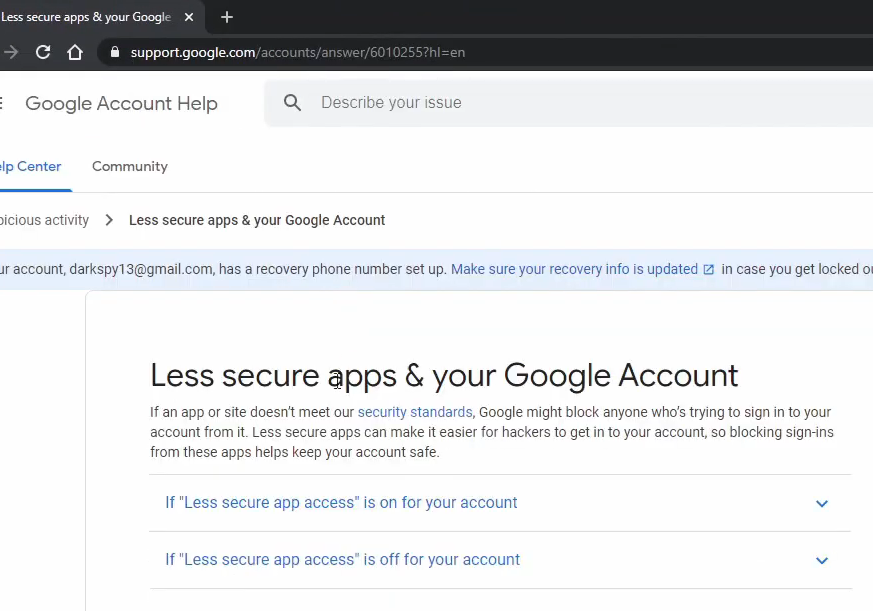
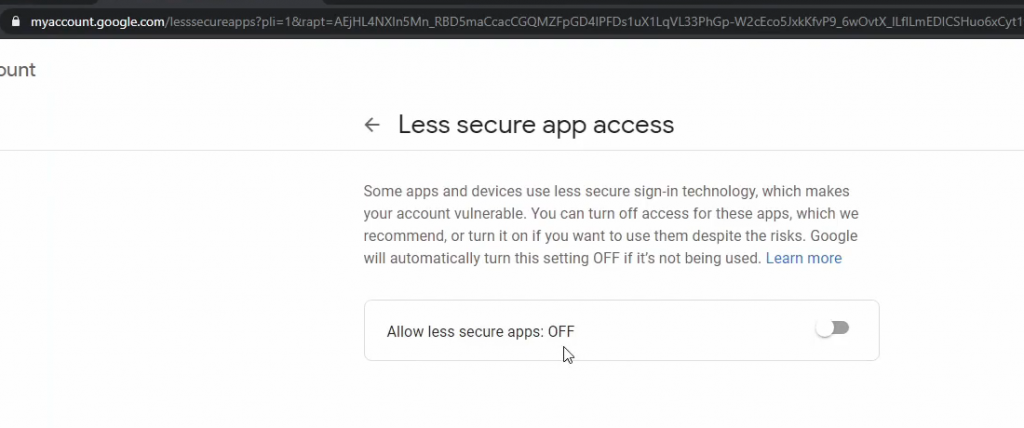
Previously, To fix this error, we simply need to enable the following setting in your google account: “Allow less secure apps.” You will see this method suggested a lot all over the internet but it does not work anymore. I will provide the new solution below!

Old Method to enable “Allow less secure apps.”:

  • Login to your Gmail Account
  • Navigate to the security settings for your Google Account
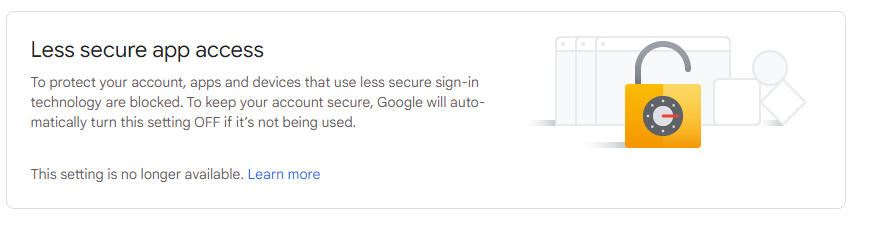
  • Navigate to “Less secure App Access” and turn on “Allow less secure apps”

Once you click the toggle switch and it has been enabled, your app should now be working, or at least… It would have before the latest Google update! Previously this would have fixed your authentication issue but now you just receive this error message.

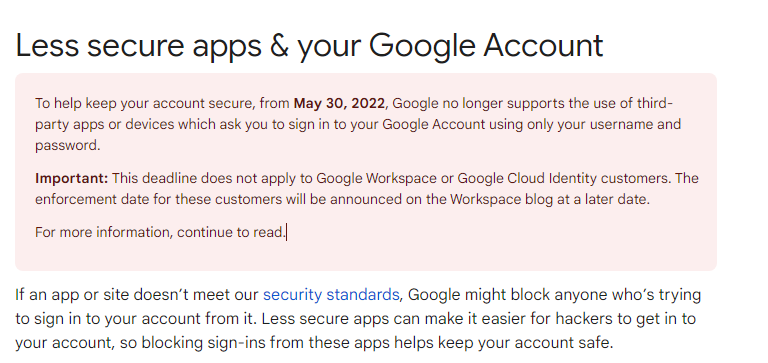
Google has actually disabled this super easy fix as of May 30th 2022. Now we have to generate a unique password for our application, which is thankfully really easy to do!

Google disabled Less Secure App setting

How to fix “The SMTP server requires a secure connection or the client was not authenticated” – after May 30th 2022

Google has now disabled the ability to enable the use of less secure applications. Instead, we will be getting an App Password and using that in our application. Follow the steps below to get your app password and then we will discuss how to use it in your application with an example.

Generate an App Password to fix the SMTP client not authenticated issue

  1. Log in to your Google account

    Navigate to Gmail.com and log in with your Google account. After that, click on “Manage your Google account”

  2. Navigate to the security section of your Google account

    Click on “Security” in the menu on the left

  3. Search for “App Passwords” in the top search box.

    Navigate to the App Passwords page by searching in the search box at the top of the page.

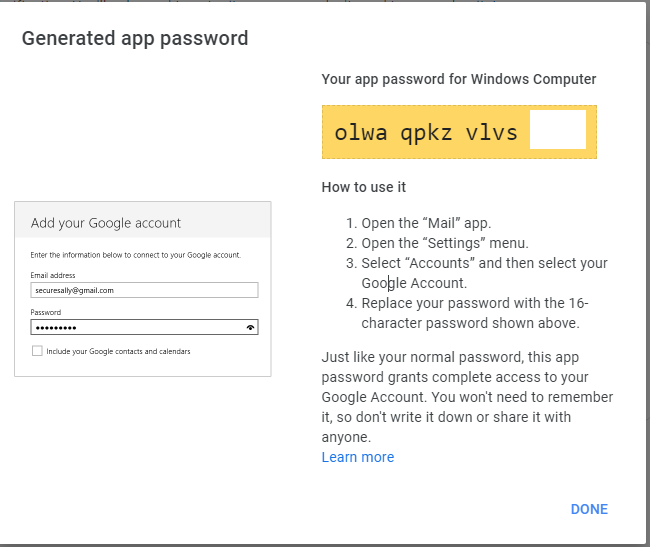
  4. Generate a new App Password

    Once on the App passwords screen, click “Select App” and choose “Mail” and then for the “Select Device” drop down, choose “Windows Computer”. After you have those options selected, click the Generate button.

  5. Use your new App Password

    Now that you have your app password, it is time to use it in our application to fix the client was not authenticated error message!

app password generated

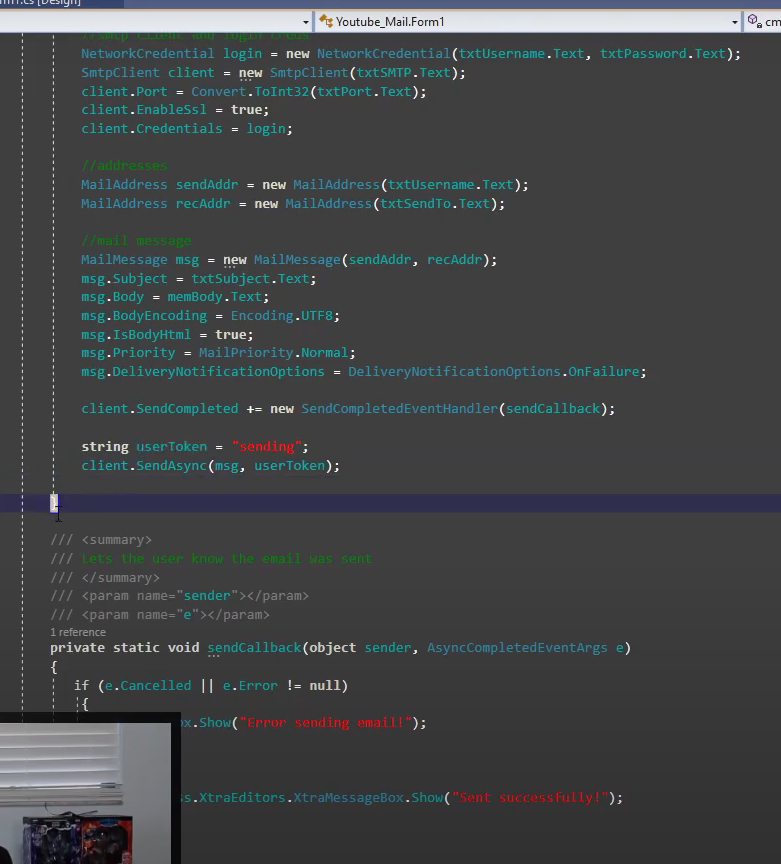
Example code to send an email using the new app password:

using System;
using System.Net;
using System.Net.Mail;

namespace GmailSmtpConsoleApp
{
    class Program
    {
        private const string ToAddress = "testemail@testing.com";
        private const string FromAddress = "testemail@testing.com";
        
        private const string GoogleAppPassword = "XXXXXXXX";
        
        private const string EmailSubject = "Test email!!";
        private const string EmailBody = "<h1>Hi</h1>";
        
        
        static void Main(string[] args)
        {
            Console.WriteLine("Hello World!");
            
            var smtpClient = new SmtpClient("smtp.gmail.com")
            {
                Port = 587,
                Credentials = new NetworkCredential(FromAddress , GoogleAppPassword),
                EnableSsl = true,
            };
            var mailMessage = new MailMessage
            {
                From = new MailAddress(FromAddress),
                Subject = EmailSubject,
                Body = EmailBody,
                IsBodyHtml = true,
            };
            mailMessage.To.Add(ToAddress);

            smtpClient.Send(mailMessage);
        }
    }
}

This code should be pretty straightforward, we are just passing our application password to the Network Credential object that we made. We then pass that NetworkCredential object off to Gmail when we send our message.

Thanks for reading and I hope this helped you fix your “The SMTP server requires a secure connection or the client was not authenticated” error message! If you are still having problems, feel free to ask any questions in the comments below and I would be happy to help!

How to write a New Line in C#

How to write a New Line in C#

Today we are going to discuss how to write a New Line in C#! This is a simple question but the answer changes based on what you are working on. If you are creating a console application, something like Console.Writeline(); will work but if you are creating a string, you will need something like “\n”. So with that being said, let’s dive right in!

How to write a new line in a console application

To write a new line inside of a console application in C# you can use Console.Writeline. This is really easy to use since you will just write a blank line out before or after your other lines. I’ll give an example below.

Console.Writeline("Apples");
Console.Writeline(); //This is our new line
Console.Writeline("Oranges");

With the above code, you will be able to see the new line between apples and Oranges. If you are creating a console application, that is all there is to it!

How to write a New Line inside of a string in C#

When you want to write a new line inside of a string, you can use “\n”. This will cause whatever is interpreting the string to add a line break where the “\n” is located. This can be handy when sending text to a rich textbox or saving a newline character to a database. Below is a code example using “\n” to add new line into a string in C#

Console.WriteLine("This is the first line.\nThis is the line after.");

The simple way to write a new line in C#

The easiest way to write a new line in C# is to use the Environment.Newline method. This method is super simple, it’s just like the above method with “\n” but instead you append Environment.Newline to the string! This inserts a special character that Rich textboxes and the console will read as a new line.

Below you can see a code example with the usage for Environment.Newline. This is the method I use the most because of how simple it is. This makes it really easy for other people to know what you are trying to do when they read your code.

Console.WriteLine("This is the first line." + Environment.NewLine + "This is the second line.");

This method for writing a new line will work in a console application or in a windows forms application.

Wrapping up

I hope this helps you add line breaks to your C# applications. This method works almost identically in VB.Net as well. The concept it’s self works the same in PHP and many other languages. Thanks for reading and I’ll see you in the next one!

How to write to Excel files in CSharp

We are going to be writing data to Excel files using C#. Writing code to add data to an Excel sheet in C# is really easy! You can write to Xlsx, Xlsm and Xls formats all in the same way! We will go over how to do that step by step! Follow along and you will be able to write values to excel files with ease!

I’ve also created a video guide on how to do this that is embedded below and that will show you the entire process! If you would like to learn how to write to excel files from a text-based format though, read on!

Include the Required Assembly File

The first thing we need to do is include the Microsoft.Office.Interop.Excel assembly. This will contain all of the functions we will be using to write an excel document out using C#.

To include that assembly we will need to do two things, the first of which is add it to the references section.

Add reference to Excel Interop Assembly

  1. Right click References and click “Add a reference”

    In solution Explorer, right click on “References” and then click “Add a reference” to bring up the Reference Manager.
    Add reference C#

  2. Click COM and then search for excel

    Click COM on the left of your Reference Manager and then go to the search box on the right. Once there type “excel” to search for Microsoft Excel 16.0 Object Library.Add excel Reference Manager

  3. Click OK to Add the reference to your project

    Make sure the reference is checked and then hit OK to add it to your project.

Add the using statement

Next, we are going to add the Using statement to the top of our class. This will look like the code below.

using Microsoft.Office.Interop.Excel;

Create a button to write to Excel

Next, head over to your designer and add a button. This new button will be named “CmdWrite” and when pressed is going to call our write excel code. After dragging the new button from our toolbox, renaming it “CmdWrite” and then changing its text to “Write”, it’s time to double-click it to get back to the code screen.

Call our WriteExcel function

In our Form1.cs code behind the designer class, we are only going to have one line of code. This line of code will call our writeExcel function inside of our WriteExcel class. I’ll write out the code below to make it easy to copy/paste.

private void CmdWrite_Click(object sender, EventArgs e) {
     WriteExcel.writeExcel();
}

Create a new Class with a writeExcel function

Create a new file in your solution explorer called “writeExcel.cs” This new class needs to be a “code file” and it will be .cs because we are writing in C#. Once you create that file, you need to add a static void function called writeExcel. I’ll write the class out below.

class WriteExcel
{
     public static void writeExcel()
     {
      
     }
}

Create an Excel application and declare our file path

First, we are going to declare our filePath variable, to keep track of where our excel file will be saved. Next, we are going to create a new Excel Application and then declare a worksheet and a workbook. I’ll

public static void writeExcel {
     {
         string filePath = "c:\\Simple\\ExcelTest.xlsx";
         Microsoft.Office.Interop.Excel.Application excel = new Microsoft.Office.Interop.Excel.Application();
         Workbook wb;
         Worksheet ws;
     }     
}

Open a worksheet inside of a workbook

Open a worksheet inside of an existing workbook to begin editing that sheet. Excel starts it’s indexes with 1 instead of 0, so you want to use worksheets[1] to get the first worksheet in your workbook.

wb = excel.Workbooks.Open(filePath);
ws = wb.Worksheets[1];

Select an Excel Range and change it’s value

Next, we are going to select an Excel range. In our example, this range is going to be C1 to C1, which is just the C1 cell. We are going to set that range’s value to “Pizza!” in our example code below.

Range cellRange = ws.Range["C1:C1"];
cellRange.Value = "Pizza!";

Save and Close the Excel Document

Lastly, we need to save and close our excel document. To save your changes to the Excel document and close it, you will need to add the 2 lines of code below. I will include all of the above code though, so you can easily copy/paste the finished product.

public static void writeExcel {
     {
         string filePath = "c:\\Simple\\ExcelTest.xlsx";
         Microsoft.Office.Interop.Excel.Application excel = new Microsoft.Office.Interop.Excel.Application();
         Workbook wb;
         Worksheet ws;

         wb = excel.Workbooks.Open(filePath);
         ws = wb.Worksheets[1];

         Range cellRange = ws.Range["C1:C1"];
         cellRange.Value = "Pizza!";

         wb.SaveAs("c:\\Simple\\ExcelTest5.xlsx");
         wb.close();
     }     
}

We now have Pizza written to our Excel Document

At this point, you should be able to run your application and it should add “Pizza!” to your excel document just like it did in mine here. If you are having trouble with this, be sure to watch my video above for step by step instructions.

Opening an Excel file with C#

I wanted to toss in a tip about how to Open the excel file after you have saved your changes to it. You can use Process.start to open the excel file. The only trick is that you need to add a Using statement for System.diagnostics. I’ll add the two lines of code below, keep in mind the Using statement goes at the top of your class and the Process.Start will go in our writeExcel function.

using System.Diagnostics;

Process.start("c:\\Simple\\ExcelTest5.xlsx");

In Closing

Well, that’s about it for the absolute basics on writing to an Excel file! I hope this quick guide helps you get started and if you have any questions, feel free to ask in the comments below!

How to read Excel files in CSharp

We are going to be reading data that is stored in Excel files using C#. Writing code to read Excel sheets in C# is really easy! You can read from xlsx, xlsm and xls formats in the same way! We will go over how to do that step by step! Follow along and you will be able to get values out of your sheets with ease!

First, I’ve created a video guide that is embedded here that will show you the entire process! If you would like to learn how to read from excel from a text-based format though, read on!

The first step is to create a new C# Application in Visual Studio, I create a new WinForms application in the above example and use a simple button. You can create a Console application or WinForms application to do the following task.

I would also like to add that this code can be easily converted to work with VB.Net! Most of the code I write to read excel documents is actually written in VB.Net. If you have any questions about how to read from Excel files in CSharp or VB.Net, leave a comment below or on the Youtube video and I will help as soon as I see it!

This is the simple Windows Forms application that I created to read from an excel file. It just contains a simple button.

WinForms app to read Excel Files

Next, you need to double-click on the button to handle the click event. This will get us into the code behind with an event handler already written! That should look like the screenshot below!

After that, we need to include the Excel Object Library. To do this, you need to right-click on References, then click add a reference. Next, you click on COM on the left and search for “Excel”. This will bring up “Microsoft Excel 16.0 Object Library”. This can have different version numbers if you have different versions of Excel installed.

You will have to have a version of Microsoft Office installed for this to work. What the application does, in the end, is create an instance of Excel that we use to open and read the file. So if you don’t have Excel installed, the application can’t create an instance of it. You will know this by not being able to find the Object Library. So if you can’t find the excel reference, it’s most likely because Excel isn’t installed on the box and needs to be installed.

Adding Excel Object Library reference

Once you have the reference added, the next step is to use that reference in the heading of your code. The line of code for this is below. I’ve included the other two lines that will be there already, just so you know where to put the using Excel line.

using System;
using Microsoft.Office.Interop.Excel;
using System.Windows.Forms;

Alright, now we have our references all set up and it’s time to start writing our code to read from the excel document! I created a new function called readExcel, which gets called from the new button click event handler. I’ll show what that looks like in the picture below.

Doing it this way just keeps the excel code out of the designer code. In a perfect world, you would put this function in another class file and not in the same file as the designer code (event handler in this case).

The following code is used to open the workbook

private void readExcel() {
     string filePath = "c:\path\to\file.xls";
     Microsoft.Office.Interop.Excel.Application excel = new Excel.Application();
     Workbook wb;
     Worksheet ws;
     wb = excel.Workbooks.Open(filePath);
     ws = wb.Worksheets[1];

}

Obviously, you will need to change the filePath to your desired file path. I also recommend using a file browser dialog or something to that nature, if the path changes frequently.

So to work through this code, we declare the file path, then we create a new excel application, next we create an object to hold an excel workbook, then we create an object to hold an excel worksheet. After that, we open the file located at the path and it is stored in the wb Workbook variable. Now that we have the book open, we can then get the first sheet and store that in ws, our worksheet variable.

Now that we have everything set up it is time to start reading values from cells!

The simple way to read a value from the excel file would be to just message box out the results using the line of code below.

private void readExcel() {
     string filePath = "c:\path\to\file.xls";
     Microsoft.Office.Interop.Excel.Application excel = new Excel.Application();
     Workbook wb;
     Worksheet ws;
     wb = excel.Workbooks.Open(filePath);
     ws = wb.Worksheets[1];

     MessageBox.Show(Convert.ToString(ws.Cells[1, 1].Value));

}

In my excel file, the cell at 1,1 has the word Apple and the resulting message box looked like this:

Messagebox with Excel data

Below I have broken that line down into parts that make it easier to understand:

private void readExcel() {
     string filePath = "c:\path\to\file.xls";
     Microsoft.Office.Interop.Excel.Application excel = new Excel.Application();
     Workbook wb;
     Worksheet ws;
     wb = excel.Workbooks.Open(filePath);
     ws = wb.Worksheets[1];

     Range cell = ws.Cells[1, 2];
     string CellValue = cell.Value;
     MessageBox.Show(CellValue);

}

The last 3 lines are the important bit. The first line creates a Range object called cell and stores the Range located at position 1,2 in the Excel file in it. Next we create a string variable called CellValue and pull the Value out of the cell variable and store it in the CellValue string. Lastly, we message box out that value. The resulting message box in my example said “Wine”

Another method you can do is to use excel’s own naming convention to read cells and ranges from the sheet. What I mean by that is being able to say “A1” or “A1:B1” to read from the sheet. This will make it easier for you to know where in the document you are reading at a glance. The code for that is below.

Range cell = ws.Range["A1"];

If you attempt to read a range using the above code, you are going to get Object[] as the result. This is because the value is an array instead of a single value. To read in a range of cell values, you will need to loop through the array to display each value. The code for this is located below.

private void readExcel() {
     string filePath = "c:\path\to\file.xls";
     Microsoft.Office.Interop.Excel.Application excel = new Excel.Application();
     Workbook wb;
     Worksheet ws;
     wb = excel.Workbooks.Open(filePath);
     ws = wb.Worksheets[1];

     Range cell = ws.Cells["A1:A2"];
     foreach (string Result in cell.Value)
     {
           MessageBox.Show(Result);
     }
}

The result of this will be a message box for each cell in the range which will contain the value of each cell. In my case, the first message box said Apple, and the second said Banana.

If you are reading a lot of values out of an Excel sheet, you are going to want to read the data in as a range and store that in an array. At that point, you can manipulate the array in code really quickly. If you read the data in one cell at a time, instead of as a range, it will be much slower with large datasets.

One last thing to note is that you will want to use .close() and .dispose() on your workbook after you are done reading values. This way your excel sheet isn’t continually locked out!

Steps to Read an Excel Sheet with CSharp

  1. Create a new Project

    Create a new windows forms or console application in Visual Studio

  2. Include the Excel Reference

    Include a reference to the Excel Interop Assembly

  3. Add the using statement

    Add the using statement to the top of the class to use the new reference.

  4. Create new excel objects

    Create a new Excel application, workbook object and worksheet object

  5. Open the workbook using the excel application class

    Use excel.workbooks.Open to open the file and store it in the excel workbook object.

  6. Open a worksheet in the workbook

    Use the .worksheets property to open the worksheet from the workbook and store it in the worksheet variable.

  7. Use worksheet.cells[].value to read the value

    Use MessageBox.Show(Convert.ToString(ws.Cells[1, 1].Value)); to read the value from a particular cell in the worksheet and show it to the user. That’s it and thanks for reading!

  8. Close and dispose of the objects

    You will also want to close and dispose of the workbook after you read your data. Otherwise the excel sheet will stay open and locked out.

I hope this was helpful and if you have any questions, feel free to leave a comment!

How to draw in C# using the Graphics Class – CSharp Programming

Basic overview of drawing in C#

How to use the Graphics class to draw to the screen in C#

The Graphics class is one of the fundamental classes used in programming with Windows Forms and GDI+. Through the Graphics class, you gain access to information about the display resolution and device capabilities. In this article, you’ll learn about the Paint event and how it supplies you regarding an adequately initialized Graphics object. This article also covers the most common operations performed using the Graphics object.

The first thing we will do is open Visual Studio and click “Create a new project” to get started. We are going to create a new Windows Form in C#. You could choose any project name you would like and its destined location on your desktop/pc. 

A blank project will be generated to serve as your canvas. You could change the width and height based on your preference. The next thing we need to handle is the paint event for the form. When the form is drawing itself, it will call this paint event, and then inside of that, we will get a handle to the graphics object. Afterward, we could paint the form ourselves. It is a step-by-step process that we need to accomplish. 

Declare a new graphics object with this syntax above. With this step, we could make new shapes like rectangles. 

How to draw a rectangle

To draw rectangles and squares in C#, the GraphicsObject provides the DrawRectangle() method. There are two ways to use the DrawRectangle() method. We will begin by drawing a rectangle without a pre-created Rectangle object.

  • The first step is to create a new brush. The syntax above is the code that you can use to alter the color and name of the brush.
  • It also needs the coordinates of the rectangle you want to create. To do that, you can encode the x, y coordinates like in the syntax attached. 
  • Since we’ve used 100×100 as the coordinates, it came out as square, but you could change the coordinates to generate your desired shape.

For the second method

  • To draw a rectangle, you will draw four lines. We will make a drawing pin and set that equal a new pen in this method. You could also set the color for your rectangle. The syntax above is the example that will generate your rectangle. 

How to draw a circle

Ellipses and circles are drawn in C# using the DrawEllipse() method of the GraphicsObject class. 

We made a drawing scene representing the “sun,” a circle in one of our examples. 

  • You could declare a “new brush” to create the round object. The syntax above shows the various brushes for different objects: the ground and the sun in the said scene.
  • An ellipse will be generated using the declared sun brush and filled with this syntax in the next step.

How to draw a line

Lines are drawn in C# using the DrawLine() method of the Graphics Object. This method takes a pre-instantiated Pen object and two sets of x and y coordinates (the start and endpoints of the line) as arguments.

A “ground” was made to complete the drawing scene in the example. A straight line represents it. 

Coordinates were also filled up to determine the width, height, and length to set up the ground.

The next step in this project is to try drawing a person! A stickman person, to be exact. It will be composed of a circle for its head, a line for its limbs and body.

  • We added another drawing pen to change its color, white. 

In the syntax above, we tried to make a whole component to make a stickman. With various lines and objects, it resulted in the image below. 

The background is also changed to the color blue! And there you go, a scene with a stickman was made using simple objects and lines. 

How to draw an image

To draw an image, it will require creating a bitmap from the file. To do this, the syntax below will help to run the image.  We will use the image above as the background for our generated image.

The syntax above draws the image, but the problem is that our form and image aren’t the exact sizes.  We could stretch the image to fit the form by doing a new rectangle.

The image will be stretched to fit the form better with this code. 

We will also try to attach some images to the scene. We will do next to draw an image bitmap from the file again. 

The attached image is quite big, so you could opt for a smaller size of the image you want. 

This is the revised image of the cat once you’ve scaled it correctly. 

Here is the complete syntax for the background and the cat. Make sure to layer your drawings correctly to make them appear in the correct order. After the cat image, we will draw the bird. 

Here is the image after the code for the bird image is generated and run. 

To add an extra effect, we will add a line object in the scene. 

The last thing that we will add to this project is text. To include text in your image, follow this syntax below. Make sure to set a font style first!

The text is added and repeated three times. The project is done!

This article shows how various graphical objects can be drawn within a drawing programmatically using C#. It may be quite challenging, but first but with troubleshooting, patience, and creativity, you could also finish a project in no time!

How to Write Speech Recognition Applications in C#

In this article, we will discuss how to use Microsoft’s Speech Recognition Engine to write a virtual assistant application. Speech recognition apps are the way of the future and they are actually easy to write using Microsoft.Speech Recognition.

Speech Recognition Operations

A speech recognition application will typically perform the following basic operations:

  • Start the speech recognizer.
  • Create a recognition grammar.
  • Load the grammar into the speech recognizer.
  • Register for speech recognition event notification.
  • Create a handler for the speech recognition event.

Free Speech Recognition API

If you are looking for a free solution for a hobby application or if you’re just trying to get your MVP built for your application, this is a nice place to start. You could swap over the code later to use for more expensive APIs available.

In this video, I also referenced Microsoft documentation, you could access this through this link. We used this example, they also have a console app built here. 

The first step is to add the following line.

microsoft.speech.recognition

You need to import the speech recognition engine first and to do that, adding the reference is a must. Navigate to your Solution Explorer and find “References” and search for speech. 

You need to add a reference to the System.Speech assembly, which is located in the GAC.

This is the only reference needed. It contains all of the following namespaces and classes. The System.Speech.Recognition namespace contains the Windows Desktop Speech technology types for implementing speech recognition.

Before you can use the Microsoft SpeechRecognitionEngine, you have to set up several properties and invoke some methods. The next step now is to create a new recognizer. In the video, at the top of my class, I’ve created an empty object for the recognizer. 

// Create an in-process speech recognizer for the en-US locale.  
recognizer = new SpeechRecognitionEngine(new System.Globalization.CultureInfo("en-US"));

On load, I have the following code.

loadSpeechRecognition(); 

This is a function that has the loading code for the recognizer. We create a new speech recognition engine and pass it as a language because this works in multiple languages. 

private void loadSpeechRecognition()
{
    // Create an in-process speech recognizer for the en-US locale.  
    recognizer = new SpeechRecognitionEngine(new System.Globalization.CultureInfo("en-US"));

    var gb = new GrammarBuilder(getChoiceLibrary());
    var g = new Grammar(gb);
    recognizer.LoadGrammar(g);

    // Add a handler for the speech recognized event.  
    recognizer.SpeechRecognized += new EventHandler<SpeechRecognizedEventArgs>(recognizer_SpeechRecognized);

    // Configure input to the speech recognizer.  
    recognizer.SetInputToDefaultAudioDevice();

    // Start asynchronous, continuous speech recognition.  
    recognizer.RecognizeAsync(RecognizeMode.Multiple);
}

Instantiate your recognizer and then you are going to build this choice library.

If you look back to the SpeechRecognitionEngine Class that is linked in this article, they created a list of choices. In your application, you may create a function that returns a list of choices.

    public Choices getChoiceLibrary()
    {
        Choices myChoices = new Choices();
        //greetings
        myChoices.Add("hey " + Agent.charName);
        myChoices.Add("hi " + Agent.charName);
        myChoices.Add("hello " + Agent.charName);
        myChoices.Add("bye " + Agent.charName);
        myChoices.Add("thanks " + Agent.charName);
        //open things
        myChoices.Add(Agent.charName + " open notepad");
        myChoices.Add(Agent.charName + " open youtube");
        myChoices.Add(Agent.charName + " open excel");
        myChoices.Add(Agent.charName + " open discord");
        myChoices.Add(Agent.charName + " open davinci");
        myChoices.Add(Agent.charName + " play some music");

        //Rocket
        myChoices.Add(Agent.charName + " say nice shot");
        myChoices.Add(Agent.charName + " say sorry");
        myChoices.Add(Agent.charName + " say no problem");
        myChoices.Add(Agent.charName + " say thanks");
        myChoices.Add(Agent.charName + " say great pass");
        myChoices.Add(Agent.charName + " say good game");

        //Chrome
        myChoices.Add(Agent.charName + " close this tab");
        myChoices.Add(Agent.charName + " refresh this tab");
        myChoices.Add(Agent.charName + " open gmail");

        //close things
        myChoices.Add(Agent.charName + " close notepad");

        myChoices.Add(Agent.charName + " lets play chess");
        myChoices.Add(Agent.charName + " open chess");

        myChoices.Add(Agent.charName + " move");
        myChoices.Add(Agent.charName + " move somewhere else");
        return myChoices;
    }

This code creates a new “choices” object and then adds your choices to it.

These pertain to the words the user can say. Make sure to add a list of choices because it heightens the accuracy of your command. 

After you have built your set of choices, it will return back over here to this grammar builder. This is where you can tell the API how a sentence should look.

The next step is the speech recognized event handler.

    public void recognizer_SpeechRecognized(object sender, SpeechRecognizedEventArgs e)
    {
       bombini.processSpeech(e.Result.Text);
    }

This action is what your recognition engine hears (something that matches with one of the choices), it will call whatever function you have built. I have it calling a function with a few different commands that it can run.

public void processSpeech(string speechText)
    {
        string currWinTitle = currentWindow.GetActiveWindowTitle();
        switch (speechText)
        {
            //open things
            case charName + " open excel":
                myActions.startProcess("excel.exe", "");
                myActions.animate(gestures.Write);
                break;
            case charName + " open notepad":
                myActions.startProcess("notepad.exe", "");
                myActions.animate(gestures.Write);
                break;
            case charName + " open youtube":
                myActions.startProcess("chrome.exe", "http://youtube.com");
                myActions.animate(gestures.Search);
                break;
            case charName + " open davinci":
                myActions.startProcess("G:\\DaVinci Resolve\\Resolve.exe", "");
                myActions.animate(gestures.Search);
                break;
        }
    }

You could also take a look at “e.result.text” which is going to be the result that the recognizer will generate. 

After setting up the event handler is set to listen to input from the default audio device. This determines if it will be listening on your microphone or listening to a headset.

Default audio device

Once you have the above set up your application should be able to listen on the correct device.

Once you have followed all of the above steps, we can start the Speech Recognition Engine asynchronously which will begin listening on another thread. Starting the Engine asynchronously makes it keep listening constantly on a second thread instead of blocking the current thread.

That is it! There are plenty of other possibilities to use the SAPI for, perhaps you could use it for innovative projects!

Thanks for reading and I’ll see you in the next one!

how to check variables in Visual Studio 2019 – C# and VB.Net

Checking the value of variables while debugging in Visual Studio is one of the best features of the IDE in my opinion! Let’s quickly go over the different ways you can view the values stored in variables at run time!

Time needed: 1 minute.

There are multiple ways to check the variable values depending on the type of variable.

  1. Tooltip

    For simple variables, such as strings and integers, you can hover over the variable in the IDE while the application is paused at a breakpoint and see the value in a tooltip.

  2. Data visualizer

    For more complex variables, such as datatables, you will have to hover over the variable in the IDE while the application is paused at a breakpoint and then click the magnifying glass. This will bring up a window displaying the table data.

  3. Immediate Window

    You can bring up the immediate window and type in “?variableName” and it will output the value of a variable. The immediate window has a lot of other uses too!

  4. Watch Window

    The last method I show is the watch window. This window allows you to constantly track the value of variables as you step through code. This is the best option visually unless you are using complex data types such as Datatables!

I hope these methods help you debug your programs faster! These methods definitely help me out and I wanted to share them with everyone! Thanks for reading and if you have any recommendations that should be added to this list, let me know in the comments section!

How to Create a Setup file in Visual Studio 2019 – C# or VB.Net

Today we are going to be talking about how to create a setup file in visual studio 2019! This setup file is a packaged version of your application with a wizard that will guide the user through the entire installation process. This will allow the user to install your latest build with ease!

If you have ever written an application and wanted to create an MSI or EXE installer then this is the guide for you! I’m going to go step by step and show you exactly how to create an installer!

Install Wizard

The entire process is pretty easy and simply requires a visual studio extension that was developed by Microsoft. This extension is not a 3rd party product nor is it terribly complicated to use.

Alright, so let’s get right into it!

The first thing we’re going to need to do is to download the required extension. The extension we will need is called “Microsoft Visual Studio installer project”

You access the Manage Extensions page by clicking on Extensions and then Manage Extensions at the top

Once you are on the Manage Extensions page, search for this extension. It is one of the most downloaded extensions, so it should be at the top of the list. Go ahead and download it, then we can move on to the next step!

Next, we need to restart visual studio to get it to install the extension. Once visual studio closes this little extension installer will install the new extension.

Once the extension installer comes up hit modify and let it progress through. This can take a second to install but it doesn’t take terribly long. It should only take about a minute or so.

VS Extension installer


alright, once that has finished installing, you can open visual studio again.

Now that you have Visual studio open again, you want to open the project that you would like to create the installer for. because it’s going to be a second project inside the same solution.

alright, so now that we’ve got our extension ready to go we are going to right-click on the solution and add a new project. This new project is going to be the setup project. Search for the setup project template and choose that as your new project type.

Setup Project Template

Once you select Setup Project, give it a name and then click create. This will create a second project under your Solution with the name you provided.

If you open that project, you will be greeted with the setup project’s main screen as shown below.

Setup project

Inside of this project, there will be 3 folders:

  • Application folder: This is where your exe and assembly files will be placed.
  • Desktop folder: This will be where we put items destined for the user’s desktop.
  • User’s Program Menu: This will be where we put items to be added to the user’s program menu.

To configure your new setup project follow these steps

  1. Add a new project output to the application folder.

    Select the Application Folder and then right click and select “Add a new Project Output”. This will copy over all of your dll’s and main exe from your other project. This will look just like your typical Debug folder contents. Add -> Project Output -> “Primary Output”

  2. Create a new shortcut using the primary output item

    Right click the Primary Output item that was added when you added the new project output to the Application Folder. Select “Create Shortcut” to create a new shortcut that we will later move to the desktop section.

  3. Import a file to be used as a shortcut icon

    Right click again, select Add and choose to add a file. Browse for an ico file and import it.

  4. Update your shortcut’s icon to the new imported icon

    Right click on the new shortcut we have created, select “Properties Window”, from here change the icon by clicking browse on the right. Browse into your Application Folder and choose the new icon.

  5. Copy your shortcut to the User’s Desktop folder

    Drag your new shortcut over to the User’s Desktop folder on the left side of the split-screen. This will make the wizard create that shortcut on the user’s desktop when the application is installed.

  6. Create another shortcut and put it in the User’s Programs Menu

    Now that you have the desktop shortcut in place, we need to create one more identical shortcut. Follow the same process to create the shortcut and set it’s icon. After you have the new setup created, right click on User’s Programs Menu and select to create a new folder. Create a folder for your shortcut to be under and then move your new shortcut into that folder. Now the User’s Programs Menu will have a shortcut created in it.

  7. Update the properties of the new setup project

    From this point, I would update a few properties of the setup project.
    Author: company or person who wrote the application
    Description: simple description about the app
    Manufacturer: Used for the install location.
    Those are the only properties I updated in my example.

  8. Setup Prerequisites

    If you right click the Project and select Properties, you can then click on a button that says “Prerequisites…” This will bring up a screen where you can choose to have certain prerequisites such as certain .net framework versions install with your application.

  9. Build the setup project and Give it a test run!

    Right-click on the project and choose build. Once it finishes building, right-click again and select “Open Folder in File Explorer”. This will bring up a folder with your install files in it!

Congratulations! That is all there is to it! At this point, you should have a working setup project! I hope this guide was helpful! I’ll see you in the next one!

Beginning C# – While Loops – Beginners guide to While Loops in C#

Hey everyone! Today we are going to be learning about While loops in C#. This is going to be a quick tutorial on how and why we use While statements and a general introduction to loops in programming.

A while loop is used to execute a block of code over and over until some condition is met.

For a simplified English example: “While the background color is red do these things.” This would do [these things] over and over until the background color is no longer red.

The while loop is very similar to a “for” loop. It will loop over and over again until the condition is met. This is the structure of a while loop:

while (condition)
{
//code to be executed
}

The main difference between a for loop and a while loop is that the while loop doesn’t increment the variable that it is testing each loop. Typically a for loop will be used when you have a set number of times something needs to happen. A while loop, on the other hand, is used when you need to loop until something is true or false.

This would be an example of a while loop that works just like a for Loop. Notice how there is a specific line to increment i, it doesn’t get incremented by the while loop itself.

While loop

Alright! let’s make a sample application!

Looping Application

To create this sample while loop application follow these steps:

  1. Create a new Windows forms project

    Open Visual Studio and create a new Win Forms application.

  2. Add a “Max” textbox

    Drag over a textbox from the toolbox and rename it txtMax. This will be used to store the number we would like to loop to.

  3. Add a “Max” label

    Add a label control to the left of the Max textbox, set it’s text property to Max as shown above.

  4. Add a list to show items

    Add a new list box to the form. We will use this to show results as the while loop runs. Rename this list box to LstItems.

  5. Add a Calculate button

    Drag a button over from the toolbox and change it’s text property to Calculate. Also change it’s name to btnCalc.

You should now have your sample form built and it is time to start writing code. I would go ahead and run the application, just to make sure everything is working properly before we begin writing code.

Once you have verified that your application is running properly, it is time to start writing code. First double click on the Calculate button. This will create an event handler for the buttons click event. Inside of this function, we are going to write a while loop that runs from 1 to 18. Inside of this loop, we are going to have it add an item to LstItems that displays the current age. The code for that looks like this:

int age = 1;
while(age <= 18)
{
LstItems.Items.Add(age);

Age = Age + 1;
}

Alright, now that we have our code written, it’s time to give the program a whirl! Your results should look like this:

loop from 1 to 18

Your Listbox should now show 1 to 18!

If you want to better visualize this process, you can add a breakpoint on the while statement (by clicking the line to the left of the line numbers in Visual Studio) and use F10 to step through as the code executes. This should help you really understand what the code is doing by watching it execute line by line.

breakpoints!

Alright, so we know how to use a while loop to count numbers, let’s create one more example. This example will read line by line through a file and when it runs out of lines the loop will end. This is something someone would use a while loop for instead of a for loop.

You will need to create a file and store a few values in it. I personally listed a few different foods in my text file and saved it to C:\Test\LoopTest.txt
My contents looked something like this:

Pizza
Hamburger
Hot Dog

Now that you have saved it somewhere, the code you will need to read this file is this:

LstItems.Items.Clear(); //This will clear our listbox out
System.Io.StreamReader sr = new System.IO.StreamReader("C:\\Test\\LoopTest.txt");
String currLine = sr.ReadLine();

While(currLine != null)
{
LstItems.Items.Add(currLine);
currLine = sr.ReadLine();
}

You may have to adjust the file location the stream reader is reading from but other than that, this code should run fine.

This code will first clear your list box, then it will read through your file and add each value to the list box until it runs out of items to read. Once the StreamReader has read the last item in the file, the next ReadLine will set currLine to null and that is when our test will fail and the While loop will end.

That’s really all there is to while loops! I hope this helped and I will see you in the next one!

How to Send email using C# and Gmail

hey everyone! Today we are going to be writing a simple application in CSharp that can send emails!

This application is going to be a simple little SMTP Client that will interface with Gmail’s Servers using your username and password. Since this is a pretty simple task, there isn’t a whole lot of code, so it’s a great project to start learning with!

Alright! Let’s get right into building the application!
In this tutorial, I’m going to be using the Devexpress components. They work just like the default windows components, they just look a little better.
The code behind is what is important and it will look almost identical regardless of the form controls.

Devexpress Blank application

Once you create your new windows forms project follow these steps to build out the UI

  1. Rename the form and change it’s text property

    Rename the form by hitting f4 to access the properties window

  2. Grab a groupbox and rename it to “Mail”

    Drag a group box over from the toolbox window. Change it’s text property (or caption) to Mail

  3. Drag over another group box and rename it to “Settings”

    Drag a second group box over from the toolbox window and change it’s text property to Settings.

  4. Add a splitter panel

    Drag a splitter panel over and put the Mail group box in the first half and the Settings group box in the second half.

  5. Dock the splitter panel to fill

    Have the new splitter panel fill the form out. Set Horizontal to false, so we have a Mail section at the top and Settings section at the bottom.

  6. Add a layout control to the bottom

    Drag and drop a layout control into the Settings group box. Have it dock to fill and we will use this to add our controls.

  7. Add textboxes to the Settings Layout control

    Add a Username textbox to the Settings layout control.
    Add a Password textbox to the Settings layout control.
    Both of those should be full width.
    Add a Port textbox to the Settings layout control, this should be half width.
    Add an SMTP textbox to the Settings layout control, this should be half width as well.

  8. Add a button to the Settings Layout Control

    Add a button to the right of the Port and SMTP text boxes. Rename this button to Send and this will be the button that sends our mail!

  9. Set default values

    Change the text property of the Username textbox to your Gmail address. Change the text property of the Port textbox to “587”. Finally, update the SMTP textbox text to be “smtp.gmail.com”

  10. Add textboxes to the Mail section

    Add a textbox to the Mail section and label it “To:”
    Add a second textbox to the mail section and label it “Subject:”
    Lastly, add a multi-line text edit to the mail section and label it “Body” (This can be a regular textbox)
    Your form should look like this:


Alright!! Now we have our form completed! It’s time to write some code!

First, we are gonna double-click on the send button, this will generate an event handler which we will put the code to send the email inside of.

Send event handler

The first line of code we are going to write will create a new NetworkCredential object called login. This will be used to pass the username/password to Gmail.

workCredential login = new NetworkCredential(txtUsername.Text, txtPassword.Text);

Next we will need to create an SMTPClient object which will actually send the message. This line looks like the following:

mtpClient client = new SmtpClient(txtSMTP.Text);

After writing that line, you will get an error and have to import System.Net.Mail. That line looks like this:

using System.Net.Mail;

After you have that setup, it is time to set our client up so it can send the message. The first setting we are going to set is the Port number. This needs to match google’s port number which is 587. This line converts our textbox’s text to an integer (variable type for numbers) and sets the client’s port to the number stored in our port textbox.

Client.Port = Convert.ToInt32(txtPort.Text);

Our next thing will be to enable SSL. Google requires SSL be enabled to use Gmail. So that code looks like this:

client.EnableSSL = true;

The last thing we are going to do is pass the credentials to the new client object and thanks to previously creating the login variable, that line looks like this:

client.Credentials = login;

Now that our client is setup, we just need to create the mail addresses and we will be ready to form our message! The code to create our mail addresses is listed below.

MailAddress sendAddr = new MailAddress(txtUsername.Text);
MailAddress recAddr = new MailAddress(txtSendTo.Text);

Next, we will need to create a new Mail Message, this is the actual content of the message.

I’m going to explain each line in paragraph form and then show the block of code after so it will be easier to copy/paste.

First, we create the object, passing it the sender and receiver addresses. After that, we pass the subject textbox’s text property as the subject. Then we pass the memo edit’s (or textbox if you used that instead) text property as the body. After that, we set the BodyEncoding to UTF8, I wouldn’t worry about this, it’s just a character encoding type. IsBodyHTML is just used to tell if the email contains HTML markup or not, I used true for this and it worked fine. Priority seems like a silly property but normal makes the most sense. Lastly, DeliveryNotificationOptions will notify you if the message fails to send.

MailMessage msg = MailMessage(sendAddr, recAddr);
msg.Subject = txtSubject.Text;
msg.Body = memBody.Text;
msg.BodyEncoding = Encoding.UTF8;
msg.IsBodyHtml = true;
msg.Priority = MailPriority.Normal;
msg.DeliveryNotificationOptions = DeliveryNotificationOptions.OnFailure;

Alright! That was a huge block of code and we are almost there! Your code should look something like this now!

Send code so far

Now we need to set up the Send Completed event handler. This isn’t totally necessary but it is nice that our application will be able to display an error if the send fails.

Below DeliveryNotificationOptions, we need to add the following code:

client.SendCompleted += new SendCompletedEventHandler(sendCallback);

This line will call the sendCallback function with a result. Now we just need to write that function!

private static void sendCallback(object sender, AsyncCompletedEventArgs e)
{
    if (e.Cancelled || e.Error != null)
     {
         MessageBox.Show("Error sending Email!");
     }
     else
     {
         MessageBox.Show("Sent Successfully!");
      }
}

This will show an error message or success message depending on the result!

Our very last lines will be the lines to send the email! This will be added back inside of our click event handler below the SendCompleted line!

string userToken = "sending"
client.SendAsync(msg, userToken);

The resulting code will look like this, sorry the box cuts off a little bit of the sendCallback code.

Completed Code

Once you have the code in place it is time to give it a test run! We have to change one setting in google to make this work. Google “Low Security Applications”, the top link should be a support.google.com link.

Less secure app access

After that, you need to click Less Secure App Access and allow Less secure Apps.

Without this option turned on, Google will not send your emails!

Once that is all set up, build your application and fill it out, this is what my application looked like all filled out!

SMTP client filled out

Once I hit the send button, the email sent! This is my test email that worked. Thanks for reading, I really hope this helped you out! If you have any questions, let me know in the comments below!!

Working test email