Want to set up XAMPP with WordPress on your computer or install WordPress locally? This is a perfect option if you need a development site for testing or other purposes.
Why use XAMPP?
XAMPP allows you to host a website on your computer. After you’ve set it up, you can create a new WordPress installation with a few clicks. However, installing XAMPP with WordPress might be difficult, so that you may want assistance.
Getting started with XAMPP and WordPress
The first thing you must do is download WordPress from the WordPress.org website. As seen in the image below, open the URL, scroll down the page, and click the download WordPress button.
Installing XAMPP
XAMPP by Bitnami
Moving further, you’ll need to use XAMPP to install WordPress on localhost. XAMPP is available for download from the Apachefriends.org website. When the configuration is complete, click the Next button.
XAMPP Components
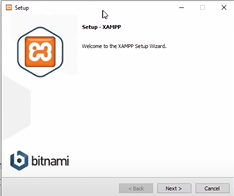
Now, look at the image below; some components must be checked before they may be installed. We simply need Apache, MySQL, and PHP to set up WordPress. You may either uncheck everything except Apache, MySQL, and PHP or leave them checked.
XAMPP Control Panel
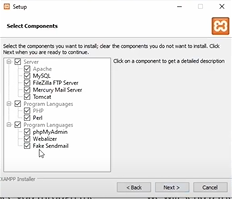
Starting Apache using XAMPP
We’ll start apache by pressing the start button, and it should become green. It will also display ports 80 and 443, the default ports used by Apache. After that, MySQL may be started; the default port is 3306.
The Apache server is now up and running, including PHP and the MySQL database server. Now that the local host is up and running, we can install WordPress.
Creating the WordPress Database
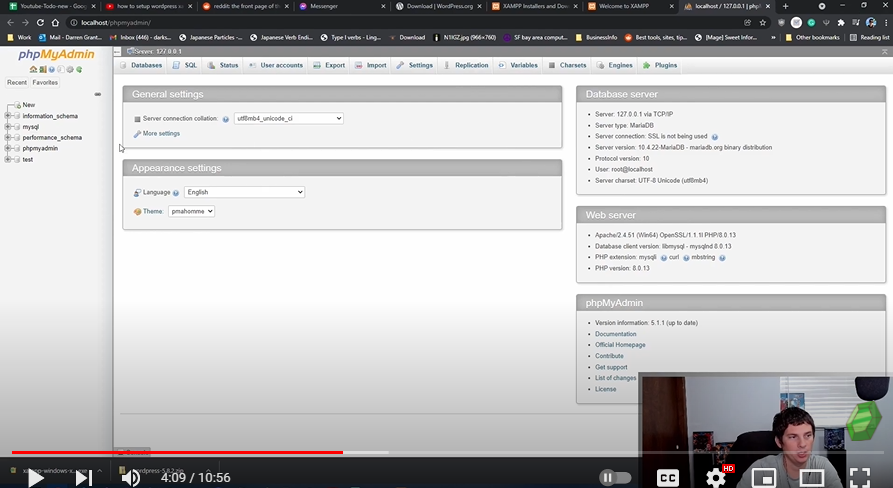
Next, you need to create a MySQL database. To do that, launch PHPMyAdmin from your XAMPP control panel.
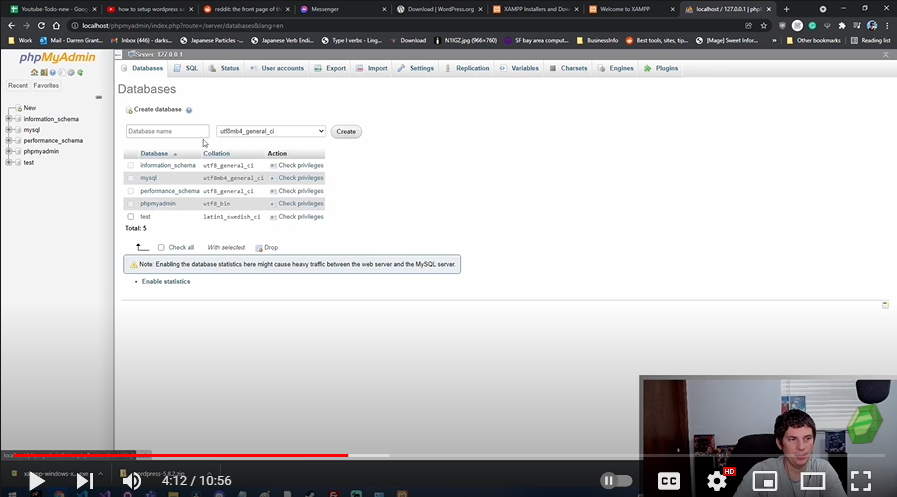
Then click on Databases at the top.
Click Create after giving your database a name. It doesn’t matter what your chosen database name is; just remember it since you’ll need it for the following stage.
When you install XAMPP with WordPress, you don’t need to create a new database user. You can use the default user, If you are installing WordPress on a live web server though, you should create a custom user for WordPress.
Now we’ve got our WordPress database set up to start the installation process.
Installing WordPress
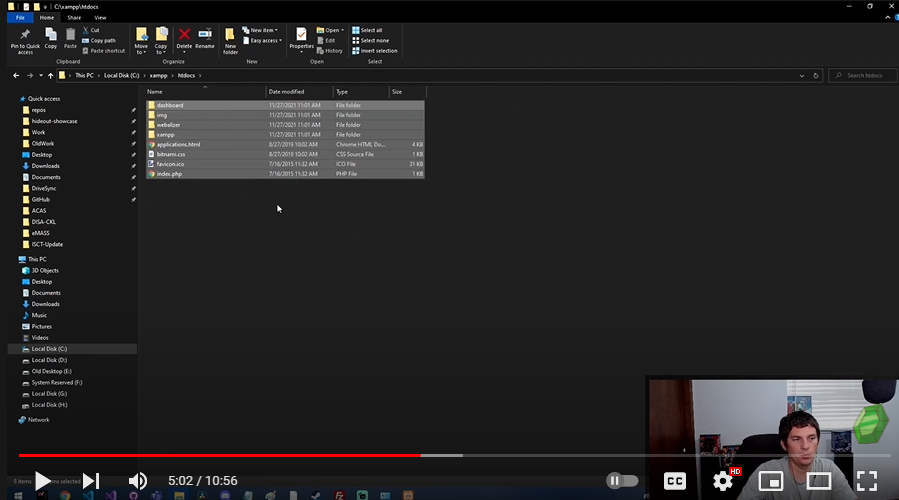
First, go to Windows Explorer and look for the XAMPP install location. Inside of the XAMPP install location will be a folder called htdocs. Delete all of the files inside of htdocs. These files were the demo website that comes with XAMPP.
Go to your Downloads > WordPress folder (the extracted WordPress zip file should be located here) > and copy the components of the WordPress folder to htdocs.
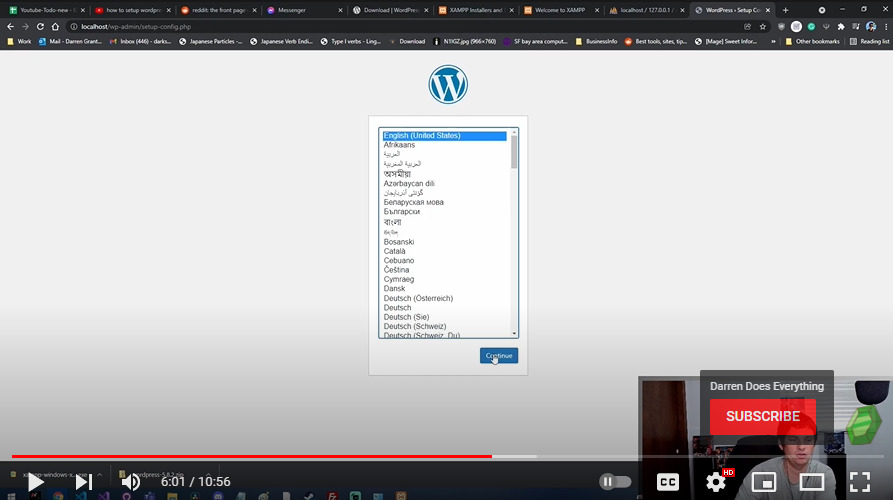
Now, when we go to the localhost, you will get this page which is the WordPress setup page.
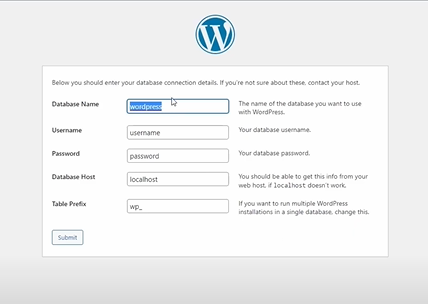
Now, enter the database name, username, password, and hostname. Then click on submit button. Click on Run the installation.
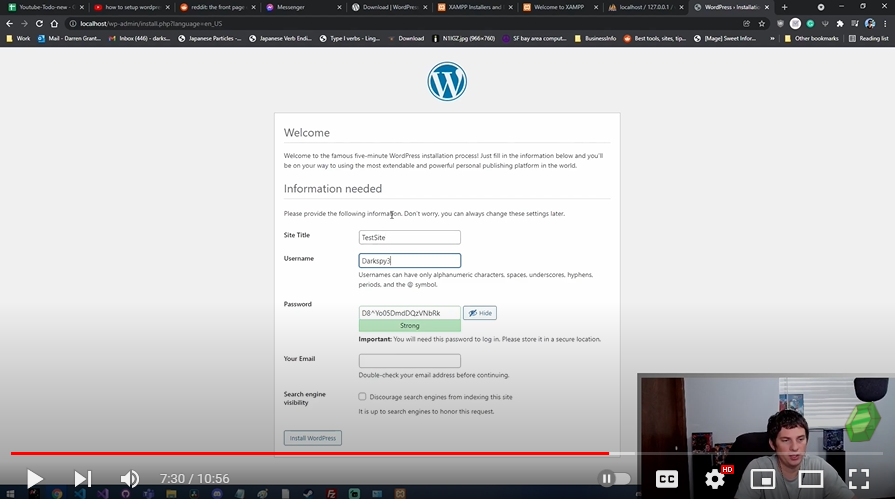
You will enter your new website details here. Site title, username, password, and correct email, click on install WordPress. WordPress will install in a minute. After that, click on the login button and type in your login details.
After clicking on login, it will take you to the WordPress dashboard, and you’re ready to edit the site!
Breakpoints are one of the best features when debugging in Visual Studio! Let’s look at how to set and use breakpoints!
What are breakpoints?
A breakpoint indicates where Visual Studio should suspend your actively running code. This allows you to look at the value of variables, the behavior of memory, or whether or not a branch of code is being run. Stepping through your code is one of the best things you can do to learn how to program.
How to set a breakpoint
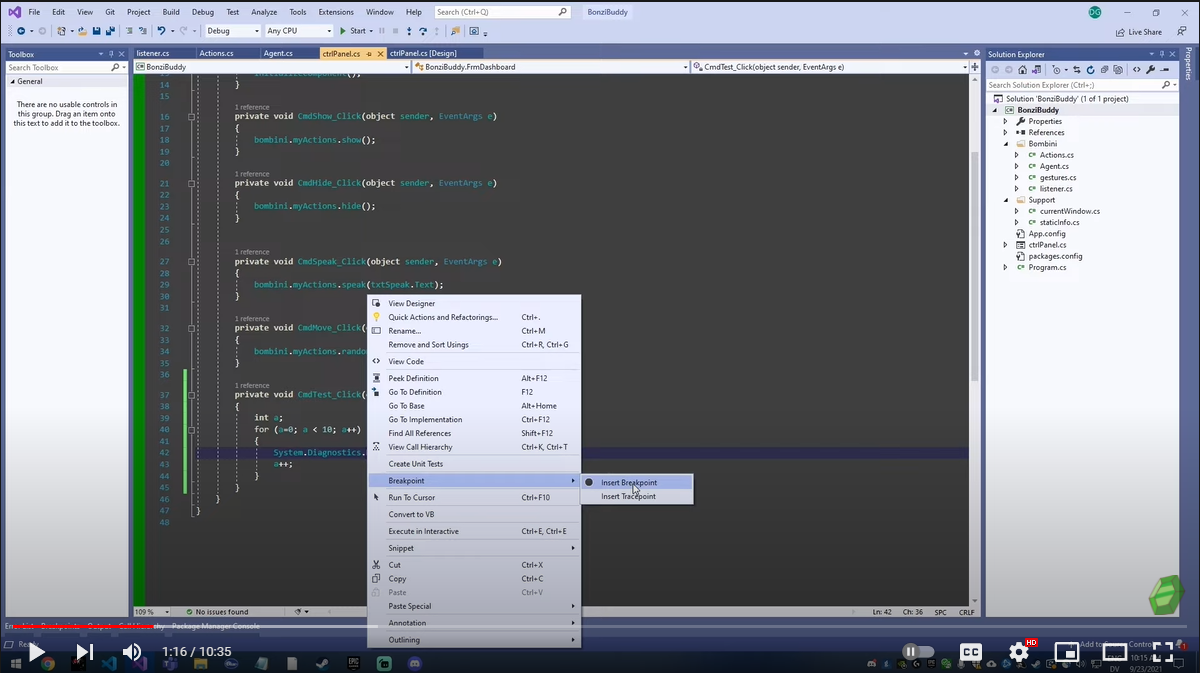
To start, you can set a breakpoint on any line of executable code by clicking in the margin of the code editor (The green line in the picture above) or simply by right-clicking on a line of code and selecting Breakpoint > Insert Breakpoint. Another option is to press F9 and a breakpoint will be inserted on whatever line you have selected.
Now we have a breakpoint, and we can work on our application!
How to access the Breakpoint Pane
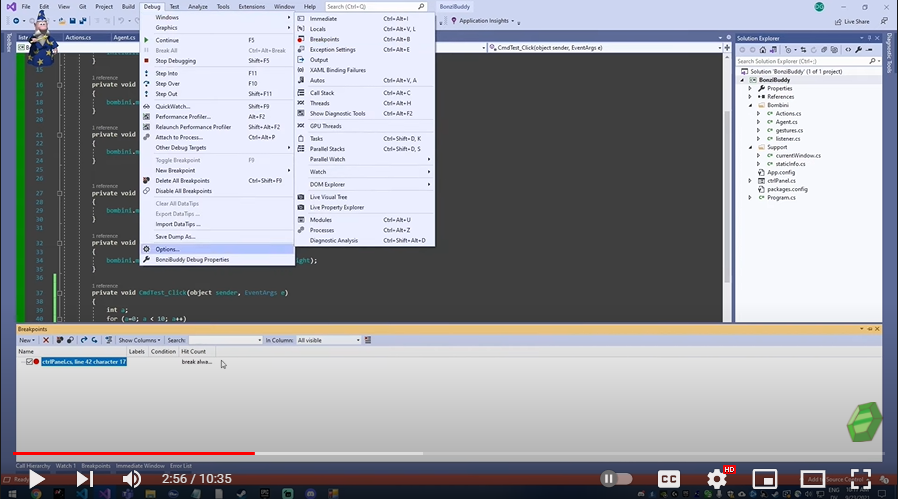
To access the breakpoint pane, hover over to Debug > Windows > Breakpoints. One thing you may want to do is to disable a breakpoint. You can enable/disable or delete breakpoints from this window, search and sort them. You can change breakpoint settings directly from this dialog. There is also an option to delete and export your breakpoints as well.
You need to start your app with the debugger attached to debugging the app process. F5 (Debug > Start Debugging) is the most common way. However, you may not have set any breakpoints to examine your app code, so we will first debug.
If you want to jump to the currently selected breakpoint, you could just click it, and it will jump into that right line.
For more options, you could navigate through “Show Columns.” There is also a search box that is very handy to hover through your code!
You could also edit the label of a breakpoint. Within Visual Studio, once you’ve created a breakpoint, you can add one or more labels to it by simply right-clicking and choosing Edit Labels.
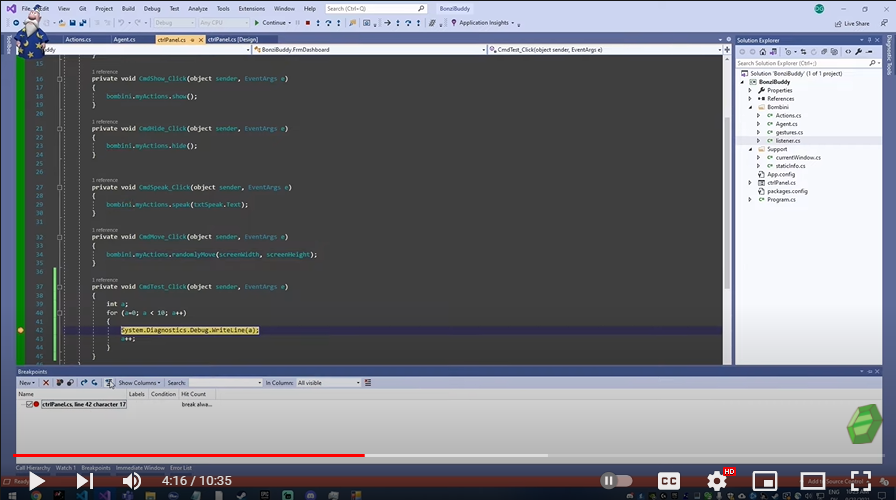
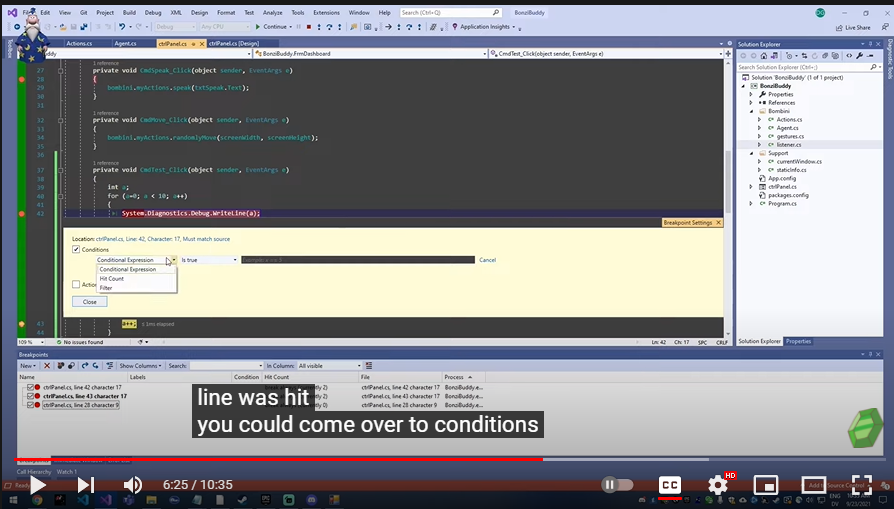
In terms of Hit Count, it works when you want a breakpoint to break after it has been hit a certain amount of times, you can choose Hit Count in the Breakpoint Settings and specify the number of iterations. You could also come over to Conditions (right-click on the breakpoint symbol (in the editor left margin or in the Breakpoint window) and select Condition… (or press Alt + F9, C), which will open the Breakpoint Settings window.) and you could set a hit count condition.
Lets get to know the Watch window
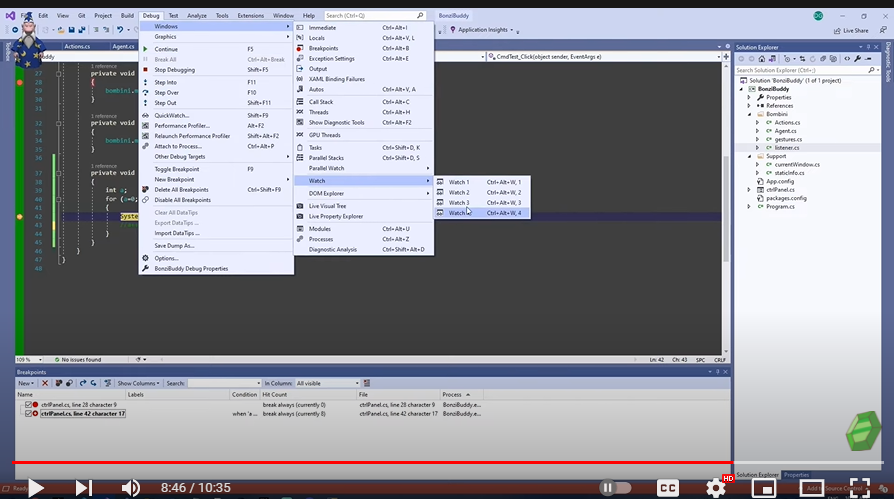
To navigate to the watch window, you will need to select Debug-> Windows -> Watch -> Watch 1. Once you have opened the watch window, you can use it in conjunction with breakpoints to easily check the value of variables while code executes.
The Watch Window allows you to see the value of variables and expressions while debugging. It’s kind of like the DataTip you get when hovering over a variable, except that you can write any expression you want. It’s available from Debug | Windows | Watch | Watch 1 or Ctrl + Alt + W + 1.
There are four watch windows in Visual Studio, which you can use in different contexts (Watch 1, Watch 2, etc.).
Any expression can be entered into the watch window. The same rules apply to expressions as to code. So if you write an illegal expression, you’ll see the same compiler error.
To add items to watch, do any of the following: Write them manually in a new row of the Watch window—Right-click on a variable and choose “Add Watch” in the context menu. Right-click on a variable in the DataTip and select “Add Watch.” “Add Watch” button from QuickWatch.
Breakpoints are a great part of Visual Studio
One of the key features of Visual Studio Code is its great debugging support. VS Code’s built-in debugger helps accelerate your edit, compile, and debug loop. Breakpoints are an essential tool for debugging your applications. You set the breakpoints whenever you want to pause the execution.
Breakpoints really helped me learn how to program. I think they were one of the most valuable tools when it came to understanding code. If you just can’t wrap your head around how a certain block of code works… Just step through it using a breakpoint and watch it work it’s magic! I hope this quick guide on breakpoints helped you and I’ll see you in the next one!
Node.js allows the development of web servers in JavaScript! This allows your front end and back end to both be created using Javascript! With this, you can create a scalable server without needing to implement threading. You can instead use event-driven programming that uses callbacks!
NPM, which is more commonly known as Node Package Manager is an application used to install node packages. This allows us to install things such as Express!
This quick guide will walk you through the process of installing and updating Node.JS, NPM and Express on Windows 10. We will also show how to set up your first Node.js site step by step!
Requirements
The method used in this guide requires Windows 10
User account with administrative rights (or at least the ability to download and install programs)
Access to command line (Start -> Run -> type CMD)
How to install Node.js, NPM and Express in Windows
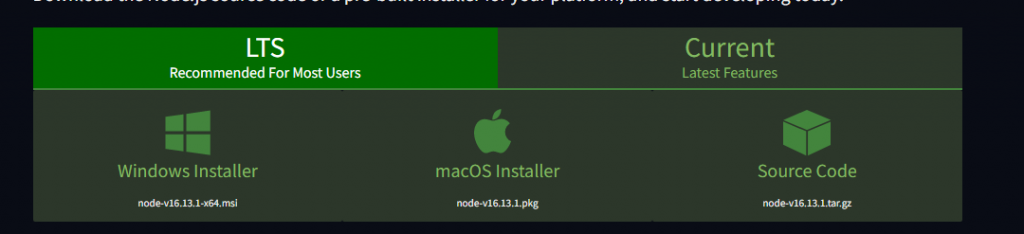
Download the Node.js installer
Navigate to the install page located at https://nodejs.org/en/download/. Once you are there, click on the Windows installer link to download the latest version for windows. This Node.js install will include NPM package manager. You will not have to download that separately.
Run the Node.js installer
Now that you have the installer downloaded, either open your downloads folder and open the installer there or click the file icon at the bottom of your browser to launch the downloaded file.
The system will verify that you would like to open the software – click Run
Node.js will show you a welcome screen – click Next
The next screen is the license agreement. Review this and the terms for installing the software – click Next
The installer will ask for an installation location. Either leave the default location or choose a new location – click Next
Next the installer will ask if you would like to change any components. either leave it set to default or modify as needed – click Next
Now we just click the Install button and the installer will install Node.js and NPM
How to verify Node.JS and NPM are installed
To verify that Node Js and NPM are installed is actually really easy.
The first thing you need to do is open Command prompt or Windows Powershell and type the following command:
node -v
This command will show you the node version, which will indicate that it is installed. If you don’t get a version back then Node is not installed.
To verify that NPM is installed, get its version using the following command:
npm -v
As long as this returns a version, then you will know that NPM is installed as well!
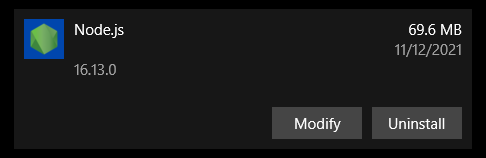
Check Node.js version
How to update Node.js and NPM in Windows
The fastest method for updating Node.js and NPM will be to navigate to https://nodejs.org/en/ and download the latest version. Once you navigate to the download page, you can compare the version there against the version we found using the above command line functions to check your Node.js version.
To update Node.js, download the windows installer from nodejs.org and open it. The wizard will guide you through the process and will uninstall the old version and replace it with the new version of Node.js.
How to uninstall Node.js and NPM in Windows
The windows control panel is the best method for uninstalling Node.js on windows.
The steps to uninstall Node.js are:
Open the start menu
Open the start menu by clicking on it or using the Windows key to bring it up.
Open the Settings screen
Click the Settings button which looks like a cog wheel (or gear) icon
Open the App page
Once you have the Settings screen open, click on the Apps button.
Find and hilight Node.js
Scroll through your list of installed applications and find Node.js. After you find Node.js in the list, click on it to highlight it.
Select Uninstall
Click on the word Uninstall under Node.js. Clicking on Uninstall will launch the uninstall software wizard and walk you through the process from here.
Uninstall Node.js
How to use Node.js in Windows
Node.js is a development framework and not a regular application. That means that it interprets commands that are written. We are going to setup a little test script to ensure everything is working perfectly!
1. Open the text editor of your choice. (I recommend Visual Studio Code)
2. Copy and paste the following code into your editor:
var http = require('http');
 http.createServer(function (req, res) {
   res.writeHead(200, {'Content-Type': 'text/html'});
   res.end('This is our first test!');
 }).listen(8000);
3. Save the file and exit the text editor (or use the in editor terminal window). Open Command prompt and input the following command:
node \path\to\thenewfile.js
Make sure the path to the newfile is changed to the path to your newly written file. This will tell Node where the server file is to run it. After this runs, it will look like nothing has happened. but in reality your script is constantly running in the background.
Windows defender may popup with a warning. For now, allow the application through windows defender so your website will work as intended.
4. Open your web browser and navigate to the following url:
http://localhost:8000
You should see “This is our first test!” in the top left corner of the page!
If everything works perfectly, your computer is now acting as a server. Any computer connecting to your computer on port 8000 will see the message “This is our first test“.
The only trick is that nobody outside of your router will be allowed access without enabling port forwarding. Your router will just block their request before your computer has a chance to respond.
Wrap Up
Now that we have gone over how to install, update, remove and set up Node.js and NPM you should be ready to go! I can’t wait to hear about what applications you all have designed!
The sky is really the limit with this technology and I hope I helped you set up your own install of Node.js!
FAQ
Where is NPM Installed on Windows
On a Windows system, the Node Package Manager (npm) is typically installed alongside Node.js, which is the JavaScript runtime that npm uses. When you install Node.js on a Windows system, the installer will add the Node.js executable (node.exe) to the system’s PATH, and it will also install npm in the same directory. You can find the directory where npm is installed by running the following command in a command prompt:
where npm
This will return the location of the npm executable on your system. Alternatively, you can also run “npm root-g” This will return the npm global packages path. Once you know the directory where npm is installed, you can access it in the command prompt by simply typing “npm”, and you can use it to install and manage packages for your projects. Please let me know if you have any other questions.
Where is nodeJS installed on windows
When you install Node.js on a Windows system, the installer will add the Node.js executable (node.exe) to the system’s PATH. This allows you to run the node command from any directory in the command prompt. You can find the directory where Node.js is installed by running the following command in a command prompt:
where node
This will return the location of the node executable on your system. You can also check the version of node by running “node-v” command. By default, the Node.js installer for Windows will install Node.js to the following location:
C:\Program Files\nodejs
This is the default directory where Node.js will be installed, but the actual location on your system may be different, depending on the options you selected when you ran the installer. You can also check the installed path by checking the environment variables. You can access the environment variables by searching for “Environment Variables” in the start menu, and look for the variable named Path and look for the path where node is installed. Please let me know if you have any other questions.
If your Laravel based website is having issues handling too many users then you may need to enable caching. Caching is a great way to allow your server to keep up with high demand without adding more costly resources.
With Laravel 5.6+ you no longer need to add custom middleware to set up caching. You can enable client-side browser caching using the built-in cache headers middleware. This makes life very easy!
The easiest type of caching to set up is browser caching. This will quickly take a huge load off of your server because the users will stop requesting large files over and over again. They will maintain the files in a local cache until the time that you set runs out and they request the files again. (Think about how many times a user should be requesting the background image for your site that shows up on every page.)
There are two different ways you can set up browser caching in Laravel.
Setup Caching Globally
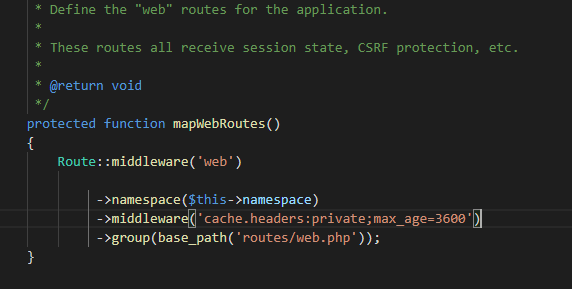
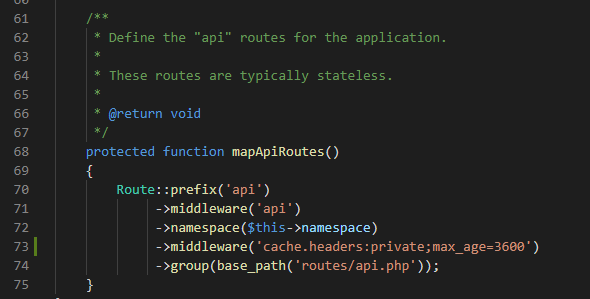
The first way is to set it up inside of the MapWebRoutes & MapApiRoutes functions that are in the RouteServiceProvider.php file.
While this way is super easy to configure, you will have issues with any kind of login system. The browser caching will mess up the keys and break things. If your website doesn’t require a login, this is definitely the way to go as it is super easy to implement and will work fine.
Locate your mapWebRoutes inside of RouteServiceProvider.php and add the following line after ->namespace($this->namespace)
After that find your mapApiRoutes and add the same line. Mine ended up looking like this
mapApiRoutes with caching setup
That’s all there is to setting caching up globally in Laravel 5.7+
Hopefully, that helps, if you do have a login system though, keep reading on to only set caching up for specific routes that don’t involve your login system!
Setup Caching Specific Routes
The second method is to set the cache for each route in your web.app config file. This method is better than the first if you have a login system because you can skip any routes that interact with your login system.
Skipping the login items will allow your login system to still work while the other parts of your webpage are cached appropriately. This will provide a tremendous speed increase while still keeping your login system in place.
Time needed: 10 minutes.
To setup caching in a specific route
Open your web.php file
The first step will be to open your web.php file which will have each of your routes in it. Mine is in the root directory and called Web.php
Locate a route that you would like to add caching to
The next step is to locate a route you would like to add caching to, for me I added it here to my search, commented and favorited routes. You can see the new item on the end of the route.
Add the following code to the end of your route
Add the following code to the end of your route. ->middleware(‘cache.headers:private;max_age=3600’) Don’t forget to end the line with a semi-colon and you are done!
We did it!
Once you have that setup, now when you navigate to the page that you enabled caching for, things like your background will only be requested by the user one time. You should be able to see this by navigating to the page and having way faster reload times.
I hope this helped you guys out! I know it really helped my website out, if you have any questions, ask in the comments below and I’ll try to help!
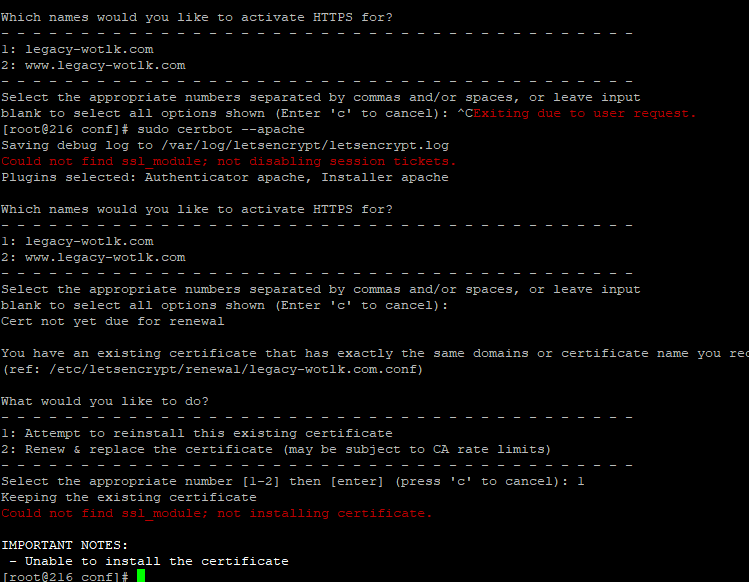
Are you having trouble setting up SSL using Certbot? Lets figure out your ssl_module issue and get your site secure again!
I was having a lot of issues because of the following two error messages…
Could not find ssl_module; not disabling session tickets.

Could not find ssl_module; not installing certificate.
Certbot failing due to ssl_module
I had googled this multiple times, with search queries such as: could not find ssl_module; not installing certificate and could not find the answer! It turns out that the answer was really simple!
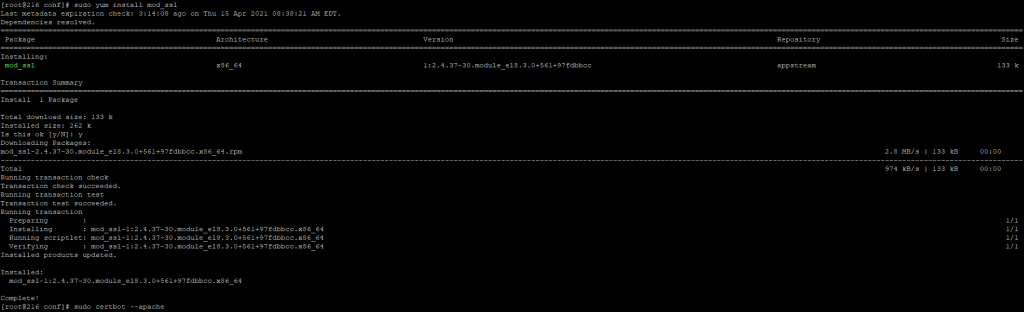
You just have to run the below command and it will fix everything!
sudo yum install mod_ssl
This is the command for CentOS. The install command could be slightly different for you if you are using a different Linux distro.
You may have to use apt-get instead of yum if you aren’t using a Red hat based distro.
Once I ran the above command and installed the SSL module we were off to the races!
SSL Module installation
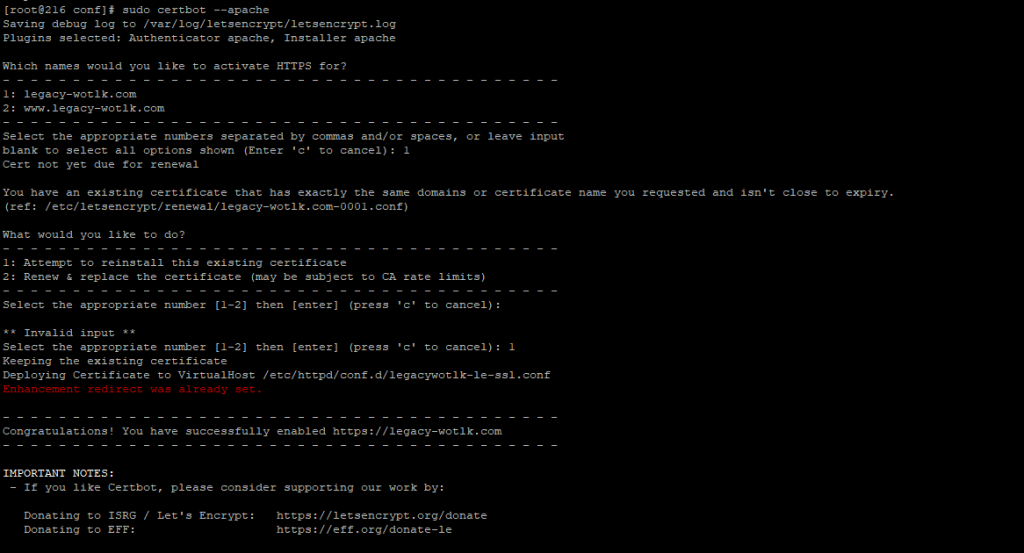
At this point, I was able to run Certbot again and it ran correctly! That’s all there was to it!
Certbot running successfully
The command I used to run certbot is listed below but it was a very simple command. Just sudo certbot –Apache but just in case that helped, I figured I would list it too
Sudo Certbot --Apache
Thanks for reading! I hope this helped! I was stuck on this for about an hour… Hopefully this got to you early in your search!