Important Windows 10 Keyboard Shortcuts for 2021

Important Windows 10 Keyboard Shortcuts for 2021

Important Keyboard Shortcuts for Windows 10. If you are looking for the best list of keyboard shortcuts then you have come to the right place. This list is pretty extensive and will make your computing that much faster!

CTRL+A. . . . . . . . . . . . . . . . . Select All
CTRL+C. . . . . . . . . . . . . . . . . Copy
CTRL+X. . . . . . . . . . . . . . . . . Cut
CTRL+V. . . . . . . . . . . . . . . . . Paste
CTRL+Z. . . . . . . . . . . . . . . . . Undo
CTRL+B. . . . . . . . . . . . . . . . . Bold
CTRL+U. . . . . . . . . . . . . . . . . Underline
CTRL+I . . . . . . . . . . . . . . . . . Italic
F1 . . . . . . . . . . . . . . . . . . . . . . Help
F2 . . . . . . . . . . . . . . . . . . . . . Rename selected object
F3 . . . . . . . . . . . . . . . . . . . . . Find all files
F4 . . . . . . . . . . . . . . . . . . . . . Opens file list drop-down in dialogs
F5 . . . . . . . . . . . . . . . . . . . . . Refresh current window
F6 . . . . . . . . . . . . . . . . . . . . . Shifts focus in Windows Explorer
F10 . . . . . . . . . . . . . . . . . . . . Activates menu bar options
ALT+TAB . . . . . . . . . . . . . . . . Cycles between open applications
ALT+F4 . . . . . . . . . . . . . . . . . Quit program, close current window
ALT+F6 . . . . . . . . . . . . . . . . . Switch between current program windows
ALT+ENTER. . . . . . . . . . . . . . Opens properties dialog
ALT+SPACE . . . . . . . . . . . . . . System menu for current window
ALT+¢ . . . . . . . . . . . . . . . . . . opens drop-down lists in dialog boxes
BACKSPACE . . . . . . . . . . . . . Switch to parent folder
CTRL+ESC . . . . . . . . . . . . . . Opens Start menu
CTRL+ALT+DEL . . . . . . . . . . Opens task manager, reboots the computer
CTRL+TAB . . . . . . . . . . . . . . Move through property tabs
CTRL+SHIFT+DRAG . . . . . . . Create shortcut (also right-click, drag)
CTRL+DRAG . . . . . . . . . . . . . Copy File
ESC . . . . . . . . . . . . . . . . . . . Cancel last function
SHIFT . . . . . . . . . . . . . . . . . . Press/hold SHIFT, insert CD-ROM to bypass auto-play
SHIFT+DRAG . . . . . . . . . . . . Move file
SHIFT+F10. . . . . . . . . . . . . . . Opens context menu (same as right-click)
SHIFT+DELETE . . . . . . . . . . . Full wipe delete (bypasses Recycle Bin)
ALT+underlined letter . . . . Opens the corresponding menu
PC Keyboard Shortcuts
Document Cursor Controls
HOME . . . . . . . . . . . . . . to beginning of line or far left of field or screen
END . . . . . . . . . . . . . . . . to end of line, or far right of field or screen
CTRL+HOME . . . . . . . . to the top
CTRL+END . . . . . . . . . . to the bottom
PAGE UP . . . . . . . . . . . . moves document or dialog box up one page
PAGE DOWN . . . . . . . . moves document or dialog down one page
ARROW KEYS . . . . . . . move focus in documents, dialogs, etc.
CTRL+ > . . . . . . . . . . . . next word
CTRL+SHIFT+ > . . . . . . selects word
Windows Explorer Tree Control
Numeric Keypad * . . . Expand all under current selection
Numeric Keypad + . . . Expands current selection
Numeric Keypad – . . . Collapses current selection
¦ . . . . . . . . . . . . . . . . . . Expand current selection or go to first child
‰ . . . . . . . . . . . . . . . . . . Collapse current selection or go to parent
Special Characters
‘ Opening single quote . . . alt 0145
’ Closing single quote . . . . alt 0146
“ Opening double quote . . . alt 0147
“ Closing double quote. . . . alt 0148
– En dash. . . . . . . . . . . . . . . alt 0150
— Em dash . . . . . . . . . . . . . . alt 0151
… Ellipsis. . . . . . . . . . . . . . . . alt 0133
• Bullet . . . . . . . . . . . . . . . . alt 0149
® Registration Mark . . . . . . . alt 0174
© Copyright . . . . . . . . . . . . . alt 0169
™ Trademark . . . . . . . . . . . . alt 0153
° Degree symbol. . . . . . . . . alt 0176
¢ Cent sign . . . . . . . . . . . . . alt 0162
1⁄4 . . . . . . . . . . . . . . . . . . . . . alt 0188
1⁄2 . . . . . . . . . . . . . . . . . . . . . alt 0189
3⁄4 . . . . . . . . . . . . . . . . . . . . . alt 0190
PC Keyboard Shortcuts
Creating unique images in a uniform world! Creating unique images in a uniform world!
é . . . . . . . . . . . . . . . alt 0233
É . . . . . . . . . . . . . . . alt 0201
ñ . . . . . . . . . . . . . . . alt 0241
÷ . . . . . . . . . . . . . . . alt 0247
File menu options in current program
Alt + E Edit options in current program
F1 Universal help (for all programs)
Ctrl + A Select all text
Ctrl + X Cut selected item
Shift + Del Cut selected item
Ctrl + C Copy selected item
Ctrl + Ins Copy selected item
Ctrl + V Paste
Shift + Ins Paste
Home Go to beginning of current line
Ctrl + Home Go to beginning of document
End Go to end of current line
Ctrl + End Go to end of document
Shift + Home Highlight from current position to beginning of line
Shift + End Highlight from current position to end of line
Ctrl + f Move one word to the left at a time
Ctrl + g Move one word to the right at a time
MICROSOFT® WINDOWS® SHORTCUT KEYS
Alt + Tab Switch between open applications
Alt +
Shift + Tab
Switch backwards between open
applications
Alt + Print
Screen
Create screen shot for current program
Ctrl + Alt + Del Reboot/Windows® task manager
Ctrl + Esc Bring up start menu
Alt + Esc Switch between applications on taskbar
F2 Rename selected icon
F3 Start find from desktop
F4 Open the drive selection when browsing
F5 Refresh contents
Alt + F4 Close current open program
Ctrl + F4 Close window in program
Ctrl + Plus
Key
Automatically adjust widths of all columns
in Windows Explorer
Alt + Enter Open properties window of selected icon
or program
Shift + F10 Simulate right-click on selected item
Shift + Del Delete programs/files permanently
Holding Shift
During Bootup
Boot safe mode or bypass system files
Holding Shift
During Bootup
When putting in an audio CD, will prevent
CD Player from playing
WINKEY SHORTCUTS
WINKEY + D Bring desktop to the top of other windows
WINKEY + M Minimize all windows
WINKEY +
SHIFT + M
Undo the minimize done by WINKEY + M
and WINKEY + D
WINKEY + E Open Microsoft Explorer
WINKEY + Tab Cycle through open programs on taskbar
WINKEY + F Display the Windows® Search/Find feature
WINKEY +
CTRL + F
Display the search for computers window
WINKEY + F1 Display the Microsoft® Windows® help
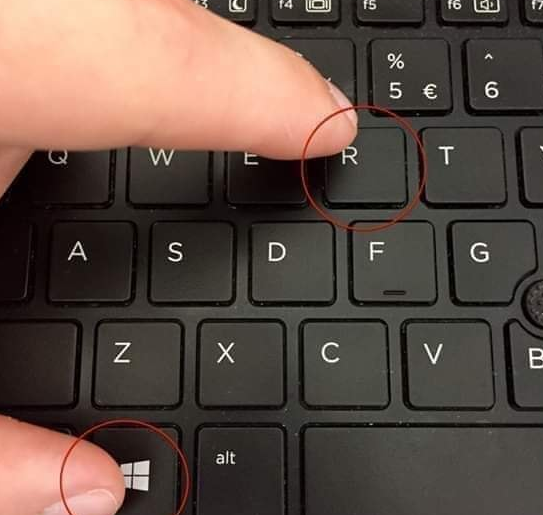
WINKEY + R Open the run window
WINKEY +
Pause /Break
Open the system properties window
WINKEY + U Open utility manager
WINKEY + L Lock the computer (Windows XP® & later)
OUTLOOK® SHORTCUT KEYS
Alt + S Send the email
Ctrl + C Copy selected text
Ctrl + X Cut selected text
Ctrl + P Open print dialog box
Ctrl + K Complete name/email typed in address bar
Ctrl + B Bold highlighted selection
Ctrl + I Italicize highlighted selection
Ctrl + U Underline highlighted selection
Ctrl + R Reply to an email
Ctrl + F Forward an email
Ctrl + N Create a new email
Ctrl + Shift + A Create a new appointment to your calendar
Ctrl + Shift + O Open the outbox
Ctrl + Shift + I Open the inbox
Ctrl + Shift + K Add a new task
Ctrl + Shift + C Create a new contact
Ctrl + Shift+ J Create a new journal entry
WORD® SHORTCUT KEYS
Ctrl + A Select all contents of the page
Ctrl + B Bold highlighted selection
Ctrl + C Copy selected text
Ctrl + X Cut selected text
Ctrl + N Open new/blank document
Ctrl + O Open options
Ctrl + P Open the print window
Ctrl + F Open find box
Ctrl + I Italicize highlighted selection
Ctrl + K Insert link
Ctrl + U Underline highlighted selection
Ctrl + V Paste
Ctrl + Y Redo the last action performed
Ctrl + Z Undo last action
Ctrl + G Find and replace options
Ctrl + H Find and replace options
Ctrl + J Justify paragraph alignment
Ctrl + L Align selected text or line to the left
Ctrl + Q Align selected paragraph to the left
Ctrl + E Align selected

Managed Debugging Assistant ‘ContextSwitchDeadlock’

If you run into the ContextSwitchDeadlock issue, it doesn’t mean your code is actually broken. You can actually turn this exception off through the settings menu of Visual Studio. You have a couple of options when it comes to fixing this issue!

This is the error I received:

Managed Debugging Assistant 'ContextSwitchDeadlock'
Managed Debugging Assistant ‘ContextSwitchDeadlock’

There are two simple fixes for this issue, the first is to simply turn the option creating this error message in visual studio.

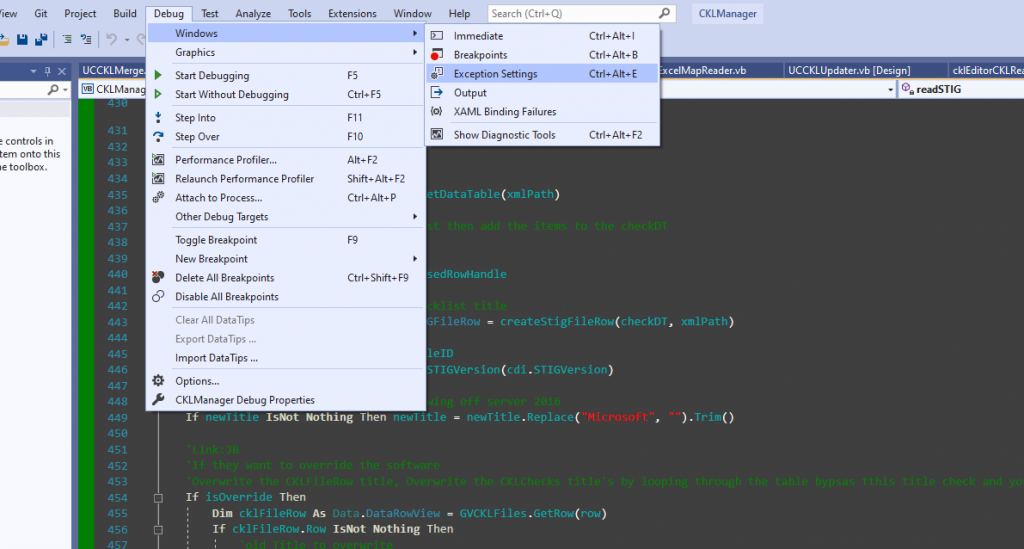
To turn this option off you need to go to exception settings by clicking Debug -> Windows -> Exception Settings

Open Exception Settings in Visual Studio

After that we need to expand Managed Debugging Assistants and uncheck ContextSwitchDeadlock

ContextSwitchDeadlock option

The other option is going to be just adding Application.DoEvents() to the section of code that is locking up the application and not pumping messages anymore. This way the system will know that the application hasn’t crashed and is still continuing to work properly.

Whichever way you solve the issue, I hope this guide helped! Thanks for reading and I’ll see you in the next one!

SSL_Module trouble while using CertBot

Are you having trouble setting up SSL using Certbot? Lets figure out your ssl_module issue and get your site secure again!

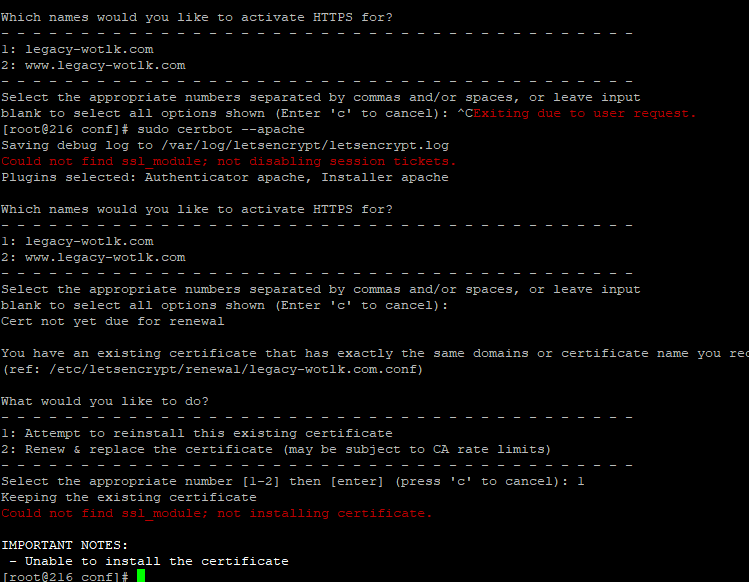
I was having a lot of issues because of the following two error messages…

Could not find ssl_module; not disabling session tickets.

Could not find ssl_module; not installing certificate.
Certbot failing due to ssl_module

I had googled this multiple times, with search queries such as: could not find ssl_module; not installing certificate and could not find the answer! It turns out that the answer was really simple!

You just have to run the below command and it will fix everything!

sudo yum install mod_ssl

This is the command for CentOS. The install command could be slightly different for you if you are using a different Linux distro.

You may have to use apt-get instead of yum if you aren’t using a Red hat based distro.

Once I ran the above command and installed the SSL module we were off to the races!

SSL Module installation

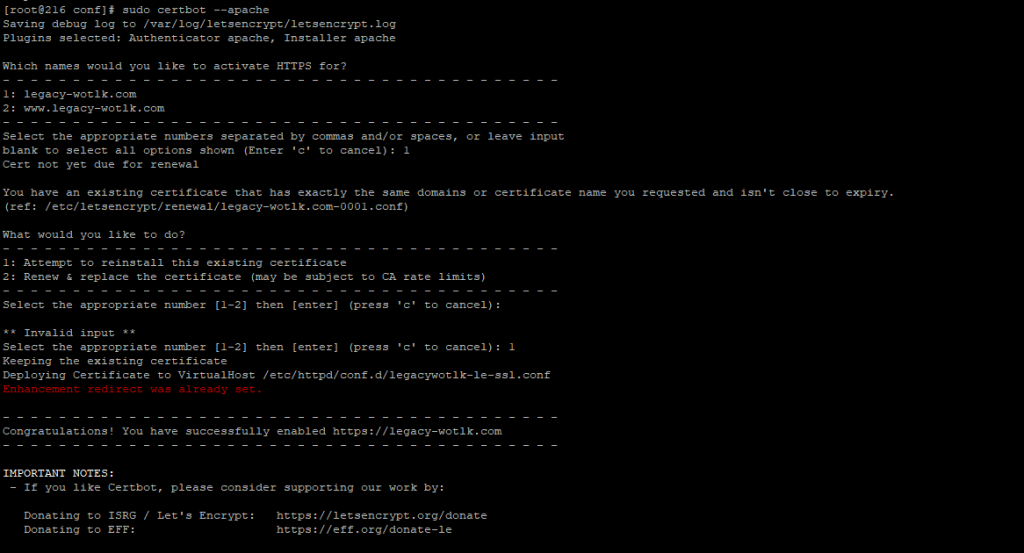
At this point, I was able to run Certbot again and it ran correctly! That’s all there was to it!

Certbot running successfully

The command I used to run certbot is listed below but it was a very simple command. Just sudo certbot –Apache but just in case that helped, I figured I would list it too

Sudo Certbot --Apache

Thanks for reading! I hope this helped! I was stuck on this for about an hour… Hopefully this got to you early in your search!

Beginning C# – If Statements – Beginners guide to if statements in C#

alright!

Darren here and welcome back to another c-sharp tutorial!
So, last time we worked on a hello world tutorial. If you missed it, I highly recommend starting there if you are brand new!

I’m going to assume at this point you know how to make a simple windows form and drag a button on it.
Today we are going to be talking about if statements in C#.

alright, so first we are going to make a simple little form that will turn a box green or red based on some conditions.
We are going to assume this is for a movie theatre entrance and make 18 the barrier for entry.
If the person is below 18, the box will turn red and if they are over 18 the box will be green!

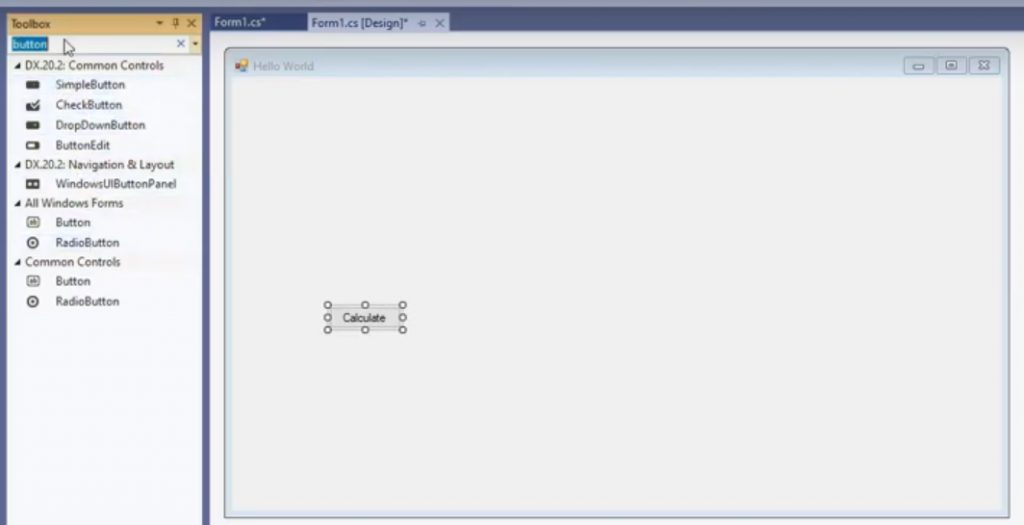
so, we start off with getting a button and placing it on the form. This button is just going to say calculate.

Button Calculate

Alright, next we will rename it to button calc.
This button is actually going to be what runs our code. (the button’s click event triggers the event handler)

Next, we need to grab a textbox from our toolbox. This textbox will store the movie patreon’s age.
After adding this textbox, we need to rename it txtAge.

textbox and button

so after getting the button and textbox set up, we are going to need the actual PictureBox that’s background color will be changed.
Drag a PictureBox over from your toolbar and then rename it to pbResult. I’m calling it pbResult because we will be using it to display our results.

The last control we are going to bring over would be a label to make the form look a bit better. Change the text of the label to say “age” and center everything in the middle of the form.
It doesn’t have to be the best-looking form ever since this application is just for learning purposes. After that, rename the label to lblAge and that’s it for our controls.

controls

Now that we have our simple little form built out, we need to handle the button’s click event.
To do that, you need to go to your button and select it. Now hit f4 to open the properties window on the right.
Once you are there at the top right, there will be a lightning bolt symbol that once pressed switches from properties to events.

Click Event

After clicking on that button and getting to the events view, you should see the “Click” event in the list. Double click on the click events row and Visual Studio will take you to the code window.
It will have also written out a click event handler and place you inside of the new function it created.

Click event with code

Once you are inside of the newly created function, it is time to write a simple IF statement. The new if statement should say “if textbox text is greater than 18 then make the background color of the PictureBox green.”

You will most likely see a squiggly line. If you see it or not will be based on your current Visual Studio settings.
Visual Studio is showing this warning because the text inside the textbox is actually a string instead of an integer. Strings can hold letters and numbers, so the compiler is worried that the user could cause an error.

The way to stop the warning would be to wrap int.parse() around our string to convert it into an integer(number).

So the resulting code would look like this.

if (int.Parse(txtAge.text) > 18) 
{
   pbResult.BackColor = Color.Green;
}

Ok, now we can run the program and input an age. So first we put in 20 to test and the PictureBox should turn green. After that, stop the application and re-start it.

Testing


If you put in 10 this time, the PictureBox won’t turn green. Nothing will happen actually since our if statement’s condition wasn’t true.
The value has to be more than 18 for our code to run.

You can put in 19 to see it turn green again before closing it. Now let’s beef the application up a bit.
This time we want to include people that are 18 and not just over 18. To do that, we will need a greater than or equal to sign, which is what the operator I used below is.

Greater than Or Equal To

we can come back and we can say it’s 18 that’s greater than or equal to 18.
So, it turns green but the problem is that if we say 18 and then we change it to 12 it stays green because we don’t have any code setting the color to red.

So, what we can do is drop-down below the if statement and add an else.

This else is actually a part of the if statement. So we want to say “else” set the background color to red instead of green.

if (int.Parse(txtAge.text) >= 18) 
{
   pbResult.BackColor = Color.Green;
}
else
{
  pbResult.BackColor = Color.Red;
}

Once you add the new else, your if statement now reads “If the text boxes text is greater than or equal to 18 set the PictureBox background color to green otherwise set it to the color red.”

Alright, now run the application again with the else in place. Now we can input “19” and get green, then once we change the text to 10 and click the button, we get a red background!

Test with 10

okay, so next we are going to add in an else if which will be our last thing for today.


While an else is a catch-all for anything that doesn’t satisfy the if statement, else-if is similar but has a specific condition check as well.
This allows you to say something like: “if the first thing isn’t true BUT this other specific thing IS true then do this instead.”

if (int.Parse(txtAge.text) >= 18) 
{
   pbResult.BackColor = Color.Green;
}
else if (int.Parse(txtAge.text) == 17)
{
   pbResult.BackColor = Color.Blue;
}
else
{
  pbResult.BackColor = Color.Red;
}

So, with the else-if in our example, we are going to say if the age is 17 then we set the background color to blue.
Our logic is that the worker needs to make sure the kid looks mature enough or something.

anyways, to do this we are going to say if it’s greater than or equal to 18 it needs to be green else-if they’re 17, set it to blue, otherwise set it to red.

Now we run this and test it by inputting 20. This should set the picture box to green, if we change the text to 17, the picture box should turn blue.
Lastly, if we set the number to 16, the picture box should turn red.

Else if example

So, that is it really! That about sums up if statements in C#!

They are a really nice construct and you are going to use this over and over again.

This will be very similar in C#, Java, Python, Javascript, VB.Net etc.
You may have curly bracers “{ }” or the words “then” and “end” in vb, the syntax changes a little but the concept is the same.
If this then do this, else if this then do this other thing and else do that.

The cool thing is that once you get a handle on If Statements and learn how to put a simple form together, you will be able to make so many cool things!

That’s it for now,
I really hope you guys learned something from this and join me in the next one!

I’ll see you in the next one!

Beginning C# – Hello World – Create a basic windows app in Visual Studio 2019

hey everyone!
Darren here and today we’re going to be learning c sharp. We are going to kick this off by creating a hello world application!

This is going to be a simple little application where we have a label that says some text and we’re going to click on a button to change what that text says.

We may change some styles of the label and a couple of other things but this will be great to get you started learning software development!

Hopefully, this will help you get started. This is not going to be the most complicated application ever but let’s get right into it!

Okay, so first we are going to choose windows forms application c-sharp for windows.

We are going to click next and then we are going to call this project “hello world”.

Name your project

It is going to save in our repos folder, which is where visual studio 2019 saves all of it’s new projects by default. We are also going to use the latest version of the.net framework we have installed. After that we click create and then it’s going to open a new project with our new form.

New form

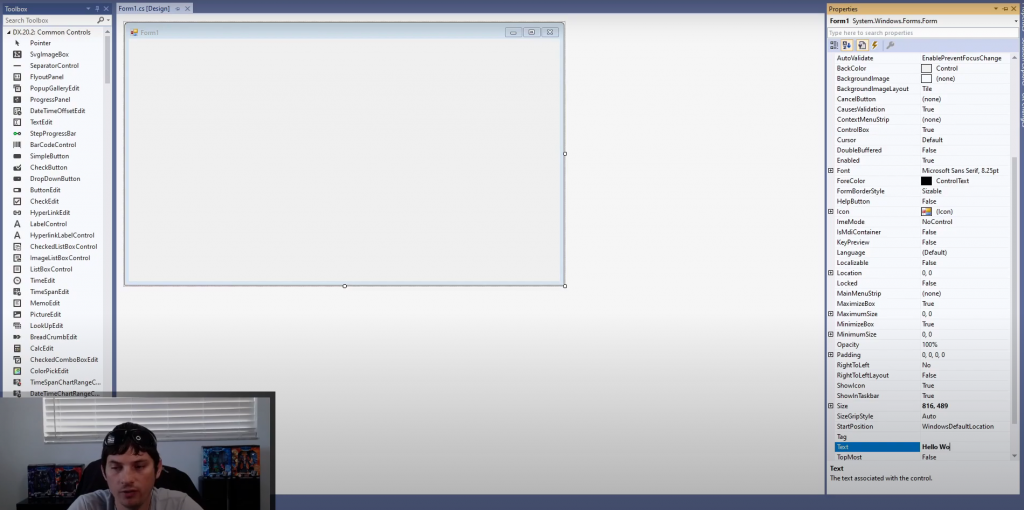
Just for fun i’m just going to change the text property on our form so i have this whole form selected and i choose the text property and just change the text to “hello world” and it’ll change the text up here.

Title text

Next, I’m going to go ahead and run this. When it’s running you can see that the text up top now says is “hello world” in the title. Visual Studio generates a regular form that looks just like every other application, you can drag it around, minimize and maximize it.

That all works but it’s simply a blank form for now.

Next, we are going to add some text to that form. The control to add text in C# would be the label control. So we are going to drag over a label here.

Next, I’m going to bring up the properties window for that label and you can change the text of it right here. I’m gonna change the text to “test”. I’m also going to rename the label to a test name. The name property is what you would reference this label by in code.

Alright, so now that our label has some new custom text and it has a new name. We are going to make our label bigger so we can see it better.

we will start by making it 48 point to make it super big! Something else cool you can do is: go up here to format and center the label in the form horizontally. After this our label is ready to go.

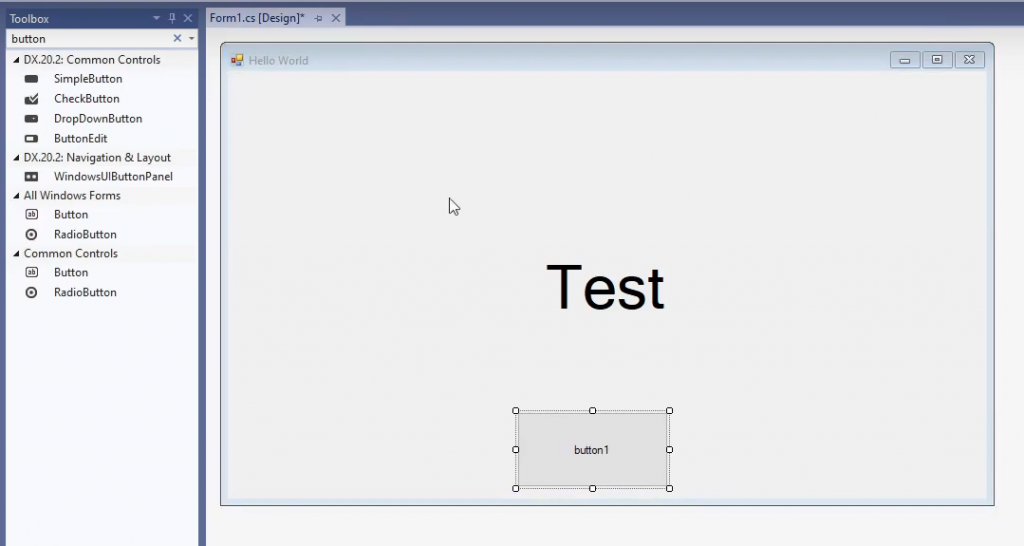
Test Label

Next, we are going to start our project and now we have this label in the middle of our form that simply says “Test”.

Alright, so now we want to add a button because we’re going to actually make some stuff happen. So we head over to our toolbox on the left and drag this button over to our form.

Button on form

Let’s head over to Format and center this button horizontally. I’m also going to change the text of the button just to say “click me!” using the text property.

Next, let’s name it “BtnClickMe”, so now we have a button called button click me and we have our test label ready to go.

With any of these controls that are on a form, they’re going to have events that you can access from the properties window. So if you come over here to events, there is a click event for this button and this will allow you to execute custom code when this button is clicked on.

If you select over here on the right side of the click event in the properties window and double click, visual studio will actually generate the click event handler for you.

Click event location

Once you have the method generated in code, click inside of it and we are going to write one line of code that will change the text of our label.

lblTest.Text = "Hello World!";

First, we call it our lblTest and lblTest has a Text property. The actual text of this label is stored inside of this Text property. We set this text property equal to the text “Hello World!”.

“Hello World!” has to be in quotes because that is how you tell C# it is a string. The last thing is the semi-colon on the end, which is customary in any C-Syntax based language.

The resulting function looks like this:

Hello world function

This will get executed when the button is clicked because this is the click event handler of that button.

So, next, we head back to the designer where we can hit start and run the program.

Run

So, now we’ve got our little label that says “Test” and then when we click our button, the label changes to “Hello World!”. It’s really that easy to get events firing and change simple things on the form.

For fun, we are going to go ahead and change the font color of the label when the button gets clicked, so you kind of get a better idea of what’s going on.

So, to do that, our label actually has a forcolor property that controls the foreground color. We are going to set that to Color.Red to set the foreground color of the label to Red.

LblTest.ForeColor = Color.Red;

Color.Red is just the enumerator for the color red. This literally just means red. so, we run the application again and click our button. now it says “Hello World!” and our text is now red.

Red Hello World

alright, so to keep this short and simple, we are going to end off there. I hope you were able to set the color to red on your test form and get the text to say Hello world.

After you get this going, you can definitely play around with other options and for example, set the label’s back color to black.

There are lots and lots of properties you can change and all kinds of other details about the label control you can edit on the fly.

I also want to point out that there are tons and tons of other controls out there. The possibilities are nearly endless. I really recommend just creating a new project and playing around with all of these different controls. Just start learning everything you can!

Alright, that about wraps it up for this one. I really hope that you learned something from this. I know this isn’t the most complicated project every but we will definitely get into more complicated projects going forward.

Well, thanks again and I’ll see you in the next one!