How to install Node.js, NPM and Express in Windows

Introduction

Node.js allows the development of web servers in JavaScript! This allows your front end and back end to both be created using Javascript! With this, you can create a scalable server without needing to implement threading. You can instead use event-driven programming that uses callbacks!

NPM, which is more commonly known as Node Package Manager is an application used to install node packages. This allows us to install things such as Express!

This quick guide will walk you through the process of installing and updating Node.JS, NPM and Express on Windows 10. We will also show how to set up your first Node.js site step by step!

Requirements

  • The method used in this guide requires Windows 10
  • User account with administrative rights (or at least the ability to download and install programs)
  • Access to command line (Start -> Run -> type CMD)

How to install Node.js, NPM and Express in Windows

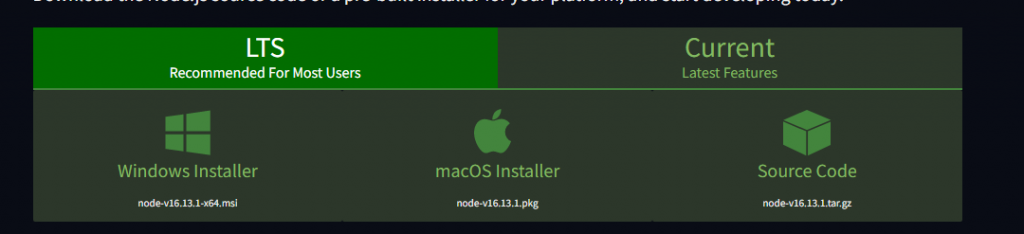
Download the Node.js installer

Navigate to the install page located at https://nodejs.org/en/download/. Once you are there, click on the Windows installer link to download the latest version for windows. This Node.js install will include NPM package manager. You will not have to download that separately.

Run the Node.js installer

  1. Now that you have the installer downloaded, either open your downloads folder and open the installer there or click the file icon at the bottom of your browser to launch the downloaded file.
  2. The system will verify that you would like to open the software – click Run
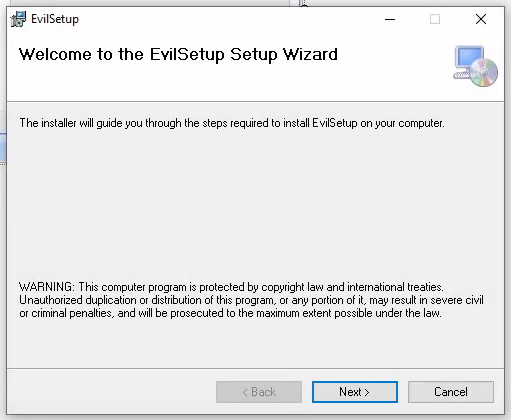
  3. Node.js will show you a welcome screen – click Next
  4. The next screen is the license agreement. Review this and the terms for installing the software – click Next
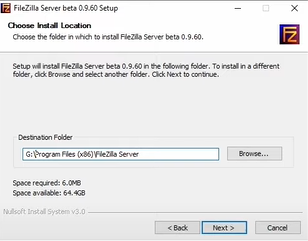
  5. The installer will ask for an installation location. Either leave the default location or choose a new location – click Next
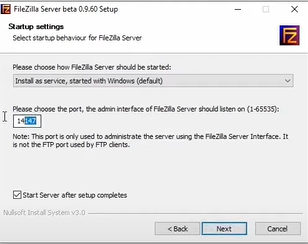
  6. Next the installer will ask if you would like to change any components. either leave it set to default or modify as needed – click Next
  7. Now we just click the Install button and the installer will install Node.js and NPM

How to verify Node.JS and NPM are installed

To verify that Node Js and NPM are installed is actually really easy.

The first thing you need to do is open Command prompt or Windows Powershell and type the following command:

node -v

This command will show you the node version, which will indicate that it is installed. If you don’t get a version back then Node is not installed.

To verify that NPM is installed, get its version using the following command:

npm -v

As long as this returns a version, then you will know that NPM is installed as well!

Check Node.js version

How to update Node.js and NPM in Windows

The fastest method for updating Node.js and NPM will be to navigate to https://nodejs.org/en/ and download the latest version. Once you navigate to the download page, you can compare the version there against the version we found using the above command line functions to check your Node.js version.

To update Node.js, download the windows installer from nodejs.org and open it. The wizard will guide you through the process and will uninstall the old version and replace it with the new version of Node.js.

How to uninstall Node.js and NPM in Windows

The windows control panel is the best method for uninstalling Node.js on windows.

The steps to uninstall Node.js are:

  1. Open the start menu

    Open the start menu by clicking on it or using the Windows key to bring it up.

  2. Open the Settings screen

    Click the Settings button which looks like a cog wheel (or gear) icon

  3. Open the App page

    Once you have the Settings screen open, click on the Apps button.

  4. Find and hilight Node.js

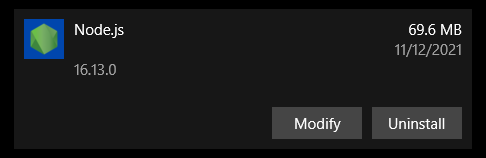
    Scroll through your list of installed applications and find Node.js. After you find Node.js in the list, click on it to highlight it.

  5. Select Uninstall

    Click on the word Uninstall under Node.js. Clicking on Uninstall will launch the uninstall software wizard and walk you through the process from here.

Uninstall Node.js

How to use Node.js in Windows

Node.js is a development framework and not a regular application. That means that it interprets commands that are written. We are going to setup a little test script to ensure everything is working perfectly!

1. Open the text editor of your choice. (I recommend Visual Studio Code)

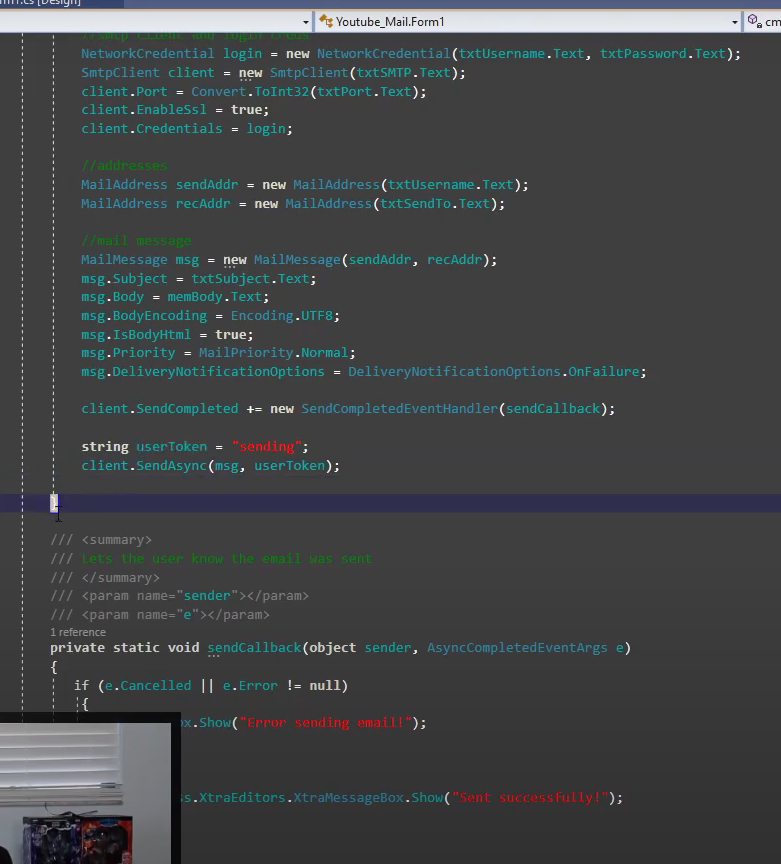
2. Copy and paste the following code into your editor:

var http = require('http');
 http.createServer(function (req, res) {
   res.writeHead(200, {'Content-Type': 'text/html'});
   res.end('This is our first test!');
 }).listen(8000);

3. Save the file and exit the text editor (or use the in editor terminal window). Open Command prompt and input the following command:

node \path\to\thenewfile.js

Make sure the path to the newfile is changed to the path to your newly written file. This will tell Node where the server file is to run it. After this runs, it will look like nothing has happened. but in reality your script is constantly running in the background.

Windows defender may popup with a warning. For now, allow the application through windows defender so your website will work as intended.

4. Open your web browser and navigate to the following url:

http://localhost:8000

You should see “This is our first test!” in the top left corner of the page!

If everything works perfectly, your computer is now acting as a server. Any computer connecting to your computer on port 8000 will see the message “This is our first test“.

The only trick is that nobody outside of your router will be allowed access without enabling port forwarding. Your router will just block their request before your computer has a chance to respond.

Wrap Up

Now that we have gone over how to install, update, remove and set up Node.js and NPM you should be ready to go! I can’t wait to hear about what applications you all have designed!

The sky is really the limit with this technology and I hope I helped you set up your own install of Node.js!

FAQ

Where is NPM Installed on Windows

On a Windows system, the Node Package Manager (npm) is typically installed alongside Node.js, which is the JavaScript runtime that npm uses.
When you install Node.js on a Windows system, the installer will add the Node.js executable (node.exe) to the system’s PATH, and it will also install npm in the same directory.
You can find the directory where npm is installed by running the following command in a command prompt:

where npm

This will return the location of the npm executable on your system.
Alternatively, you can also run “npm root -g” This will return the npm global packages path.
Once you know the directory where npm is installed, you can access it in the command prompt by simply typing “npm”, and you can use it to install and manage packages for your projects.
Please let me know if you have any other questions.

Where is nodeJS installed on windows

When you install Node.js on a Windows system, the installer will add the Node.js executable (node.exe) to the system’s PATH. This allows you to run the node command from any directory in the command prompt.
You can find the directory where Node.js is installed by running the following command in a command prompt:

where node

This will return the location of the node executable on your system.
You can also check the version of node by running “node -v” command.
By default, the Node.js installer for Windows will install Node.js to the following location:

C:\Program Files\nodejs

This is the default directory where Node.js will be installed, but the actual location on your system may be different, depending on the options you selected when you ran the installer.
You can also check the installed path by checking the environment variables. You can access the environment variables by searching for “Environment Variables” in the start menu, and look for the variable named Path and look for the path where node is installed.
Please let me know if you have any other questions.

How to set up a Windows 10 FTP server – FileZilla FTP Server setup

How to set up a Windows 10 FTP server – FileZilla FTP Server setup

Using a free tool called FileZilla, we’ll walk you through the procedures to set up a folder on your Windows PC as an FTP repository. FTP allows you to easily transfer large amounts of data between computers; the FTP repository can be mapped to multiple computers across the Internet, allowing others to access the directory directly from Windows Explorer.

Download Filezilla

The first step is to download Filezilla server.

  • Go to https://filezilla-project.org in your browser. It will take us to the FileZilla Server download page if we click Download FileZilla Server.

Install Filezilla

Once the executable setup file is on your system follow the below steps to install it on your OS.

  • Double click on the FileZilla_Server setup file
  • Click on the Yes button, when it will ask your permission to run the setup.
  • Next, select the “I Agree” to accept the terms and conditions of the software.
  • Installing the Standard package is the default option. The only thing that will be unselected is “source code,” which you may choose if you are a developer or want to look at FileZilla’s code. Normally, though, we may leave it unchecked.
Choose Components
  • Select the Next button
Choose a destination
  • The destination folder will set to use the C drive, in case you don’t want to install it there, you can change it. Otherwise, click Next.
Choose a port

Leave the default option “Install as a server, starting with Windows” to let the FileZilla server start automatically with Windows. You can select that option if you wish to start it manually.

For the sake of this lesson, everything else may be left at the defaults except for the parameters listed above. The FileZilla interface will appear after the installation is complete. Now your installation is complete!

Configure Filezilla

When this window appears after installation, simply click OK:

We may now define a directory as an FTP repository after the FTP server UI has loaded. Minimize the UI and create a folder where you want the FTP share to reside if the directory you wish to use isn’t already there.

Add a User Account

Now the FileZilla FTP Server has been installed on Windows 10, we need to create an FTP user that can log in to the server. To set up an FTP user in the FileZilla server, complete the following steps:

  1. Click on the user icon (the Fourth icon from the left). Then, click on the add button and enter the name of the user account to be created and press OK.

  2. On the left side of the window that comes up, click on “Shared folders.”

  3. Once there, click on “Add” underneath “Users.” Enter the username for an account that another computer will be using to access the repository we’re setting up.

  4. Click OK once you’re done entering the account name, and then click on “Add” underneath the “Shared folders” section. Next is to select the directory you would like to share as an FTP repository.

  5. Click OK again. By default, the user we’ve created is able to read files, list directories, and list subdirectories. To give the user further permissions, such as the ability to copy files to this repository, check the boxes beneath ‘Files’ and ‘Directories.’

  6. Click OK once you’re done setting the user permissions.

And now our new FTP server is running!

how to check variables in Visual Studio 2019 – C# and VB.Net

Checking the value of variables while debugging in Visual Studio is one of the best features of the IDE in my opinion! Let’s quickly go over the different ways you can view the values stored in variables at run time!

Time needed: 1 minute.

There are multiple ways to check the variable values depending on the type of variable.

  1. Tooltip

    For simple variables, such as strings and integers, you can hover over the variable in the IDE while the application is paused at a breakpoint and see the value in a tooltip.

  2. Data visualizer

    For more complex variables, such as datatables, you will have to hover over the variable in the IDE while the application is paused at a breakpoint and then click the magnifying glass. This will bring up a window displaying the table data.

  3. Immediate Window

    You can bring up the immediate window and type in “?variableName” and it will output the value of a variable. The immediate window has a lot of other uses too!

  4. Watch Window

    The last method I show is the watch window. This window allows you to constantly track the value of variables as you step through code. This is the best option visually unless you are using complex data types such as Datatables!

I hope these methods help you debug your programs faster! These methods definitely help me out and I wanted to share them with everyone! Thanks for reading and if you have any recommendations that should be added to this list, let me know in the comments section!

How to set up Caching on Laravel 5.7+

If your Laravel based website is having issues handling too many users then you may need to enable caching. Caching is a great way to allow your server to keep up with high demand without adding more costly resources.

With Laravel 5.6+ you no longer need to add custom middleware to set up caching. You can enable client-side browser caching using the built-in cache headers middleware. This makes life very easy!

The easiest type of caching to set up is browser caching. This will quickly take a huge load off of your server because the users will stop requesting large files over and over again. They will maintain the files in a local cache until the time that you set runs out and they request the files again. (Think about how many times a user should be requesting the background image for your site that shows up on every page.)

There are two different ways you can set up browser caching in Laravel.

Setup Caching Globally

The first way is to set it up inside of the MapWebRoutes & MapApiRoutes functions that are in the RouteServiceProvider.php file.

While this way is super easy to configure, you will have issues with any kind of login system. The browser caching will mess up the keys and break things. If your website doesn’t require a login, this is definitely the way to go as it is super easy to implement and will work fine.

Locate your mapWebRoutes inside of RouteServiceProvider.php and add the following line after ->namespace($this->namespace)

->middleware('cache.headers:private;max_age=3600')

Mine ended up looking like this:

MapWebRoutes with caching setup

After that find your mapApiRoutes and add the same line. Mine ended up looking like this

mapApiRoutes with caching setup

That’s all there is to setting caching up globally in Laravel 5.7+

Hopefully, that helps, if you do have a login system though, keep reading on to only set caching up for specific routes that don’t involve your login system!

Setup Caching Specific Routes

The second method is to set the cache for each route in your web.app config file. This method is better than the first if you have a login system because you can skip any routes that interact with your login system.

Skipping the login items will allow your login system to still work while the other parts of your webpage are cached appropriately. This will provide a tremendous speed increase while still keeping your login system in place.

Time needed: 10 minutes.

To setup caching in a specific route

  1. Open your web.php file

    The first step will be to open your web.php file which will have each of your routes in it. Mine is in the root directory and called Web.php

  2. Locate a route that you would like to add caching to

    The next step is to locate a route you would like to add caching to, for me I added it here to my search, commented and favorited routes. You can see the new item on the end of the route.

  3. Add the following code to the end of your route

    Add the following code to the end of your route.
    ->middleware(‘cache.headers:private;max_age=3600’)
    Don’t forget to end the line with a semi-colon and you are done!

  4. We did it!

    Once you have that setup, now when you navigate to the page that you enabled caching for, things like your background will only be requested by the user one time. You should be able to see this by navigating to the page and having way faster reload times.

I hope this helped you guys out! I know it really helped my website out, if you have any questions, ask in the comments below and I’ll try to help!

How to Create a Setup file in Visual Studio 2019 – C# or VB.Net

Today we are going to be talking about how to create a setup file in visual studio 2019! This setup file is a packaged version of your application with a wizard that will guide the user through the entire installation process. This will allow the user to install your latest build with ease!

If you have ever written an application and wanted to create an MSI or EXE installer then this is the guide for you! I’m going to go step by step and show you exactly how to create an installer!

Install Wizard

The entire process is pretty easy and simply requires a visual studio extension that was developed by Microsoft. This extension is not a 3rd party product nor is it terribly complicated to use.

Alright, so let’s get right into it!

The first thing we’re going to need to do is to download the required extension. The extension we will need is called “Microsoft Visual Studio installer project”

You access the Manage Extensions page by clicking on Extensions and then Manage Extensions at the top

Once you are on the Manage Extensions page, search for this extension. It is one of the most downloaded extensions, so it should be at the top of the list. Go ahead and download it, then we can move on to the next step!

Next, we need to restart visual studio to get it to install the extension. Once visual studio closes this little extension installer will install the new extension.

Once the extension installer comes up hit modify and let it progress through. This can take a second to install but it doesn’t take terribly long. It should only take about a minute or so.

VS Extension installer


alright, once that has finished installing, you can open visual studio again.

Now that you have Visual studio open again, you want to open the project that you would like to create the installer for. because it’s going to be a second project inside the same solution.

alright, so now that we’ve got our extension ready to go we are going to right-click on the solution and add a new project. This new project is going to be the setup project. Search for the setup project template and choose that as your new project type.

Setup Project Template

Once you select Setup Project, give it a name and then click create. This will create a second project under your Solution with the name you provided.

If you open that project, you will be greeted with the setup project’s main screen as shown below.

Setup project

Inside of this project, there will be 3 folders:

  • Application folder: This is where your exe and assembly files will be placed.
  • Desktop folder: This will be where we put items destined for the user’s desktop.
  • User’s Program Menu: This will be where we put items to be added to the user’s program menu.

To configure your new setup project follow these steps

  1. Add a new project output to the application folder.

    Select the Application Folder and then right click and select “Add a new Project Output”. This will copy over all of your dll’s and main exe from your other project. This will look just like your typical Debug folder contents. Add -> Project Output -> “Primary Output”

  2. Create a new shortcut using the primary output item

    Right click the Primary Output item that was added when you added the new project output to the Application Folder. Select “Create Shortcut” to create a new shortcut that we will later move to the desktop section.

  3. Import a file to be used as a shortcut icon

    Right click again, select Add and choose to add a file. Browse for an ico file and import it.

  4. Update your shortcut’s icon to the new imported icon

    Right click on the new shortcut we have created, select “Properties Window”, from here change the icon by clicking browse on the right. Browse into your Application Folder and choose the new icon.

  5. Copy your shortcut to the User’s Desktop folder

    Drag your new shortcut over to the User’s Desktop folder on the left side of the split-screen. This will make the wizard create that shortcut on the user’s desktop when the application is installed.

  6. Create another shortcut and put it in the User’s Programs Menu

    Now that you have the desktop shortcut in place, we need to create one more identical shortcut. Follow the same process to create the shortcut and set it’s icon. After you have the new setup created, right click on User’s Programs Menu and select to create a new folder. Create a folder for your shortcut to be under and then move your new shortcut into that folder. Now the User’s Programs Menu will have a shortcut created in it.

  7. Update the properties of the new setup project

    From this point, I would update a few properties of the setup project.
    Author: company or person who wrote the application
    Description: simple description about the app
    Manufacturer: Used for the install location.
    Those are the only properties I updated in my example.

  8. Setup Prerequisites

    If you right click the Project and select Properties, you can then click on a button that says “Prerequisites…” This will bring up a screen where you can choose to have certain prerequisites such as certain .net framework versions install with your application.

  9. Build the setup project and Give it a test run!

    Right-click on the project and choose build. Once it finishes building, right-click again and select “Open Folder in File Explorer”. This will bring up a folder with your install files in it!

Congratulations! That is all there is to it! At this point, you should have a working setup project! I hope this guide was helpful! I’ll see you in the next one!

Beginning C# – While Loops – Beginners guide to While Loops in C#

Hey everyone! Today we are going to be learning about While loops in C#. This is going to be a quick tutorial on how and why we use While statements and a general introduction to loops in programming.

A while loop is used to execute a block of code over and over until some condition is met.

For a simplified English example: “While the background color is red do these things.” This would do [these things] over and over until the background color is no longer red.

The while loop is very similar to a “for” loop. It will loop over and over again until the condition is met. This is the structure of a while loop:

while (condition)
{
//code to be executed
}

The main difference between a for loop and a while loop is that the while loop doesn’t increment the variable that it is testing each loop. Typically a for loop will be used when you have a set number of times something needs to happen. A while loop, on the other hand, is used when you need to loop until something is true or false.

This would be an example of a while loop that works just like a for Loop. Notice how there is a specific line to increment i, it doesn’t get incremented by the while loop itself.

While loop

Alright! let’s make a sample application!

Looping Application

To create this sample while loop application follow these steps:

  1. Create a new Windows forms project

    Open Visual Studio and create a new Win Forms application.

  2. Add a “Max” textbox

    Drag over a textbox from the toolbox and rename it txtMax. This will be used to store the number we would like to loop to.

  3. Add a “Max” label

    Add a label control to the left of the Max textbox, set it’s text property to Max as shown above.

  4. Add a list to show items

    Add a new list box to the form. We will use this to show results as the while loop runs. Rename this list box to LstItems.

  5. Add a Calculate button

    Drag a button over from the toolbox and change it’s text property to Calculate. Also change it’s name to btnCalc.

You should now have your sample form built and it is time to start writing code. I would go ahead and run the application, just to make sure everything is working properly before we begin writing code.

Once you have verified that your application is running properly, it is time to start writing code. First double click on the Calculate button. This will create an event handler for the buttons click event. Inside of this function, we are going to write a while loop that runs from 1 to 18. Inside of this loop, we are going to have it add an item to LstItems that displays the current age. The code for that looks like this:

int age = 1;
while(age <= 18)
{
LstItems.Items.Add(age);

Age = Age + 1;
}

Alright, now that we have our code written, it’s time to give the program a whirl! Your results should look like this:

loop from 1 to 18

Your Listbox should now show 1 to 18!

If you want to better visualize this process, you can add a breakpoint on the while statement (by clicking the line to the left of the line numbers in Visual Studio) and use F10 to step through as the code executes. This should help you really understand what the code is doing by watching it execute line by line.

breakpoints!

Alright, so we know how to use a while loop to count numbers, let’s create one more example. This example will read line by line through a file and when it runs out of lines the loop will end. This is something someone would use a while loop for instead of a for loop.

You will need to create a file and store a few values in it. I personally listed a few different foods in my text file and saved it to C:\Test\LoopTest.txt
My contents looked something like this:

Pizza
Hamburger
Hot Dog

Now that you have saved it somewhere, the code you will need to read this file is this:

LstItems.Items.Clear(); //This will clear our listbox out
System.Io.StreamReader sr = new System.IO.StreamReader("C:\\Test\\LoopTest.txt");
String currLine = sr.ReadLine();

While(currLine != null)
{
LstItems.Items.Add(currLine);
currLine = sr.ReadLine();
}

You may have to adjust the file location the stream reader is reading from but other than that, this code should run fine.

This code will first clear your list box, then it will read through your file and add each value to the list box until it runs out of items to read. Once the StreamReader has read the last item in the file, the next ReadLine will set currLine to null and that is when our test will fail and the While loop will end.

That’s really all there is to while loops! I hope this helped and I will see you in the next one!

How to Send email using C# and Gmail

hey everyone! Today we are going to be writing a simple application in CSharp that can send emails!

This application is going to be a simple little SMTP Client that will interface with Gmail’s Servers using your username and password. Since this is a pretty simple task, there isn’t a whole lot of code, so it’s a great project to start learning with!

Alright! Let’s get right into building the application!
In this tutorial, I’m going to be using the Devexpress components. They work just like the default windows components, they just look a little better.
The code behind is what is important and it will look almost identical regardless of the form controls.

Devexpress Blank application

Once you create your new windows forms project follow these steps to build out the UI

  1. Rename the form and change it’s text property

    Rename the form by hitting f4 to access the properties window

  2. Grab a groupbox and rename it to “Mail”

    Drag a group box over from the toolbox window. Change it’s text property (or caption) to Mail

  3. Drag over another group box and rename it to “Settings”

    Drag a second group box over from the toolbox window and change it’s text property to Settings.

  4. Add a splitter panel

    Drag a splitter panel over and put the Mail group box in the first half and the Settings group box in the second half.

  5. Dock the splitter panel to fill

    Have the new splitter panel fill the form out. Set Horizontal to false, so we have a Mail section at the top and Settings section at the bottom.

  6. Add a layout control to the bottom

    Drag and drop a layout control into the Settings group box. Have it dock to fill and we will use this to add our controls.

  7. Add textboxes to the Settings Layout control

    Add a Username textbox to the Settings layout control.
    Add a Password textbox to the Settings layout control.
    Both of those should be full width.
    Add a Port textbox to the Settings layout control, this should be half width.
    Add an SMTP textbox to the Settings layout control, this should be half width as well.

  8. Add a button to the Settings Layout Control

    Add a button to the right of the Port and SMTP text boxes. Rename this button to Send and this will be the button that sends our mail!

  9. Set default values

    Change the text property of the Username textbox to your Gmail address. Change the text property of the Port textbox to “587”. Finally, update the SMTP textbox text to be “smtp.gmail.com”

  10. Add textboxes to the Mail section

    Add a textbox to the Mail section and label it “To:”
    Add a second textbox to the mail section and label it “Subject:”
    Lastly, add a multi-line text edit to the mail section and label it “Body” (This can be a regular textbox)
    Your form should look like this:


Alright!! Now we have our form completed! It’s time to write some code!

First, we are gonna double-click on the send button, this will generate an event handler which we will put the code to send the email inside of.

Send event handler

The first line of code we are going to write will create a new NetworkCredential object called login. This will be used to pass the username/password to Gmail.

workCredential login = new NetworkCredential(txtUsername.Text, txtPassword.Text);

Next we will need to create an SMTPClient object which will actually send the message. This line looks like the following:

mtpClient client = new SmtpClient(txtSMTP.Text);

After writing that line, you will get an error and have to import System.Net.Mail. That line looks like this:

using System.Net.Mail;

After you have that setup, it is time to set our client up so it can send the message. The first setting we are going to set is the Port number. This needs to match google’s port number which is 587. This line converts our textbox’s text to an integer (variable type for numbers) and sets the client’s port to the number stored in our port textbox.

Client.Port = Convert.ToInt32(txtPort.Text);

Our next thing will be to enable SSL. Google requires SSL be enabled to use Gmail. So that code looks like this:

client.EnableSSL = true;

The last thing we are going to do is pass the credentials to the new client object and thanks to previously creating the login variable, that line looks like this:

client.Credentials = login;

Now that our client is setup, we just need to create the mail addresses and we will be ready to form our message! The code to create our mail addresses is listed below.

MailAddress sendAddr = new MailAddress(txtUsername.Text);
MailAddress recAddr = new MailAddress(txtSendTo.Text);

Next, we will need to create a new Mail Message, this is the actual content of the message.

I’m going to explain each line in paragraph form and then show the block of code after so it will be easier to copy/paste.

First, we create the object, passing it the sender and receiver addresses. After that, we pass the subject textbox’s text property as the subject. Then we pass the memo edit’s (or textbox if you used that instead) text property as the body. After that, we set the BodyEncoding to UTF8, I wouldn’t worry about this, it’s just a character encoding type. IsBodyHTML is just used to tell if the email contains HTML markup or not, I used true for this and it worked fine. Priority seems like a silly property but normal makes the most sense. Lastly, DeliveryNotificationOptions will notify you if the message fails to send.

MailMessage msg = MailMessage(sendAddr, recAddr);
msg.Subject = txtSubject.Text;
msg.Body = memBody.Text;
msg.BodyEncoding = Encoding.UTF8;
msg.IsBodyHtml = true;
msg.Priority = MailPriority.Normal;
msg.DeliveryNotificationOptions = DeliveryNotificationOptions.OnFailure;

Alright! That was a huge block of code and we are almost there! Your code should look something like this now!

Send code so far

Now we need to set up the Send Completed event handler. This isn’t totally necessary but it is nice that our application will be able to display an error if the send fails.

Below DeliveryNotificationOptions, we need to add the following code:

client.SendCompleted += new SendCompletedEventHandler(sendCallback);

This line will call the sendCallback function with a result. Now we just need to write that function!

private static void sendCallback(object sender, AsyncCompletedEventArgs e)
{
    if (e.Cancelled || e.Error != null)
     {
         MessageBox.Show("Error sending Email!");
     }
     else
     {
         MessageBox.Show("Sent Successfully!");
      }
}

This will show an error message or success message depending on the result!

Our very last lines will be the lines to send the email! This will be added back inside of our click event handler below the SendCompleted line!

string userToken = "sending"
client.SendAsync(msg, userToken);

The resulting code will look like this, sorry the box cuts off a little bit of the sendCallback code.

Completed Code

Once you have the code in place it is time to give it a test run! We have to change one setting in google to make this work. Google “Low Security Applications”, the top link should be a support.google.com link.

Less secure app access

After that, you need to click Less Secure App Access and allow Less secure Apps.

Without this option turned on, Google will not send your emails!

Once that is all set up, build your application and fill it out, this is what my application looked like all filled out!

SMTP client filled out

Once I hit the send button, the email sent! This is my test email that worked. Thanks for reading, I really hope this helped you out! If you have any questions, let me know in the comments below!!

Working test email

How to Copy to and from the Clipboard using C#

Hey everyone and welcome back! Today we will be making a C# copy to clipboard style application to learn how to use the C# Clipboard library!

Today we’re going to be learning about the clipboard, which is a really cool thing to be able to use in C#! On top of being a super useful thing to manipulate, the clipboard is really easy to work with!

If you aren’t familiar with the clipboard, what I’m talking about is when you type a word and then right-click and then copy the text. This copies the text to your “Clipboard”

The Clipboard is kind of an invisible notepad that you can copy things to and paste from. For example, you could type your name out, copy your name and then paste it to multiple places. This saves you from typing the same thing over and over again.

Alright! On to the programming! We can easily access this clipboard and have our programs do some pretty cool stuff!

Clipboard App

First, you are going to want to create a sample application like the one I have above (also shown in the video)

This little form has a text box at the top, a picture box in the middle and a button on the bottom. Nothing special there. Next, we are going to go ahead and add some code.

Double click on the button and that will create an event handler for the button’s click event. This is where we are going to do most of our operations.

To access the clipboard we are going to use the clipboard class that is inside of the system.windows namespace. So the first thing to do is make sure system.windows is imported.

using System.Windows;

Once you have system.windows imported, it’s time to use the clipboard.getText function to get the text currently saved to your clipboard.

this.txtGetData.Text = Clipboard.GetText();

Our textbox is named txtGetData and this line will set the text of that textbox to whatever text is saved in your clipboard using the Clipboard.GetText function!

In the video, I wrote some text out in notepad and copied it. Once the text was in my clipboard, all I had to do was click the giant button at the bottom to run the code and have it set the textbox’s text to what I had copied.

clipboard button clicked

The next function we are going to use is the Clipboard.GetImage() function. This can be used to retrieve an image that has been copied to your clipboard. My picturebox is named pbData and the line of code to copy the image from the clipboard looks like this:

pbData.Image = Clipboard.GetImage();

So for our example, I am going to pull up a random image using google images and then copy it to my clipboard by pressing the button.

Image copied to clipboard using GetImage()

Next, we are going to write some text TO our clipboard. This is done in a very similar way. Instead of GetText() we are going to use SetText(). Below is an example of me setting the text of my clipboard to whatever was typed into the textbox.

Clipboard.SetText(txtGetData.Text);
Setting clipboard text

Copying an image to your clipboard is done in a very similar way. The code for that (with a picture box named pbData) is:

Clipboard.SetImage(pbData.Image);

And… That’s about it for copying text & images to and from the clipboard! Those are definitely the most common uses for the Clipboard class but there are two more relatively common things you can use the Clipboard class for. You can copy raw Data to and from the clipboard and you can clear the clipboard.

To copy raw data from the clipboard, you are going to use this function:

Object obj = Clipboard.GetData();

This can be used to copy/paste all kinds of data!

The last item on our list to cover is the clear function. This will erase any data that is currently stored in your clipboard!

Clipboard.Clear();

And that about wraps up working with the Clipboard in C#! I hope this helped you on your current project and thanks for reading!

Managed Debugging Assistant ‘ContextSwitchDeadlock’

If you run into the ContextSwitchDeadlock issue, it doesn’t mean your code is actually broken. You can actually turn this exception off through the settings menu of Visual Studio. You have a couple of options when it comes to fixing this issue!

This is the error I received:

Managed Debugging Assistant 'ContextSwitchDeadlock'
Managed Debugging Assistant ‘ContextSwitchDeadlock’

There are two simple fixes for this issue, the first is to simply turn the option creating this error message in visual studio.

To turn this option off you need to go to exception settings by clicking Debug -> Windows -> Exception Settings

Open Exception Settings in Visual Studio

After that we need to expand Managed Debugging Assistants and uncheck ContextSwitchDeadlock

ContextSwitchDeadlock option

The other option is going to be just adding Application.DoEvents() to the section of code that is locking up the application and not pumping messages anymore. This way the system will know that the application hasn’t crashed and is still continuing to work properly.

Whichever way you solve the issue, I hope this guide helped! Thanks for reading and I’ll see you in the next one!