How to Send email using C# and Gmail

hey everyone! Today we are going to be writing a simple application in CSharp that can send emails!

This application is going to be a simple little SMTP Client that will interface with Gmail’s Servers using your username and password. Since this is a pretty simple task, there isn’t a whole lot of code, so it’s a great project to start learning with!

Alright! Let’s get right into building the application!
In this tutorial, I’m going to be using the Devexpress components. They work just like the default windows components, they just look a little better.
The code behind is what is important and it will look almost identical regardless of the form controls.

Devexpress Blank application

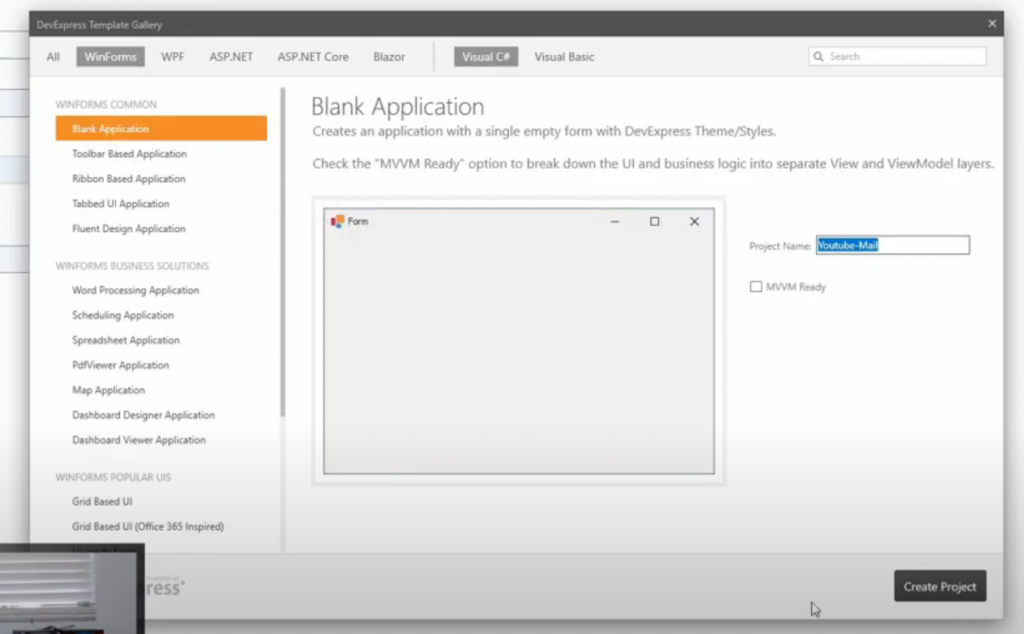
Once you create your new windows forms project follow these steps to build out the UI

  1. Rename the form and change it’s text property

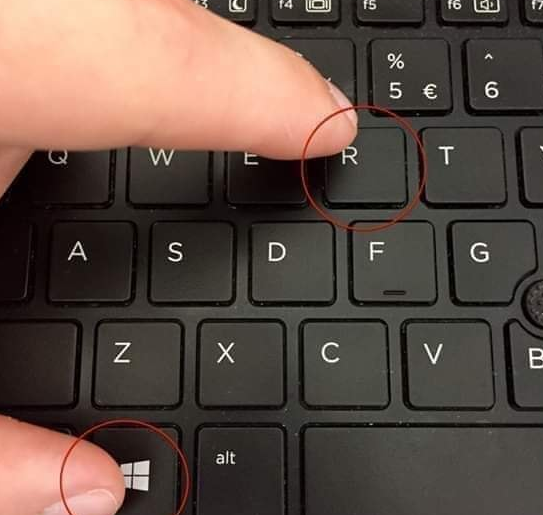
    Rename the form by hitting f4 to access the properties window

  2. Grab a groupbox and rename it to “Mail”

    Drag a group box over from the toolbox window. Change it’s text property (or caption) to Mail

  3. Drag over another group box and rename it to “Settings”

    Drag a second group box over from the toolbox window and change it’s text property to Settings.

  4. Add a splitter panel

    Drag a splitter panel over and put the Mail group box in the first half and the Settings group box in the second half.

  5. Dock the splitter panel to fill

    Have the new splitter panel fill the form out. Set Horizontal to false, so we have a Mail section at the top and Settings section at the bottom.

  6. Add a layout control to the bottom

    Drag and drop a layout control into the Settings group box. Have it dock to fill and we will use this to add our controls.

  7. Add textboxes to the Settings Layout control

    Add a Username textbox to the Settings layout control.
    Add a Password textbox to the Settings layout control.
    Both of those should be full width.
    Add a Port textbox to the Settings layout control, this should be half width.
    Add an SMTP textbox to the Settings layout control, this should be half width as well.

  8. Add a button to the Settings Layout Control

    Add a button to the right of the Port and SMTP text boxes. Rename this button to Send and this will be the button that sends our mail!

  9. Set default values

    Change the text property of the Username textbox to your Gmail address. Change the text property of the Port textbox to “587”. Finally, update the SMTP textbox text to be “smtp.gmail.com”

  10. Add textboxes to the Mail section

    Add a textbox to the Mail section and label it “To:”
    Add a second textbox to the mail section and label it “Subject:”
    Lastly, add a multi-line text edit to the mail section and label it “Body” (This can be a regular textbox)
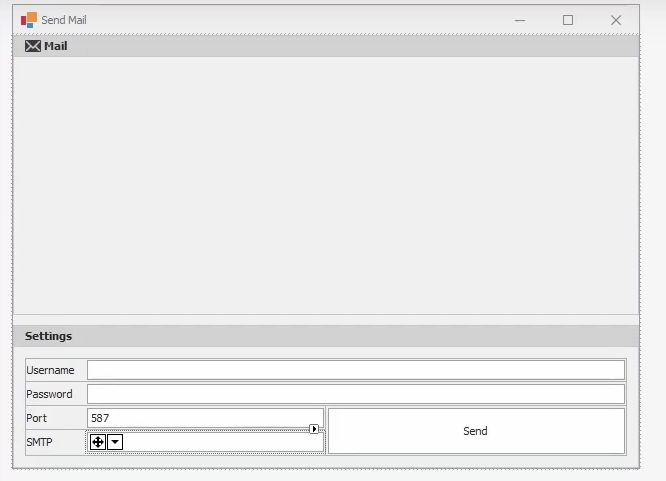
    Your form should look like this:


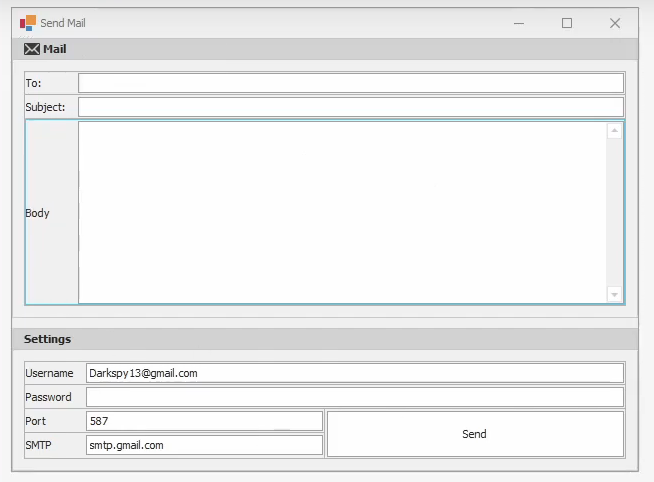
Alright!! Now we have our form completed! It’s time to write some code!

First, we are gonna double-click on the send button, this will generate an event handler which we will put the code to send the email inside of.

Send event handler

The first line of code we are going to write will create a new NetworkCredential object called login. This will be used to pass the username/password to Gmail.

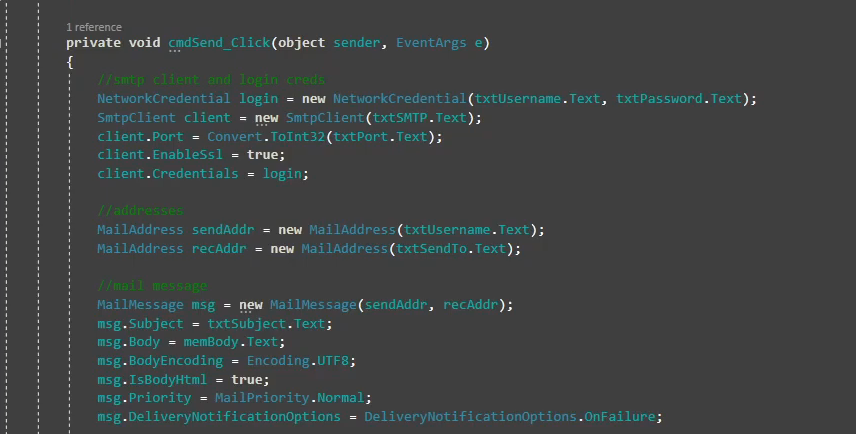
workCredential login = new NetworkCredential(txtUsername.Text, txtPassword.Text);

Next we will need to create an SMTPClient object which will actually send the message. This line looks like the following:

mtpClient client = new SmtpClient(txtSMTP.Text);

After writing that line, you will get an error and have to import System.Net.Mail. That line looks like this:

using System.Net.Mail;

After you have that setup, it is time to set our client up so it can send the message. The first setting we are going to set is the Port number. This needs to match google’s port number which is 587. This line converts our textbox’s text to an integer (variable type for numbers) and sets the client’s port to the number stored in our port textbox.

Client.Port = Convert.ToInt32(txtPort.Text);

Our next thing will be to enable SSL. Google requires SSL be enabled to use Gmail. So that code looks like this:

client.EnableSSL = true;

The last thing we are going to do is pass the credentials to the new client object and thanks to previously creating the login variable, that line looks like this:

client.Credentials = login;

Now that our client is setup, we just need to create the mail addresses and we will be ready to form our message! The code to create our mail addresses is listed below.

MailAddress sendAddr = new MailAddress(txtUsername.Text);
MailAddress recAddr = new MailAddress(txtSendTo.Text);

Next, we will need to create a new Mail Message, this is the actual content of the message.

I’m going to explain each line in paragraph form and then show the block of code after so it will be easier to copy/paste.

First, we create the object, passing it the sender and receiver addresses. After that, we pass the subject textbox’s text property as the subject. Then we pass the memo edit’s (or textbox if you used that instead) text property as the body. After that, we set the BodyEncoding to UTF8, I wouldn’t worry about this, it’s just a character encoding type. IsBodyHTML is just used to tell if the email contains HTML markup or not, I used true for this and it worked fine. Priority seems like a silly property but normal makes the most sense. Lastly, DeliveryNotificationOptions will notify you if the message fails to send.

MailMessage msg = MailMessage(sendAddr, recAddr);
msg.Subject = txtSubject.Text;
msg.Body = memBody.Text;
msg.BodyEncoding = Encoding.UTF8;
msg.IsBodyHtml = true;
msg.Priority = MailPriority.Normal;
msg.DeliveryNotificationOptions = DeliveryNotificationOptions.OnFailure;

Alright! That was a huge block of code and we are almost there! Your code should look something like this now!

Send code so far

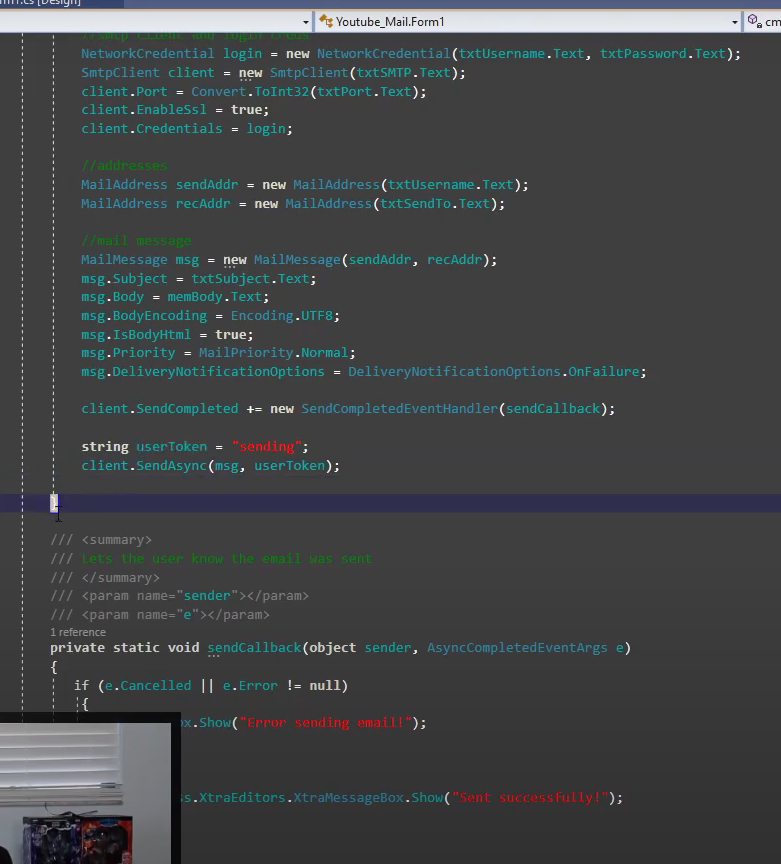
Now we need to set up the Send Completed event handler. This isn’t totally necessary but it is nice that our application will be able to display an error if the send fails.

Below DeliveryNotificationOptions, we need to add the following code:

client.SendCompleted += new SendCompletedEventHandler(sendCallback);

This line will call the sendCallback function with a result. Now we just need to write that function!

private static void sendCallback(object sender, AsyncCompletedEventArgs e)
{
    if (e.Cancelled || e.Error != null)
     {
         MessageBox.Show("Error sending Email!");
     }
     else
     {
         MessageBox.Show("Sent Successfully!");
      }
}

This will show an error message or success message depending on the result!

Our very last lines will be the lines to send the email! This will be added back inside of our click event handler below the SendCompleted line!

string userToken = "sending"
client.SendAsync(msg, userToken);

The resulting code will look like this, sorry the box cuts off a little bit of the sendCallback code.

Completed Code

Once you have the code in place it is time to give it a test run! We have to change one setting in google to make this work. Google “Low Security Applications”, the top link should be a support.google.com link.

Less secure app access

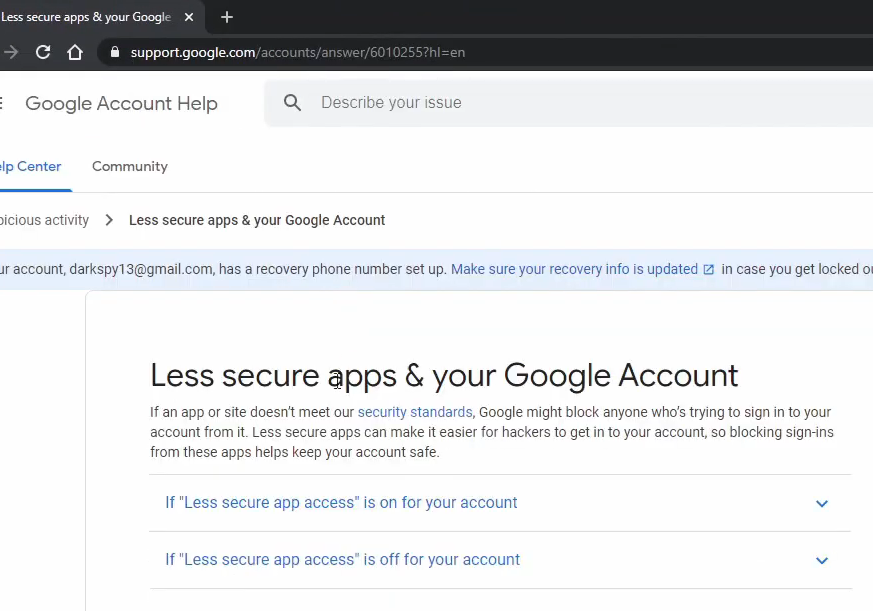
After that, you need to click Less Secure App Access and allow Less secure Apps.

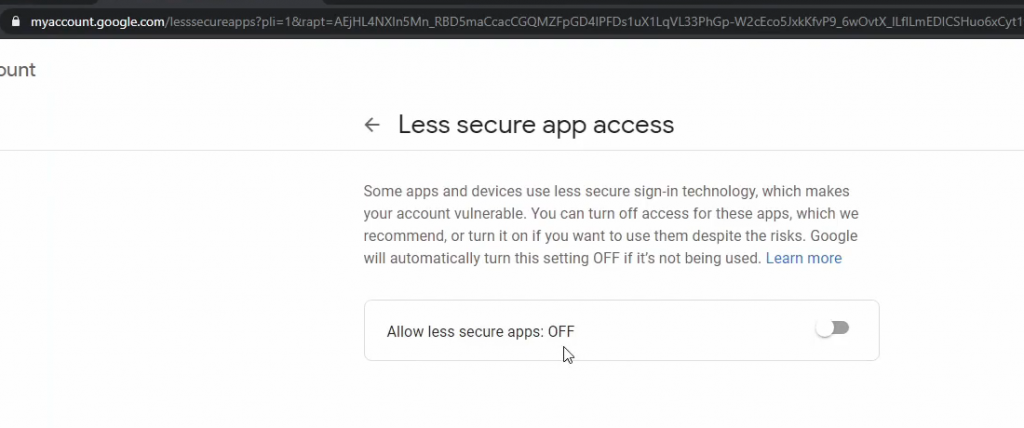
Without this option turned on, Google will not send your emails!

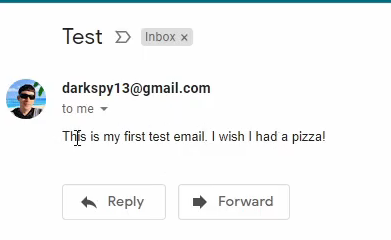
Once that is all set up, build your application and fill it out, this is what my application looked like all filled out!

SMTP client filled out

Once I hit the send button, the email sent! This is my test email that worked. Thanks for reading, I really hope this helped you out! If you have any questions, let me know in the comments below!!

Working test email

How to Copy to and from the Clipboard using C#

Hey everyone and welcome back! Today we will be making a C# copy to clipboard style application to learn how to use the C# Clipboard library!

Today we’re going to be learning about the clipboard, which is a really cool thing to be able to use in C#! On top of being a super useful thing to manipulate, the clipboard is really easy to work with!

If you aren’t familiar with the clipboard, what I’m talking about is when you type a word and then right-click and then copy the text. This copies the text to your “Clipboard”

The Clipboard is kind of an invisible notepad that you can copy things to and paste from. For example, you could type your name out, copy your name and then paste it to multiple places. This saves you from typing the same thing over and over again.

Alright! On to the programming! We can easily access this clipboard and have our programs do some pretty cool stuff!

Clipboard App

First, you are going to want to create a sample application like the one I have above (also shown in the video)

This little form has a text box at the top, a picture box in the middle and a button on the bottom. Nothing special there. Next, we are going to go ahead and add some code.

Double click on the button and that will create an event handler for the button’s click event. This is where we are going to do most of our operations.

To access the clipboard we are going to use the clipboard class that is inside of the system.windows namespace. So the first thing to do is make sure system.windows is imported.

using System.Windows;

Once you have system.windows imported, it’s time to use the clipboard.getText function to get the text currently saved to your clipboard.

this.txtGetData.Text = Clipboard.GetText();

Our textbox is named txtGetData and this line will set the text of that textbox to whatever text is saved in your clipboard using the Clipboard.GetText function!

In the video, I wrote some text out in notepad and copied it. Once the text was in my clipboard, all I had to do was click the giant button at the bottom to run the code and have it set the textbox’s text to what I had copied.

clipboard button clicked

The next function we are going to use is the Clipboard.GetImage() function. This can be used to retrieve an image that has been copied to your clipboard. My picturebox is named pbData and the line of code to copy the image from the clipboard looks like this:

pbData.Image = Clipboard.GetImage();

So for our example, I am going to pull up a random image using google images and then copy it to my clipboard by pressing the button.

Image copied to clipboard using GetImage()

Next, we are going to write some text TO our clipboard. This is done in a very similar way. Instead of GetText() we are going to use SetText(). Below is an example of me setting the text of my clipboard to whatever was typed into the textbox.

Clipboard.SetText(txtGetData.Text);
Setting clipboard text

Copying an image to your clipboard is done in a very similar way. The code for that (with a picture box named pbData) is:

Clipboard.SetImage(pbData.Image);

And… That’s about it for copying text & images to and from the clipboard! Those are definitely the most common uses for the Clipboard class but there are two more relatively common things you can use the Clipboard class for. You can copy raw Data to and from the clipboard and you can clear the clipboard.

To copy raw data from the clipboard, you are going to use this function:

Object obj = Clipboard.GetData();

This can be used to copy/paste all kinds of data!

The last item on our list to cover is the clear function. This will erase any data that is currently stored in your clipboard!

Clipboard.Clear();

And that about wraps up working with the Clipboard in C#! I hope this helped you on your current project and thanks for reading!

Important Windows 10 Keyboard Shortcuts for 2021

Important Windows 10 Keyboard Shortcuts for 2021

Important Keyboard Shortcuts for Windows 10. If you are looking for the best list of keyboard shortcuts then you have come to the right place. This list is pretty extensive and will make your computing that much faster!

CTRL+A. . . . . . . . . . . . . . . . . Select All
CTRL+C. . . . . . . . . . . . . . . . . Copy
CTRL+X. . . . . . . . . . . . . . . . . Cut
CTRL+V. . . . . . . . . . . . . . . . . Paste
CTRL+Z. . . . . . . . . . . . . . . . . Undo
CTRL+B. . . . . . . . . . . . . . . . . Bold
CTRL+U. . . . . . . . . . . . . . . . . Underline
CTRL+I . . . . . . . . . . . . . . . . . Italic
F1 . . . . . . . . . . . . . . . . . . . . . . Help
F2 . . . . . . . . . . . . . . . . . . . . . Rename selected object
F3 . . . . . . . . . . . . . . . . . . . . . Find all files
F4 . . . . . . . . . . . . . . . . . . . . . Opens file list drop-down in dialogs
F5 . . . . . . . . . . . . . . . . . . . . . Refresh current window
F6 . . . . . . . . . . . . . . . . . . . . . Shifts focus in Windows Explorer
F10 . . . . . . . . . . . . . . . . . . . . Activates menu bar options
ALT+TAB . . . . . . . . . . . . . . . . Cycles between open applications
ALT+F4 . . . . . . . . . . . . . . . . . Quit program, close current window
ALT+F6 . . . . . . . . . . . . . . . . . Switch between current program windows
ALT+ENTER. . . . . . . . . . . . . . Opens properties dialog
ALT+SPACE . . . . . . . . . . . . . . System menu for current window
ALT+¢ . . . . . . . . . . . . . . . . . . opens drop-down lists in dialog boxes
BACKSPACE . . . . . . . . . . . . . Switch to parent folder
CTRL+ESC . . . . . . . . . . . . . . Opens Start menu
CTRL+ALT+DEL . . . . . . . . . . Opens task manager, reboots the computer
CTRL+TAB . . . . . . . . . . . . . . Move through property tabs
CTRL+SHIFT+DRAG . . . . . . . Create shortcut (also right-click, drag)
CTRL+DRAG . . . . . . . . . . . . . Copy File
ESC . . . . . . . . . . . . . . . . . . . Cancel last function
SHIFT . . . . . . . . . . . . . . . . . . Press/hold SHIFT, insert CD-ROM to bypass auto-play
SHIFT+DRAG . . . . . . . . . . . . Move file
SHIFT+F10. . . . . . . . . . . . . . . Opens context menu (same as right-click)
SHIFT+DELETE . . . . . . . . . . . Full wipe delete (bypasses Recycle Bin)
ALT+underlined letter . . . . Opens the corresponding menu
PC Keyboard Shortcuts
Document Cursor Controls
HOME . . . . . . . . . . . . . . to beginning of line or far left of field or screen
END . . . . . . . . . . . . . . . . to end of line, or far right of field or screen
CTRL+HOME . . . . . . . . to the top
CTRL+END . . . . . . . . . . to the bottom
PAGE UP . . . . . . . . . . . . moves document or dialog box up one page
PAGE DOWN . . . . . . . . moves document or dialog down one page
ARROW KEYS . . . . . . . move focus in documents, dialogs, etc.
CTRL+ > . . . . . . . . . . . . next word
CTRL+SHIFT+ > . . . . . . selects word
Windows Explorer Tree Control
Numeric Keypad * . . . Expand all under current selection
Numeric Keypad + . . . Expands current selection
Numeric Keypad – . . . Collapses current selection
¦ . . . . . . . . . . . . . . . . . . Expand current selection or go to first child
‰ . . . . . . . . . . . . . . . . . . Collapse current selection or go to parent
Special Characters
‘ Opening single quote . . . alt 0145
’ Closing single quote . . . . alt 0146
“ Opening double quote . . . alt 0147
“ Closing double quote. . . . alt 0148
– En dash. . . . . . . . . . . . . . . alt 0150
— Em dash . . . . . . . . . . . . . . alt 0151
… Ellipsis. . . . . . . . . . . . . . . . alt 0133
• Bullet . . . . . . . . . . . . . . . . alt 0149
® Registration Mark . . . . . . . alt 0174
© Copyright . . . . . . . . . . . . . alt 0169
™ Trademark . . . . . . . . . . . . alt 0153
° Degree symbol. . . . . . . . . alt 0176
¢ Cent sign . . . . . . . . . . . . . alt 0162
1⁄4 . . . . . . . . . . . . . . . . . . . . . alt 0188
1⁄2 . . . . . . . . . . . . . . . . . . . . . alt 0189
3⁄4 . . . . . . . . . . . . . . . . . . . . . alt 0190
PC Keyboard Shortcuts
Creating unique images in a uniform world! Creating unique images in a uniform world!
é . . . . . . . . . . . . . . . alt 0233
É . . . . . . . . . . . . . . . alt 0201
ñ . . . . . . . . . . . . . . . alt 0241
÷ . . . . . . . . . . . . . . . alt 0247
File menu options in current program
Alt + E Edit options in current program
F1 Universal help (for all programs)
Ctrl + A Select all text
Ctrl + X Cut selected item
Shift + Del Cut selected item
Ctrl + C Copy selected item
Ctrl + Ins Copy selected item
Ctrl + V Paste
Shift + Ins Paste
Home Go to beginning of current line
Ctrl + Home Go to beginning of document
End Go to end of current line
Ctrl + End Go to end of document
Shift + Home Highlight from current position to beginning of line
Shift + End Highlight from current position to end of line
Ctrl + f Move one word to the left at a time
Ctrl + g Move one word to the right at a time
MICROSOFT® WINDOWS® SHORTCUT KEYS
Alt + Tab Switch between open applications
Alt +
Shift + Tab
Switch backwards between open
applications
Alt + Print
Screen
Create screen shot for current program
Ctrl + Alt + Del Reboot/Windows® task manager
Ctrl + Esc Bring up start menu
Alt + Esc Switch between applications on taskbar
F2 Rename selected icon
F3 Start find from desktop
F4 Open the drive selection when browsing
F5 Refresh contents
Alt + F4 Close current open program
Ctrl + F4 Close window in program
Ctrl + Plus
Key
Automatically adjust widths of all columns
in Windows Explorer
Alt + Enter Open properties window of selected icon
or program
Shift + F10 Simulate right-click on selected item
Shift + Del Delete programs/files permanently
Holding Shift
During Bootup
Boot safe mode or bypass system files
Holding Shift
During Bootup
When putting in an audio CD, will prevent
CD Player from playing
WINKEY SHORTCUTS
WINKEY + D Bring desktop to the top of other windows
WINKEY + M Minimize all windows
WINKEY +
SHIFT + M
Undo the minimize done by WINKEY + M
and WINKEY + D
WINKEY + E Open Microsoft Explorer
WINKEY + Tab Cycle through open programs on taskbar
WINKEY + F Display the Windows® Search/Find feature
WINKEY +
CTRL + F
Display the search for computers window
WINKEY + F1 Display the Microsoft® Windows® help
WINKEY + R Open the run window
WINKEY +
Pause /Break
Open the system properties window
WINKEY + U Open utility manager
WINKEY + L Lock the computer (Windows XP® & later)
OUTLOOK® SHORTCUT KEYS
Alt + S Send the email
Ctrl + C Copy selected text
Ctrl + X Cut selected text
Ctrl + P Open print dialog box
Ctrl + K Complete name/email typed in address bar
Ctrl + B Bold highlighted selection
Ctrl + I Italicize highlighted selection
Ctrl + U Underline highlighted selection
Ctrl + R Reply to an email
Ctrl + F Forward an email
Ctrl + N Create a new email
Ctrl + Shift + A Create a new appointment to your calendar
Ctrl + Shift + O Open the outbox
Ctrl + Shift + I Open the inbox
Ctrl + Shift + K Add a new task
Ctrl + Shift + C Create a new contact
Ctrl + Shift+ J Create a new journal entry
WORD® SHORTCUT KEYS
Ctrl + A Select all contents of the page
Ctrl + B Bold highlighted selection
Ctrl + C Copy selected text
Ctrl + X Cut selected text
Ctrl + N Open new/blank document
Ctrl + O Open options
Ctrl + P Open the print window
Ctrl + F Open find box
Ctrl + I Italicize highlighted selection
Ctrl + K Insert link
Ctrl + U Underline highlighted selection
Ctrl + V Paste
Ctrl + Y Redo the last action performed
Ctrl + Z Undo last action
Ctrl + G Find and replace options
Ctrl + H Find and replace options
Ctrl + J Justify paragraph alignment
Ctrl + L Align selected text or line to the left
Ctrl + Q Align selected paragraph to the left
Ctrl + E Align selected