How to draw in C# using the Graphics Class – CSharp Programming

Basic overview of drawing in C#

How to use the Graphics class to draw to the screen in C#

The Graphics class is one of the fundamental classes used in programming with Windows Forms and GDI+. Through the Graphics class, you gain access to information about the display resolution and device capabilities. In this article, you’ll learn about the Paint event and how it supplies you regarding an adequately initialized Graphics object. This article also covers the most common operations performed using the Graphics object.

The first thing we will do is open Visual Studio and click “Create a new project” to get started. We are going to create a new Windows Form in C#. You could choose any project name you would like and its destined location on your desktop/pc. 

A blank project will be generated to serve as your canvas. You could change the width and height based on your preference. The next thing we need to handle is the paint event for the form. When the form is drawing itself, it will call this paint event, and then inside of that, we will get a handle to the graphics object. Afterward, we could paint the form ourselves. It is a step-by-step process that we need to accomplish. 

Declare a new graphics object with this syntax above. With this step, we could make new shapes like rectangles. 

How to draw a rectangle

To draw rectangles and squares in C#, the GraphicsObject provides the DrawRectangle() method. There are two ways to use the DrawRectangle() method. We will begin by drawing a rectangle without a pre-created Rectangle object.

  • The first step is to create a new brush. The syntax above is the code that you can use to alter the color and name of the brush.
  • It also needs the coordinates of the rectangle you want to create. To do that, you can encode the x, y coordinates like in the syntax attached. 
  • Since we’ve used 100×100 as the coordinates, it came out as square, but you could change the coordinates to generate your desired shape.

For the second method

  • To draw a rectangle, you will draw four lines. We will make a drawing pin and set that equal a new pen in this method. You could also set the color for your rectangle. The syntax above is the example that will generate your rectangle. 

How to draw a circle

Ellipses and circles are drawn in C# using the DrawEllipse() method of the GraphicsObject class. 

We made a drawing scene representing the “sun,” a circle in one of our examples. 

  • You could declare a “new brush” to create the round object. The syntax above shows the various brushes for different objects: the ground and the sun in the said scene.
  • An ellipse will be generated using the declared sun brush and filled with this syntax in the next step.

How to draw a line

Lines are drawn in C# using the DrawLine() method of the Graphics Object. This method takes a pre-instantiated Pen object and two sets of x and y coordinates (the start and endpoints of the line) as arguments.

A “ground” was made to complete the drawing scene in the example. A straight line represents it. 

Coordinates were also filled up to determine the width, height, and length to set up the ground.

The next step in this project is to try drawing a person! A stickman person, to be exact. It will be composed of a circle for its head, a line for its limbs and body.

  • We added another drawing pen to change its color, white. 

In the syntax above, we tried to make a whole component to make a stickman. With various lines and objects, it resulted in the image below. 

The background is also changed to the color blue! And there you go, a scene with a stickman was made using simple objects and lines. 

How to draw an image

To draw an image, it will require creating a bitmap from the file. To do this, the syntax below will help to run the image.  We will use the image above as the background for our generated image.

The syntax above draws the image, but the problem is that our form and image aren’t the exact sizes.  We could stretch the image to fit the form by doing a new rectangle.

The image will be stretched to fit the form better with this code. 

We will also try to attach some images to the scene. We will do next to draw an image bitmap from the file again. 

The attached image is quite big, so you could opt for a smaller size of the image you want. 

This is the revised image of the cat once you’ve scaled it correctly. 

Here is the complete syntax for the background and the cat. Make sure to layer your drawings correctly to make them appear in the correct order. After the cat image, we will draw the bird. 

Here is the image after the code for the bird image is generated and run. 

To add an extra effect, we will add a line object in the scene. 

The last thing that we will add to this project is text. To include text in your image, follow this syntax below. Make sure to set a font style first!

The text is added and repeated three times. The project is done!

This article shows how various graphical objects can be drawn within a drawing programmatically using C#. It may be quite challenging, but first but with troubleshooting, patience, and creativity, you could also finish a project in no time!

How to install WordPress on Windows using XAMPP – WordPress Local setup in 2021

Want to set up XAMPP with WordPress on your computer or install WordPress locally? This is a perfect option if you need a development site for testing or other purposes.

Why use XAMPP?

XAMPP allows you to host a website on your computer. After you’ve set it up, you can create a new WordPress installation with a few clicks. However, installing XAMPP with WordPress might be difficult, so that you may want assistance.

Getting started with XAMPP and WordPress

The first thing you must do is download WordPress from the WordPress.org website. As seen in the image below, open the URL, scroll down the page, and click the download WordPress button.

Installing XAMPP

XAMPP by Bitnami

Moving further, you’ll need to use XAMPP to install WordPress on localhost. XAMPP is available for download from the Apachefriends.org website. When the configuration is complete, click the Next button.

XAMPP Components

Now, look at the image below; some components must be checked before they may be installed. We simply need Apache, MySQL, and PHP to set up WordPress. You may either uncheck everything except Apache, MySQL, and PHP or leave them checked.

XAMPP Control Panel

Starting Apache using XAMPP

We’ll start apache by pressing the start button, and it should become green. It will also display ports 80 and 443, the default ports used by Apache. After that, MySQL may be started; the default port is 3306.

The Apache server is now up and running, including PHP and the MySQL database server. Now that the local host is up and running, we can install WordPress.

Creating the WordPress Database

Next, you need to create a MySQL database. To do that, launch PHPMyAdmin from your XAMPP control panel.

Then click on Databases at the top. 

Click Create after giving your database a name. It doesn’t matter what your chosen database name is; just remember it since you’ll need it for the following stage.

When you install XAMPP with WordPress, you don’t need to create a new database user. You can use the default user, If you are installing WordPress on a live web server though, you should create a custom user for WordPress.

Now we’ve got our WordPress database set up to start the installation process.

Installing WordPress

First, go to Windows Explorer and look for the XAMPP install location. Inside of the XAMPP install location will be a folder called htdocs. Delete all of the files inside of htdocs. These files were the demo website that comes with XAMPP.

Go to your Downloads > WordPress folder (the extracted WordPress zip file should be located here) > and copy the components of the WordPress folder to htdocs. 

Now, when we go to the localhost, you will get this page which is the WordPress setup page. 

Now, enter the database name, username, password, and hostname. Then click on submit button. Click on Run the installation

You will enter your new website details here. Site title, username, password, and correct email, click on install WordPress. WordPress will install in a minute. After that, click on the login button and type in your login details.

After clicking on login, it will take you to the WordPress dashboard, and you’re ready to edit the site!

How to use Breakpoints in Visual Studio 2019 – Breakpoint Guide – Csharp VB.Net

Breakpoints are one of the best features when debugging in Visual Studio! Let’s look at how to set and use breakpoints!

What are breakpoints?

A breakpoint indicates where Visual Studio should suspend your actively running code. This allows you to look at the value of variables, the behavior of memory, or whether or not a branch of code is being run. Stepping through your code is one of the best things you can do to learn how to program.

How to set a breakpoint

To start, you can set a breakpoint on any line of executable code by clicking in the margin of the code editor (The green line in the picture above) or simply by right-clicking on a line of code and selecting Breakpoint > Insert Breakpoint. Another option is to press F9 and a breakpoint will be inserted on whatever line you have selected.

Now we have a breakpoint, and we can work on our application!

How to access the Breakpoint Pane

To access the breakpoint pane, hover over to Debug > Windows > Breakpoints. One thing you may want to do is to disable a breakpoint. You can enable/disable or delete breakpoints from this window, search and sort them. You can change breakpoint settings directly from this dialog. There is also an option to delete and export your breakpoints as well. 

You need to start your app with the debugger attached to debugging the app process. F5 (Debug > Start Debugging) is the most common way. However, you may not have set any breakpoints to examine your app code, so we will first debug. 

If you want to jump to the currently selected breakpoint, you could just click it, and it will jump into that right line. 

For more options, you could navigate through “Show Columns.” There is also a search box that is very handy to hover through your code!

You could also edit the label of a breakpoint. Within Visual Studio, once you’ve created a breakpoint, you can add one or more labels to it by simply right-clicking and choosing Edit Labels.

In terms of Hit Count, it works when you want a breakpoint to break after it has been hit a certain amount of times, you can choose Hit Count in the Breakpoint Settings and specify the number of iterations. You could also come over to Conditions (right-click on the breakpoint symbol (in the editor left margin or in the Breakpoint window) and select Condition… (or press Alt + F9, C), which will open the Breakpoint Settings window.) and you could set a hit count condition.

Lets get to know the Watch window

To navigate to the watch window, you will need to select Debug-> Windows -> Watch -> Watch 1. Once you have opened the watch window, you can use it in conjunction with breakpoints to easily check the value of variables while code executes.

The Watch Window allows you to see the value of variables and expressions while debugging. It’s kind of like the DataTip you get when hovering over a variable, except that you can write any expression you want. It’s available from Debug | Windows | Watch | Watch 1 or Ctrl + Alt + W + 1.

There are four watch windows in Visual Studio, which you can use in different contexts (Watch 1, Watch 2, etc.).

Any expression can be entered into the watch window. The same rules apply to expressions as to code. So if you write an illegal expression, you’ll see the same compiler error.

To add items to watch, do any of the following: Write them manually in a new row of the Watch window—Right-click on a variable and choose “Add Watch” in the context menu. Right-click on a variable in the DataTip and select “Add Watch.” “Add Watch” button from QuickWatch.

Breakpoints are a great part of Visual Studio

One of the key features of Visual Studio Code is its great debugging support. VS Code’s built-in debugger helps accelerate your edit, compile, and debug loop. Breakpoints are an essential tool for debugging your applications. You set the breakpoints whenever you want to pause the execution.

Breakpoints really helped me learn how to program. I think they were one of the most valuable tools when it came to understanding code. If you just can’t wrap your head around how a certain block of code works… Just step through it using a breakpoint and watch it work it’s magic! I hope this quick guide on breakpoints helped you and I’ll see you in the next one!

How to Free Up Disk Space on Windows 10

Today we are going to go over multiple ways that will help you free up disk space on your Windows PC. If you have tried to install a game or new application and you just don’t have room then this is going to be super helpful! Be sure to check out the WinDirStat application at the bottom of the list because it helped me the most!

Get an additional hard drive

No matter how large a hard drive or solid-state drive you have in your PC or laptop, there will come a time when you run out of space. If you’re bumping up against your PC’s physical storage limit, here are some quick tricks you can use to reclaim a couple of gigabytes’ worth of storage space. These options will take you only so far; if you need more free space after following these tips, you may need to add a second hard drive or replace your current drive with one with more storage capacity. 

Uninstall Applications using add/remove programs

You probably have some apps and programs on your PC that you don’t use — either apps you’ve installed and forgotten about, or bloatware that came preinstalled on your computer from the manufacturer. To find out which apps are taking up space, open the Settings menu and go to Apps > Apps & features and choose Sort by size. To uninstall an app from this menu, click the app and then click Uninstall.

Run Disk Cleanup

Just one tip, you could also right-click your hard drive, you could click Disk Cleanup. Windows has a built-in disk cleanup utility, aptly named Disk Cleanup, which can help you clear up space by removing various files — including temporary internet files, system error memory dump files, and even previous Windows installations that may still be hanging around. Select the file types you want to delete — from Downloaded Program Files to Thumbnails — and hit OK. If you’re unclear about what files are included for each item listed, click the View Files button to check before proceeding.

Use WinDirStat to find and delete large hidden files

One discovery I’ve also found is WinDirStat. WinDirStat is a disk usage statistics viewer and cleanup tool for various versions of Microsoft Windows. You could opt to download this application here: https://windirstat.net/download.html. Go with the recommended installation.

Launch WinDirStat and select the drive you want to evaluate. Click “OK,” and give the program 5 to 10 minutes to scan your hard disk.

When the scan is complete, you’ll be presented with the summary screen. The top half lists files and folders sorted by file size. If you click on a folder or file, the corresponding color block will be highlighted below.

Alternatively, click the large blocks of color to find out which files are taking the most space.

Once you’ve identified the culprit, right-click the file and choose “Delete (to Recycle Bin)” for later disposal, or “Delete (no way to undelete)” for permanent, irreversible deletion.

Perform this scan in WinDirStat about once a month to clean up any files you no longer need access to. For day-to-day file deletion, follow our instructions for permanently deleting files, as emptying the Recycle Bin still leaves traces of the deleted files on your hard drive

How to Write Speech Recognition Applications in C#

In this article, we will discuss how to use Microsoft’s Speech Recognition Engine to write a virtual assistant application. Speech recognition apps are the way of the future and they are actually easy to write using Microsoft.Speech Recognition.

Speech Recognition Operations

A speech recognition application will typically perform the following basic operations:

  • Start the speech recognizer.
  • Create a recognition grammar.
  • Load the grammar into the speech recognizer.
  • Register for speech recognition event notification.
  • Create a handler for the speech recognition event.

Free Speech Recognition API

If you are looking for a free solution for a hobby application or if you’re just trying to get your MVP built for your application, this is a nice place to start. You could swap over the code later to use for more expensive APIs available.

In this video, I also referenced Microsoft documentation, you could access this through this link. We used this example, they also have a console app built here. 

The first step is to add the following line.

microsoft.speech.recognition

You need to import the speech recognition engine first and to do that, adding the reference is a must. Navigate to your Solution Explorer and find “References” and search for speech. 

You need to add a reference to the System.Speech assembly, which is located in the GAC.

This is the only reference needed. It contains all of the following namespaces and classes. The System.Speech.Recognition namespace contains the Windows Desktop Speech technology types for implementing speech recognition.

Before you can use the Microsoft SpeechRecognitionEngine, you have to set up several properties and invoke some methods. The next step now is to create a new recognizer. In the video, at the top of my class, I’ve created an empty object for the recognizer. 

// Create an in-process speech recognizer for the en-US locale.  
recognizer = new SpeechRecognitionEngine(new System.Globalization.CultureInfo("en-US"));

On load, I have the following code.

loadSpeechRecognition(); 

This is a function that has the loading code for the recognizer. We create a new speech recognition engine and pass it as a language because this works in multiple languages. 

private void loadSpeechRecognition()
{
    // Create an in-process speech recognizer for the en-US locale.  
    recognizer = new SpeechRecognitionEngine(new System.Globalization.CultureInfo("en-US"));

    var gb = new GrammarBuilder(getChoiceLibrary());
    var g = new Grammar(gb);
    recognizer.LoadGrammar(g);

    // Add a handler for the speech recognized event.  
    recognizer.SpeechRecognized += new EventHandler<SpeechRecognizedEventArgs>(recognizer_SpeechRecognized);

    // Configure input to the speech recognizer.  
    recognizer.SetInputToDefaultAudioDevice();

    // Start asynchronous, continuous speech recognition.  
    recognizer.RecognizeAsync(RecognizeMode.Multiple);
}

Instantiate your recognizer and then you are going to build this choice library.

If you look back to the SpeechRecognitionEngine Class that is linked in this article, they created a list of choices. In your application, you may create a function that returns a list of choices.

    public Choices getChoiceLibrary()
    {
        Choices myChoices = new Choices();
        //greetings
        myChoices.Add("hey " + Agent.charName);
        myChoices.Add("hi " + Agent.charName);
        myChoices.Add("hello " + Agent.charName);
        myChoices.Add("bye " + Agent.charName);
        myChoices.Add("thanks " + Agent.charName);
        //open things
        myChoices.Add(Agent.charName + " open notepad");
        myChoices.Add(Agent.charName + " open youtube");
        myChoices.Add(Agent.charName + " open excel");
        myChoices.Add(Agent.charName + " open discord");
        myChoices.Add(Agent.charName + " open davinci");
        myChoices.Add(Agent.charName + " play some music");

        //Rocket
        myChoices.Add(Agent.charName + " say nice shot");
        myChoices.Add(Agent.charName + " say sorry");
        myChoices.Add(Agent.charName + " say no problem");
        myChoices.Add(Agent.charName + " say thanks");
        myChoices.Add(Agent.charName + " say great pass");
        myChoices.Add(Agent.charName + " say good game");

        //Chrome
        myChoices.Add(Agent.charName + " close this tab");
        myChoices.Add(Agent.charName + " refresh this tab");
        myChoices.Add(Agent.charName + " open gmail");

        //close things
        myChoices.Add(Agent.charName + " close notepad");

        myChoices.Add(Agent.charName + " lets play chess");
        myChoices.Add(Agent.charName + " open chess");

        myChoices.Add(Agent.charName + " move");
        myChoices.Add(Agent.charName + " move somewhere else");
        return myChoices;
    }

This code creates a new “choices” object and then adds your choices to it.

These pertain to the words the user can say. Make sure to add a list of choices because it heightens the accuracy of your command. 

After you have built your set of choices, it will return back over here to this grammar builder. This is where you can tell the API how a sentence should look.

The next step is the speech recognized event handler.

    public void recognizer_SpeechRecognized(object sender, SpeechRecognizedEventArgs e)
    {
       bombini.processSpeech(e.Result.Text);
    }

This action is what your recognition engine hears (something that matches with one of the choices), it will call whatever function you have built. I have it calling a function with a few different commands that it can run.

public void processSpeech(string speechText)
    {
        string currWinTitle = currentWindow.GetActiveWindowTitle();
        switch (speechText)
        {
            //open things
            case charName + " open excel":
                myActions.startProcess("excel.exe", "");
                myActions.animate(gestures.Write);
                break;
            case charName + " open notepad":
                myActions.startProcess("notepad.exe", "");
                myActions.animate(gestures.Write);
                break;
            case charName + " open youtube":
                myActions.startProcess("chrome.exe", "http://youtube.com");
                myActions.animate(gestures.Search);
                break;
            case charName + " open davinci":
                myActions.startProcess("G:\\DaVinci Resolve\\Resolve.exe", "");
                myActions.animate(gestures.Search);
                break;
        }
    }

You could also take a look at “e.result.text” which is going to be the result that the recognizer will generate. 

After setting up the event handler is set to listen to input from the default audio device. This determines if it will be listening on your microphone or listening to a headset.

Default audio device

Once you have the above set up your application should be able to listen on the correct device.

Once you have followed all of the above steps, we can start the Speech Recognition Engine asynchronously which will begin listening on another thread. Starting the Engine asynchronously makes it keep listening constantly on a second thread instead of blocking the current thread.

That is it! There are plenty of other possibilities to use the SAPI for, perhaps you could use it for innovative projects!

Thanks for reading and I’ll see you in the next one!

How to check page views of a single page in Google Analytics

Are you curious about how your visitors interact with your one-page website? Do you want to know what interests them the most? Today we talk about how to check page views of a single page! We also deep dive into behavior analytics!

With the right setup, you can easily track your single-page site in Google Analytics just like any other website. Sadly, Analytics doesn’t track pageviews by default on sites that have content on a single page.

Having a single-page website has a lot of benefits over a multi-page site. With a single-page site, your visitors can read your entire content in one place, as they don’t have to explore different pages by making multiple clicks.

Navigate to analytics.google.com in your Web browser. Click the “Access Analytics” button on the right side of the page and enter your Google account email address and password if prompted. If you haven’t yet created an Analytics profile for your website, click on the “Admin” tab and click “Add New Account” to create an account for the website you wish to track.

Just a quick note, you need a javascript line to be added to your website and once you’ve added that to every page on your website, then it gets propagated to every page and all the data streams in for Google Analytics. 

The Behavior section reveals what your visitors do on your website. Specifically, the reports tell you what pages people visit and what actions they take while visiting.

You can access Behavior reports using the menu in the left sidebar of your Google Analytics dashboard.

For example, in this video, I’ve discussed that I made content in regards to Diablo 2, an action role-playing hack-and-slash computer video game. In this webpage, you could keep track of how your pages are ranked according to the number of views.

You could click on your chosen page to see its detailed statistics, as seen in the screenshot above. You could also change the time period from daily, weekly, and monthly, depending on the data that you want to see. 

The Behavior Flow report lets you see the path visitors commonly take on your website—from the first page they view to the last page they visit before leaving your site. This report gives you a visual guide to how long visitors stay on your website and where those visitors end up leaving.

One of the keys to maintaining a successful website is continuous tracking and analysis of its performance metrics. Web analytics programs such as Google Analytics provide numerous reports about user behavior on your site. The Pageviews report in Analytics allows you to see how well a given page engages users relative to other pages. The Pageviews data can also provide insight into whether the content on a page meets the needs and expectations of your visitors.

How to set up a Windows 10 FTP server – FileZilla FTP Server setup

How to set up a Windows 10 FTP server – FileZilla FTP Server setup

Using a free tool called FileZilla, we’ll walk you through the procedures to set up a folder on your Windows PC as an FTP repository. FTP allows you to easily transfer large amounts of data between computers; the FTP repository can be mapped to multiple computers across the Internet, allowing others to access the directory directly from Windows Explorer.

Download Filezilla

The first step is to download Filezilla server.

  • Go to https://filezilla-project.org in your browser. It will take us to the FileZilla Server download page if we click Download FileZilla Server.

Install Filezilla

Once the executable setup file is on your system follow the below steps to install it on your OS.

  • Double click on the FileZilla_Server setup file
  • Click on the Yes button, when it will ask your permission to run the setup.
  • Next, select the “I Agree” to accept the terms and conditions of the software.
  • Installing the Standard package is the default option. The only thing that will be unselected is “source code,” which you may choose if you are a developer or want to look at FileZilla’s code. Normally, though, we may leave it unchecked.
Choose Components
  • Select the Next button
Choose a destination
  • The destination folder will set to use the C drive, in case you don’t want to install it there, you can change it. Otherwise, click Next.
Choose a port

Leave the default option “Install as a server, starting with Windows” to let the FileZilla server start automatically with Windows. You can select that option if you wish to start it manually.

For the sake of this lesson, everything else may be left at the defaults except for the parameters listed above. The FileZilla interface will appear after the installation is complete. Now your installation is complete!

Configure Filezilla

When this window appears after installation, simply click OK:

We may now define a directory as an FTP repository after the FTP server UI has loaded. Minimize the UI and create a folder where you want the FTP share to reside if the directory you wish to use isn’t already there.

Add a User Account

Now the FileZilla FTP Server has been installed on Windows 10, we need to create an FTP user that can log in to the server. To set up an FTP user in the FileZilla server, complete the following steps:

  1. Click on the user icon (the Fourth icon from the left). Then, click on the add button and enter the name of the user account to be created and press OK.

  2. On the left side of the window that comes up, click on “Shared folders.”

  3. Once there, click on “Add” underneath “Users.” Enter the username for an account that another computer will be using to access the repository we’re setting up.

  4. Click OK once you’re done entering the account name, and then click on “Add” underneath the “Shared folders” section. Next is to select the directory you would like to share as an FTP repository.

  5. Click OK again. By default, the user we’ve created is able to read files, list directories, and list subdirectories. To give the user further permissions, such as the ability to copy files to this repository, check the boxes beneath ‘Files’ and ‘Directories.’

  6. Click OK once you’re done setting the user permissions.

And now our new FTP server is running!

How to set up Caching on Laravel 5.7+

If your Laravel based website is having issues handling too many users then you may need to enable caching. Caching is a great way to allow your server to keep up with high demand without adding more costly resources.

With Laravel 5.6+ you no longer need to add custom middleware to set up caching. You can enable client-side browser caching using the built-in cache headers middleware. This makes life very easy!

The easiest type of caching to set up is browser caching. This will quickly take a huge load off of your server because the users will stop requesting large files over and over again. They will maintain the files in a local cache until the time that you set runs out and they request the files again. (Think about how many times a user should be requesting the background image for your site that shows up on every page.)

There are two different ways you can set up browser caching in Laravel.

Setup Caching Globally

The first way is to set it up inside of the MapWebRoutes & MapApiRoutes functions that are in the RouteServiceProvider.php file.

While this way is super easy to configure, you will have issues with any kind of login system. The browser caching will mess up the keys and break things. If your website doesn’t require a login, this is definitely the way to go as it is super easy to implement and will work fine.

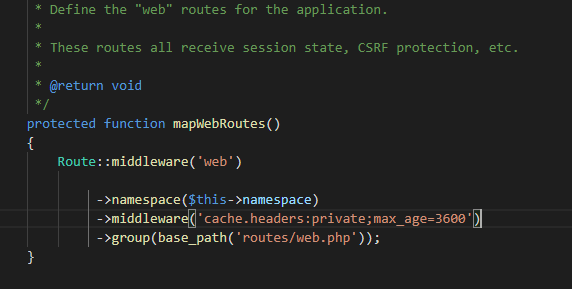
Locate your mapWebRoutes inside of RouteServiceProvider.php and add the following line after ->namespace($this->namespace)

->middleware('cache.headers:private;max_age=3600')

Mine ended up looking like this:

MapWebRoutes with caching setup

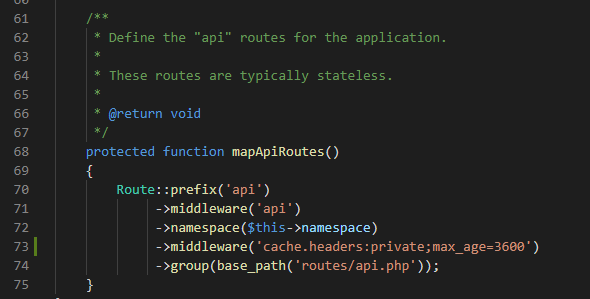
After that find your mapApiRoutes and add the same line. Mine ended up looking like this

mapApiRoutes with caching setup

That’s all there is to setting caching up globally in Laravel 5.7+

Hopefully, that helps, if you do have a login system though, keep reading on to only set caching up for specific routes that don’t involve your login system!

Setup Caching Specific Routes

The second method is to set the cache for each route in your web.app config file. This method is better than the first if you have a login system because you can skip any routes that interact with your login system.

Skipping the login items will allow your login system to still work while the other parts of your webpage are cached appropriately. This will provide a tremendous speed increase while still keeping your login system in place.

Time needed: 10 minutes.

To setup caching in a specific route

  1. Open your web.php file

    The first step will be to open your web.php file which will have each of your routes in it. Mine is in the root directory and called Web.php

  2. Locate a route that you would like to add caching to

    The next step is to locate a route you would like to add caching to, for me I added it here to my search, commented and favorited routes. You can see the new item on the end of the route.

  3. Add the following code to the end of your route

    Add the following code to the end of your route.
    ->middleware(‘cache.headers:private;max_age=3600’)
    Don’t forget to end the line with a semi-colon and you are done!

  4. We did it!

    Once you have that setup, now when you navigate to the page that you enabled caching for, things like your background will only be requested by the user one time. You should be able to see this by navigating to the page and having way faster reload times.

I hope this helped you guys out! I know it really helped my website out, if you have any questions, ask in the comments below and I’ll try to help!

How to Create a Setup file in Visual Studio 2019 – C# or VB.Net

Today we are going to be talking about how to create a setup file in visual studio 2019! This setup file is a packaged version of your application with a wizard that will guide the user through the entire installation process. This will allow the user to install your latest build with ease!

If you have ever written an application and wanted to create an MSI or EXE installer then this is the guide for you! I’m going to go step by step and show you exactly how to create an installer!

Install Wizard

The entire process is pretty easy and simply requires a visual studio extension that was developed by Microsoft. This extension is not a 3rd party product nor is it terribly complicated to use.

Alright, so let’s get right into it!

The first thing we’re going to need to do is to download the required extension. The extension we will need is called “Microsoft Visual Studio installer project”

You access the Manage Extensions page by clicking on Extensions and then Manage Extensions at the top

Once you are on the Manage Extensions page, search for this extension. It is one of the most downloaded extensions, so it should be at the top of the list. Go ahead and download it, then we can move on to the next step!

Next, we need to restart visual studio to get it to install the extension. Once visual studio closes this little extension installer will install the new extension.

Once the extension installer comes up hit modify and let it progress through. This can take a second to install but it doesn’t take terribly long. It should only take about a minute or so.

VS Extension installer


alright, once that has finished installing, you can open visual studio again.

Now that you have Visual studio open again, you want to open the project that you would like to create the installer for. because it’s going to be a second project inside the same solution.

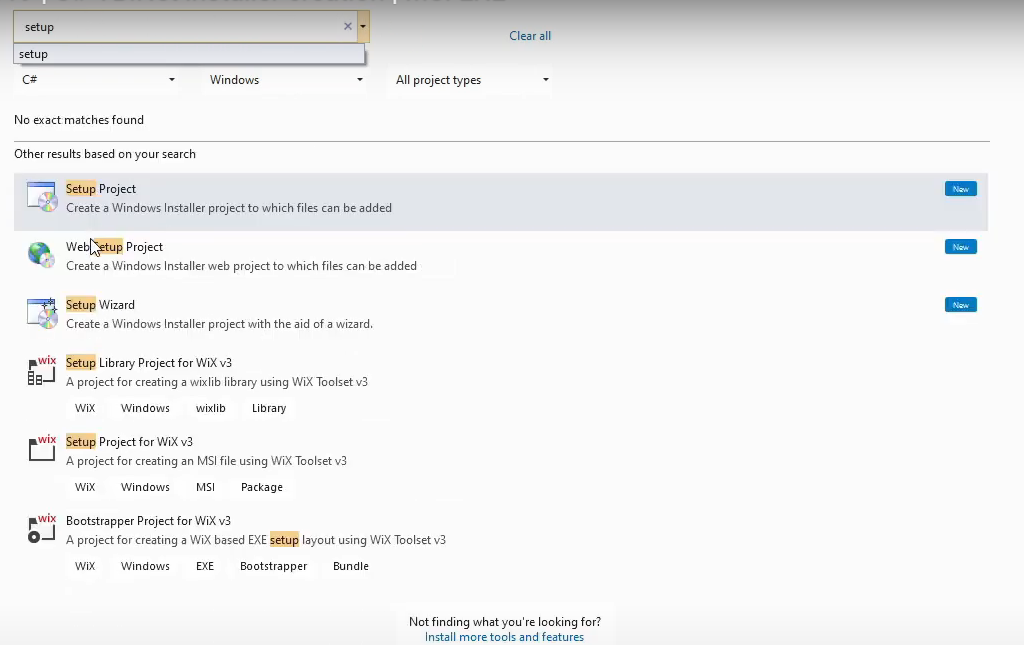
alright, so now that we’ve got our extension ready to go we are going to right-click on the solution and add a new project. This new project is going to be the setup project. Search for the setup project template and choose that as your new project type.

Setup Project Template

Once you select Setup Project, give it a name and then click create. This will create a second project under your Solution with the name you provided.

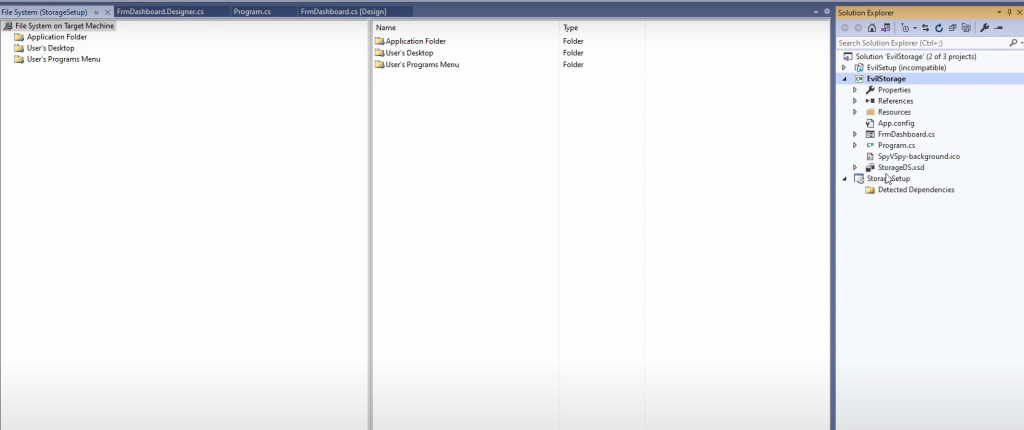
If you open that project, you will be greeted with the setup project’s main screen as shown below.

Setup project

Inside of this project, there will be 3 folders:

  • Application folder: This is where your exe and assembly files will be placed.
  • Desktop folder: This will be where we put items destined for the user’s desktop.
  • User’s Program Menu: This will be where we put items to be added to the user’s program menu.

To configure your new setup project follow these steps

  1. Add a new project output to the application folder.

    Select the Application Folder and then right click and select “Add a new Project Output”. This will copy over all of your dll’s and main exe from your other project. This will look just like your typical Debug folder contents. Add -> Project Output -> “Primary Output”

  2. Create a new shortcut using the primary output item

    Right click the Primary Output item that was added when you added the new project output to the Application Folder. Select “Create Shortcut” to create a new shortcut that we will later move to the desktop section.

  3. Import a file to be used as a shortcut icon

    Right click again, select Add and choose to add a file. Browse for an ico file and import it.

  4. Update your shortcut’s icon to the new imported icon

    Right click on the new shortcut we have created, select “Properties Window”, from here change the icon by clicking browse on the right. Browse into your Application Folder and choose the new icon.

  5. Copy your shortcut to the User’s Desktop folder

    Drag your new shortcut over to the User’s Desktop folder on the left side of the split-screen. This will make the wizard create that shortcut on the user’s desktop when the application is installed.

  6. Create another shortcut and put it in the User’s Programs Menu

    Now that you have the desktop shortcut in place, we need to create one more identical shortcut. Follow the same process to create the shortcut and set it’s icon. After you have the new setup created, right click on User’s Programs Menu and select to create a new folder. Create a folder for your shortcut to be under and then move your new shortcut into that folder. Now the User’s Programs Menu will have a shortcut created in it.

  7. Update the properties of the new setup project

    From this point, I would update a few properties of the setup project.
    Author: company or person who wrote the application
    Description: simple description about the app
    Manufacturer: Used for the install location.
    Those are the only properties I updated in my example.

  8. Setup Prerequisites

    If you right click the Project and select Properties, you can then click on a button that says “Prerequisites…” This will bring up a screen where you can choose to have certain prerequisites such as certain .net framework versions install with your application.

  9. Build the setup project and Give it a test run!

    Right-click on the project and choose build. Once it finishes building, right-click again and select “Open Folder in File Explorer”. This will bring up a folder with your install files in it!

Congratulations! That is all there is to it! At this point, you should have a working setup project! I hope this guide was helpful! I’ll see you in the next one!

Beginning C# – While Loops – Beginners guide to While Loops in C#

Hey everyone! Today we are going to be learning about While loops in C#. This is going to be a quick tutorial on how and why we use While statements and a general introduction to loops in programming.

A while loop is used to execute a block of code over and over until some condition is met.

For a simplified English example: “While the background color is red do these things.” This would do [these things] over and over until the background color is no longer red.

The while loop is very similar to a “for” loop. It will loop over and over again until the condition is met. This is the structure of a while loop:

while (condition)
{
//code to be executed
}

The main difference between a for loop and a while loop is that the while loop doesn’t increment the variable that it is testing each loop. Typically a for loop will be used when you have a set number of times something needs to happen. A while loop, on the other hand, is used when you need to loop until something is true or false.

This would be an example of a while loop that works just like a for Loop. Notice how there is a specific line to increment i, it doesn’t get incremented by the while loop itself.

While loop

Alright! let’s make a sample application!

Looping Application

To create this sample while loop application follow these steps:

  1. Create a new Windows forms project

    Open Visual Studio and create a new Win Forms application.

  2. Add a “Max” textbox

    Drag over a textbox from the toolbox and rename it txtMax. This will be used to store the number we would like to loop to.

  3. Add a “Max” label

    Add a label control to the left of the Max textbox, set it’s text property to Max as shown above.

  4. Add a list to show items

    Add a new list box to the form. We will use this to show results as the while loop runs. Rename this list box to LstItems.

  5. Add a Calculate button

    Drag a button over from the toolbox and change it’s text property to Calculate. Also change it’s name to btnCalc.

You should now have your sample form built and it is time to start writing code. I would go ahead and run the application, just to make sure everything is working properly before we begin writing code.

Once you have verified that your application is running properly, it is time to start writing code. First double click on the Calculate button. This will create an event handler for the buttons click event. Inside of this function, we are going to write a while loop that runs from 1 to 18. Inside of this loop, we are going to have it add an item to LstItems that displays the current age. The code for that looks like this:

int age = 1;
while(age <= 18)
{
LstItems.Items.Add(age);

Age = Age + 1;
}

Alright, now that we have our code written, it’s time to give the program a whirl! Your results should look like this:

loop from 1 to 18

Your Listbox should now show 1 to 18!

If you want to better visualize this process, you can add a breakpoint on the while statement (by clicking the line to the left of the line numbers in Visual Studio) and use F10 to step through as the code executes. This should help you really understand what the code is doing by watching it execute line by line.

breakpoints!

Alright, so we know how to use a while loop to count numbers, let’s create one more example. This example will read line by line through a file and when it runs out of lines the loop will end. This is something someone would use a while loop for instead of a for loop.

You will need to create a file and store a few values in it. I personally listed a few different foods in my text file and saved it to C:\Test\LoopTest.txt
My contents looked something like this:

Pizza
Hamburger
Hot Dog

Now that you have saved it somewhere, the code you will need to read this file is this:

LstItems.Items.Clear(); //This will clear our listbox out
System.Io.StreamReader sr = new System.IO.StreamReader("C:\\Test\\LoopTest.txt");
String currLine = sr.ReadLine();

While(currLine != null)
{
LstItems.Items.Add(currLine);
currLine = sr.ReadLine();
}

You may have to adjust the file location the stream reader is reading from but other than that, this code should run fine.

This code will first clear your list box, then it will read through your file and add each value to the list box until it runs out of items to read. Once the StreamReader has read the last item in the file, the next ReadLine will set currLine to null and that is when our test will fail and the While loop will end.

That’s really all there is to while loops! I hope this helped and I will see you in the next one!